Yes! You Can Spray Paint Cabinet Hardware

Looking for a easy and affordable makeover for your cabinet hardware? YES! You can spray paint hardware a whole new color!
Are you surprised to hear you can spray paint hardware? If you aren’t ready to buy new hardware, but want to change the metallic finish this is the solution.
It’s a budget friendly temporary fix (that may last a LONG time) and giving you the finish update you want without the expense.

Change the finish on not only cabinet hardware, but furniture hardware too! I’ll teach you everything you need to know about how-to spray paint hardware, so it’s as durable as possible.
How Long Will Spray Painted Hardware Last?
Let’s be real that the spray paint finish is a short term not a long term solution. Nothing will be more durable than the factory finish on cabinet and furniture hardware.
On a properly prepared piece of hardware, a new spray paint finish will looking good for quite a while. It really depends on how much use the hardware gets.
My nightstand hardware spray paint makeover has lasted for YEARS. On frequently used knobs and pulls in a kitchen or bathroom where water is involved, you can expect those to wear faster.
Spray painting your cabinet hardware is a great option for a quick change, but it won’t last FOREVER.
I’ll teach you the best way to prep and spray paint your cabinet hardware, so it lasts as long as possible!
Yes! You Can Spray Paint Furniture Hardware
This spray paint tutorial isn’t just for cabinet hardware, but furniture hardware too…really any type of metal hardware.
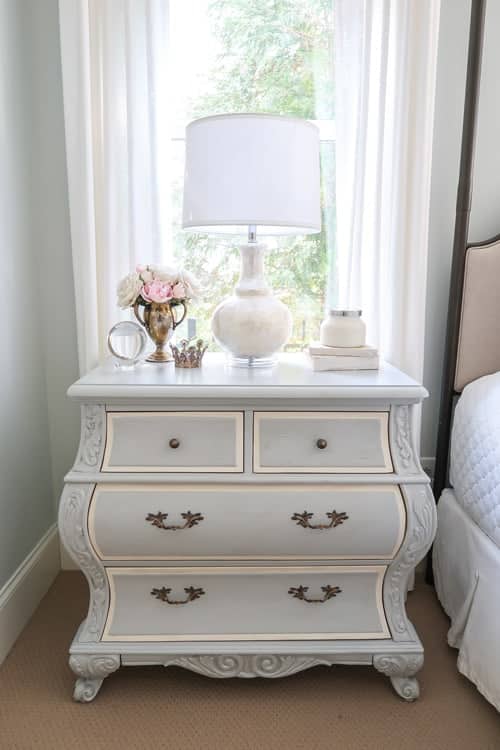
After a primary bedroom makeover, I painted the existing nightstands a brand new color. Read: French Blue Paint Nightstand Makeover
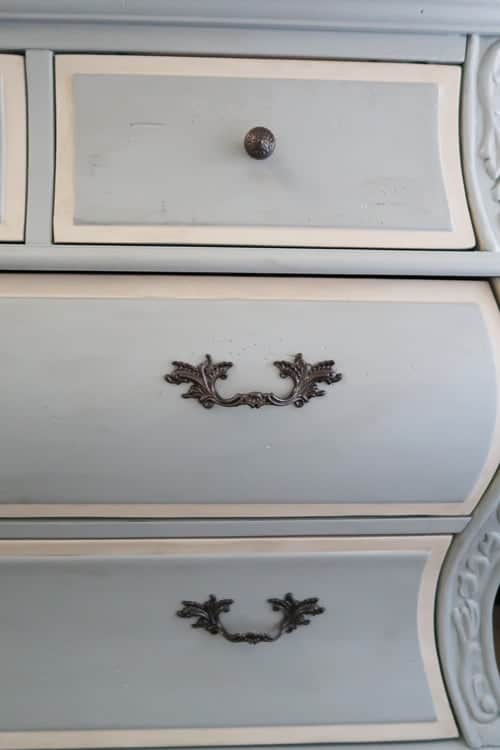
As part of the paint makeover, I wanted the nightstand hardware to match the new canopy bed. I found the perfect metallic color Rust-Oleum Forged Hammered Burnished Amber.
I’ve been living with the spray painted nightstand hardware for 3 YEARS. Everyday I use the drawer pulls and knobs and haven’t had any issues or areas chipping, peeling or rubbing off.
Plus love the look and how it pulled the same finish as the bed into the rest of the room.

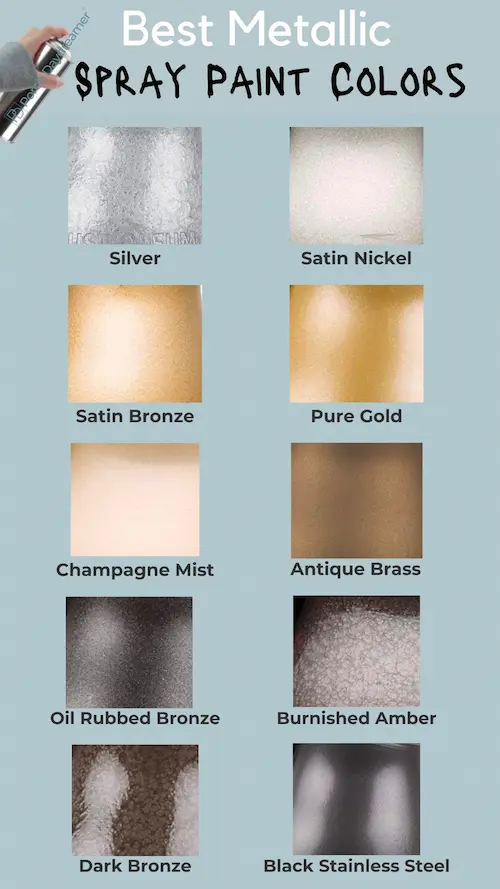
Best Metallic Spray Paint Colors for Hardware
OK, the fun part! I LOVE finding the perfect paint color, so let’s look at the metallic finishes that are available in spray paint.
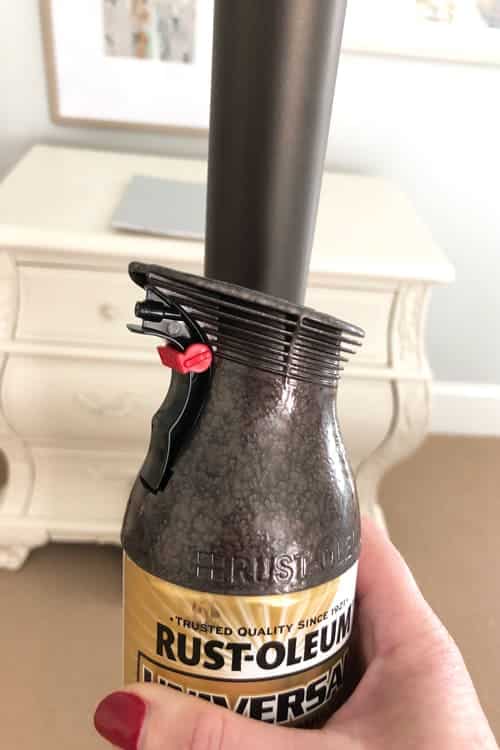
My favorite brand of metallic spray paint for cabinet and furniture hardware is Rust-Oleum Universal Metallic Finish.
There are many beautiful metallic spray paint options available. You can shift your current hardware from silver to gold, gold to bronze, copper to silver, sliver to black the list goes on.
YES! MIX METALLIC FINISHES IN ONE ROOM
For instance, I have gold finished picture frames in my kitchen and my cabinet hardware is satin nickel.
It’s really up to the design look you have in mind and the other metallic finishes in the room.
Before you tackle a and spray paint a WHOLE kitchen full of hardware, first test the metallic finish you are considering on a piece of foam core board first!

SHOP ALL of my favorite metallic spray paint options or select the best option for your hardware from the options below:
NOTE: THE HAMMERED METALLIC FINISHES WILL PROVIDE A TEXTURE AS SHOWN BELOW. If you want a smooth finish, avoid the colors that say “hammered”.
You are going to be surprised at how easy this project is and how quickly you can transform your hardware with some primer and spray paint!
To help document the how-to process, I sprayed some hardware I had around the house and it’s amazing how good it looks. Not only does the hardware look good, but feels good too.
Showing you the hardware in natural daylight because sometimes video is just better at showing the details.
pin it for later!

How-to Spray Paint Cabinet Hardware
First and foremost, if the finish you are trying to cover is peeling, flaking or uneven I would say it’s time to buy new hardware.
Spray paint is ideal for a quick color change, but not to repair a damaged finish on a piece of hardware.
If you are in the market for new hardware I have a great post explaining how to measure for cabinets and drawers, plus my favorite designs too!
Supplies:
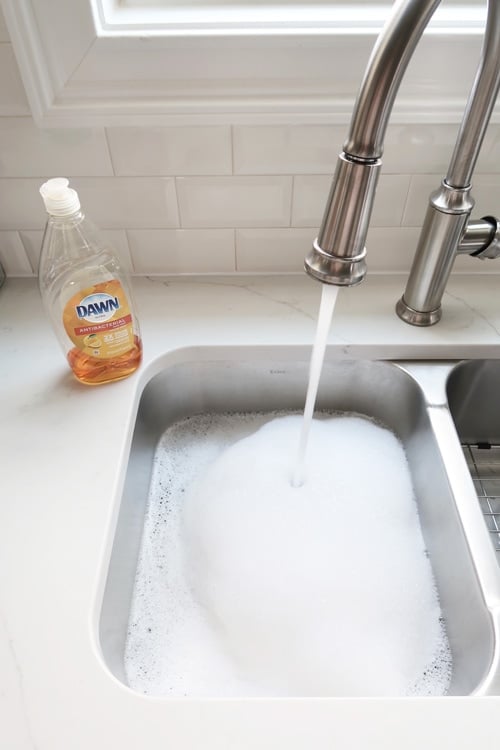
- Dawn dish detergent or one that is considered a degreaser
- Spray Bonding Primer
- Metallic Colored Spray Paint
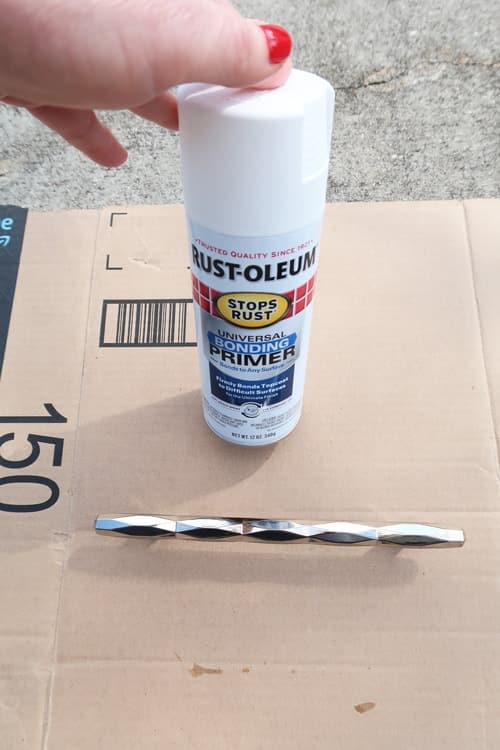
- Cardboard
STEP 1: Clean the Hardware
Clean the hardware you are going to paint in warm water using a liquid dishwashing detergent that is also a degreaser.
Dawn is my favorite – have you seen it used in oil spills to clean animals. Rub down with a soft sponge to remove all residue.
Dry thoroughly, before priming.
Have you heard of bonding primer? It’s a paint game changing product and I go into detail in this post: When Bonding Primer is a Must Before Painting
Here are some general tips on applying spray paint to get the best results!
STEP 2: Spray Bonding Primer
This is for instructional purposes, so I am only showing one piece of hardware.
You can spray multiple pieces together, but make sure they are far enough apart so you can spray the ends well.
Using the spray BONDING PRIMER, holding the can 8 inches from the hardware, lightly spray one coat to cover all surfaces of the hardware.
Bend down and move around the entire piece, so you coat all surfaces. Let dry 30 minutes to 1 hour depending on humidity in the air.
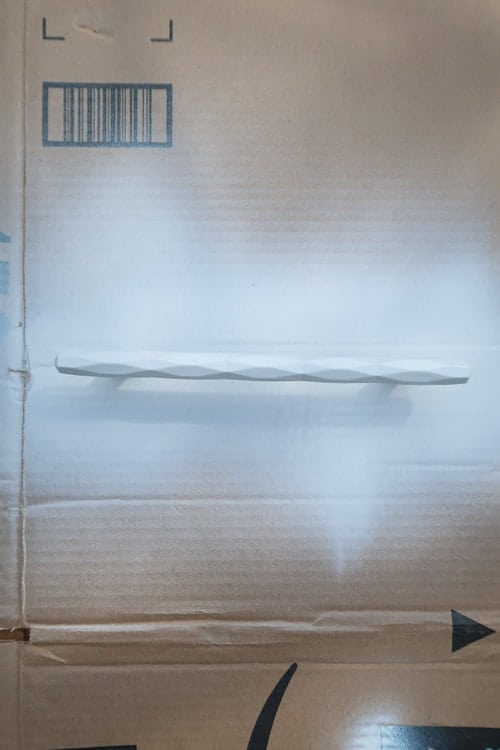
Once dry, flip over and make sure the underside is coated.
If you need to touch up, use a fresh piece of cardboard, so the hardware doesn’t stick to the primer residue. Follow the same process, as above.
STEP 3: Spray Metallic Finish
NOTE: the spray nozzle is different than a regular can of spray paint. Test on the cardboard before you start spraying.
Holding the can 8 inches from the hardware, apply one light coat of the spray paint color of your choice to cover all surfaces of the hardware.
Bend down and move around the entire piece, so you coat all surfaces. Dry 1 hour and apply 2nd light coat.
It’s better to apply 3 light coats for full coverage than over apply and get drips!

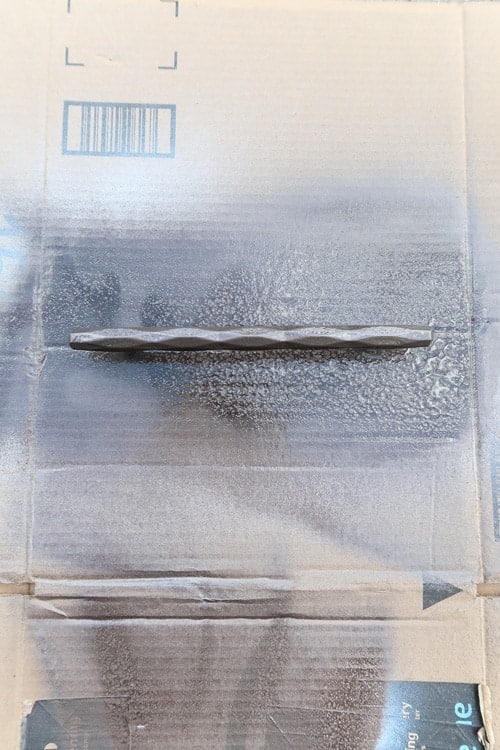
Flip over and make sure the underside is coated.
If you need to touch up, use a fresh piece of cardboard, so the hardware doesn’t stick to the paint residue.
HAVE DRIPS? Lightly sand those areas, clean, re-apply primer and paint as instructed above.
STEP 4: Let the Hardware Dry
Let the hardware dry several days to a week before installing and using.
This will ensure the coating is fully cured and will last as long as possible.
How amazing is spray paint that it can transform anything!
Transform Home Decor with Spray Paint
- Transform Outdoor Resin Wicker with Spray Paint!
- Easily Update Picture Frames with Spray Paint!
- Spray Paint Curtain Rods for a Whole New Look
I hope you found this helpful and are saving a TON of money by spray painting your cabinet hardware.
Until next time…
Porch Daydreamer
Tracey
Will spraying a clear coat, ie. polyurethane or lacquer, to protect the paint, help?
Yes, if you want to change the sheen of the spray paint you can add a clear coat over the top. If you want to add a layer of protection, try this top coat from Rust-Oleum.
Hi there! awesome post, thanks for sharing. Do we still need to apply a coat of primer even though the hammered spray paint is a paint and primer in one? Thanks in advance!
Hi, Tara! Yes, for a longer term more durable adhesion on metal you need to start with the primer. Paint manufacturers make this claim, but regular spray paint can’t act as a bonding primer. The paint + primer is just a way to get you to use more paint 🙂
Ok but where can I find those handles?! They’re gorgeous!!
Thanks! My team designed those, so thank you for the compliment. Here is a link to the collection (affiliate): https://amzn.to/3AM5yV7
Thank you!! So excited to update my cabinet hardware with copper!
Hi Tracey!
I love your blog! I’ve been wanting to paint my kitchen cabinets for years. After much research and scouring Pinterest, I stumbled upon your blog. I’m taking the plunge.
Now my question. What are your thoughts/suggestions on spray painting interior door levers and hinges? Using your same method as the cabinet hardware?
Hi, Kristie! You can use the exact same method, just know the wear and tear on hinges will be greater so they will fall faster. Just touch them up as needed!
Please tell me once my Rustoleum gold spray paint goes on a few coats that the handles will feel better, they are rough feeling. When I tried to lightly sand one just to see what would happen the primer came off. So I have sprayed the first coat and they still feel rough. They felt so smooth and wonderful when I first bought them. I am about to break out in a panic.
Yes, the purpose of bonding primer is to create a rough surface for the the paint. Never scratch or sand the bonding primer it’s just a surface modifier and will cure with the paint so it sticks. You can see in the video how smooth mine was even with a hammered spray paint They feel great!
will this work for kitchen cabinet hinges?
Absolutely!
Great info. Thanks for the advise
You are welcome!
Hi, I needed this awesome post! I recently spray painted my cabinet pulls, but didn’t use a primer, so you can imagine the chipping paint. I plan to repaint them. Should I sand the pulls before I primer and spray paint them again? I also plan to use some kind of polycrylic top coat to seal, so you have one you recommend? Thanks!
I’m glad you found it helpful! Your instincts are right…the failing paint needs to be removed. You may want to see if you can soak of the paint with a diluted striper to save time. Just try one first to see how it goes 🙂
I’ll be looking for a cruelty free alternative to the Dawn, would an all purpose cleaner work or does it have to say degreaser?
Use whatever you typically use to clean pots and pans, which I would imagine has a degreaser agent in it.
I needed this post badly. Often I am spray painting something, especially draw/cabinet pulls. I often find that over time, the paint starts to chip. I will be using your fabulous ideas for repainting my pulls and knobs. Thank you so much for sharing.