Yes! Use a Paint Sprayer INSIDE to Paint Furniture

Have you wondered if you can use a paint sprayer inside of your home to paint furniture? You can and it will take DAYS off of the paint project.
This honestly is probably one of the most interesting furniture painting projects I have ever tackled!
If you are looking for an inexpensive and pro finish update, this furniture painting project is for you!
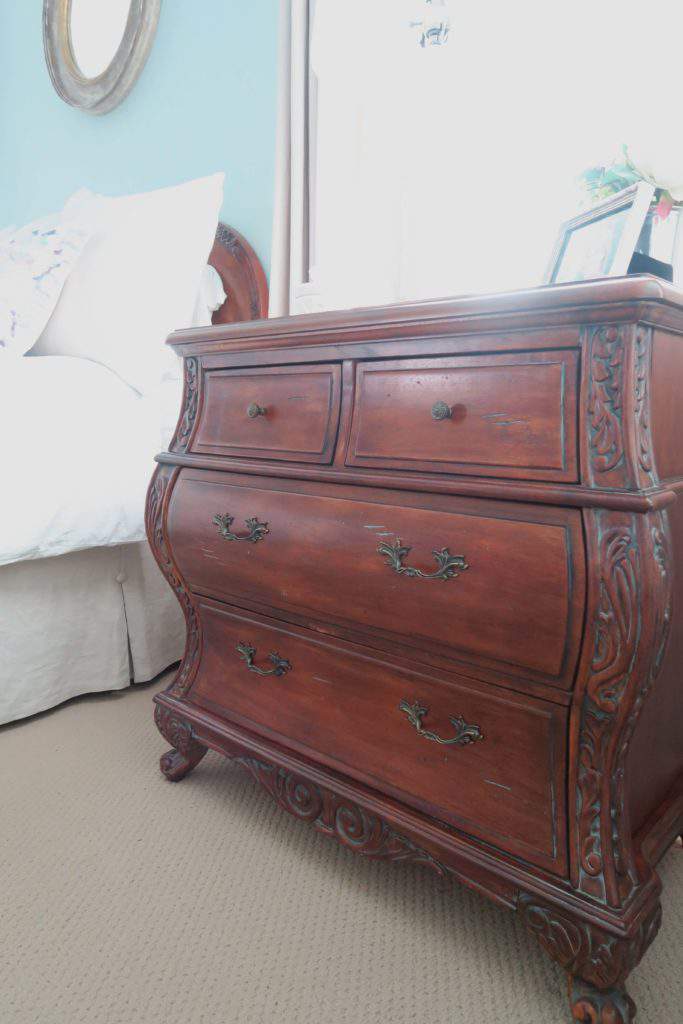
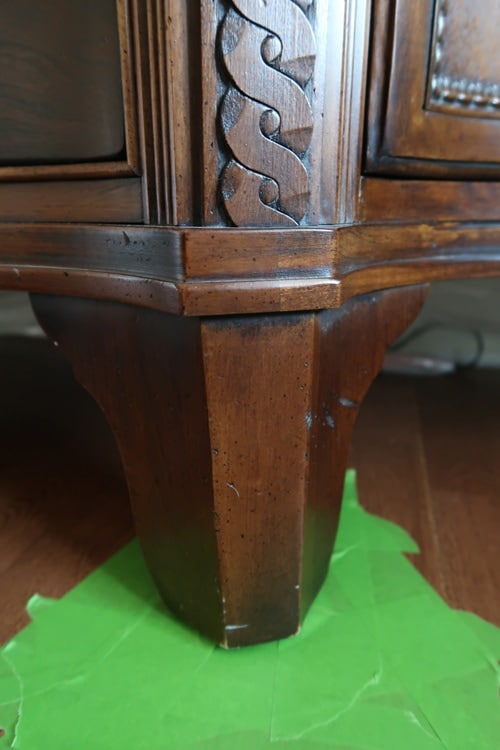
It started with a need to makeover my 20 year old stained wood bedroom furniture.
It’s really beautiful furniture and I know there are those that never would paint beautiful pieces, but I needed to see something different in my bedroom.
You see this furniture was leftover from my married life…yeah, a paint makeover was the perfect solution to make this furniture feel like ME!
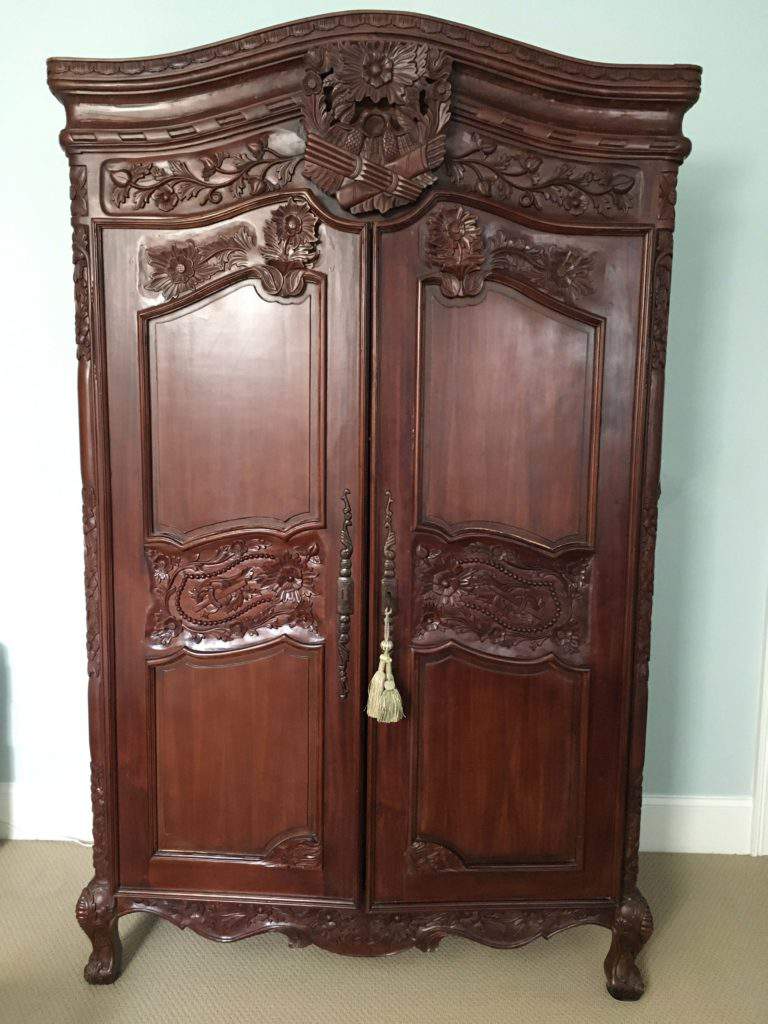
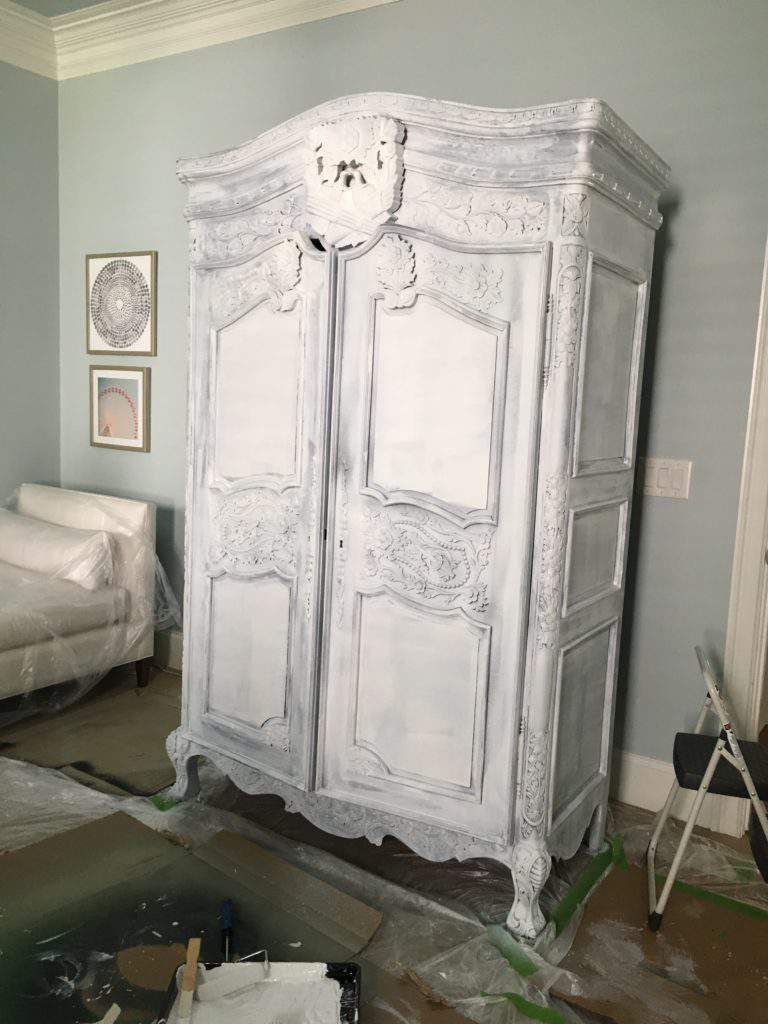
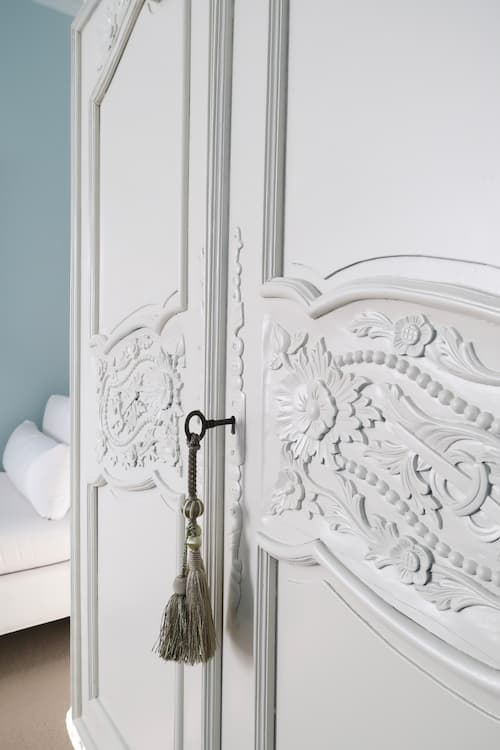
The biggest issue I faced in this project was the size of the French carved entertainment center.
The movers struggled trying to move it into my home and getting it through the bedroom door was almost impossible. That meant I COULDN’T MOVE IT to spray paint it in the garage!
That posed the biggest challenge in deciding deciding to paint it a whole new color.
I DREADED having apply the primer and paint by hand knowing how LONG it was going to take.
Tips for Painting Stained Wood Furniture
- You MUST prime before you paint regardless of paint type!
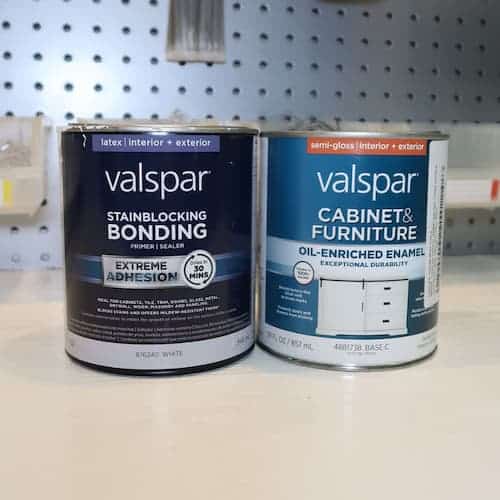
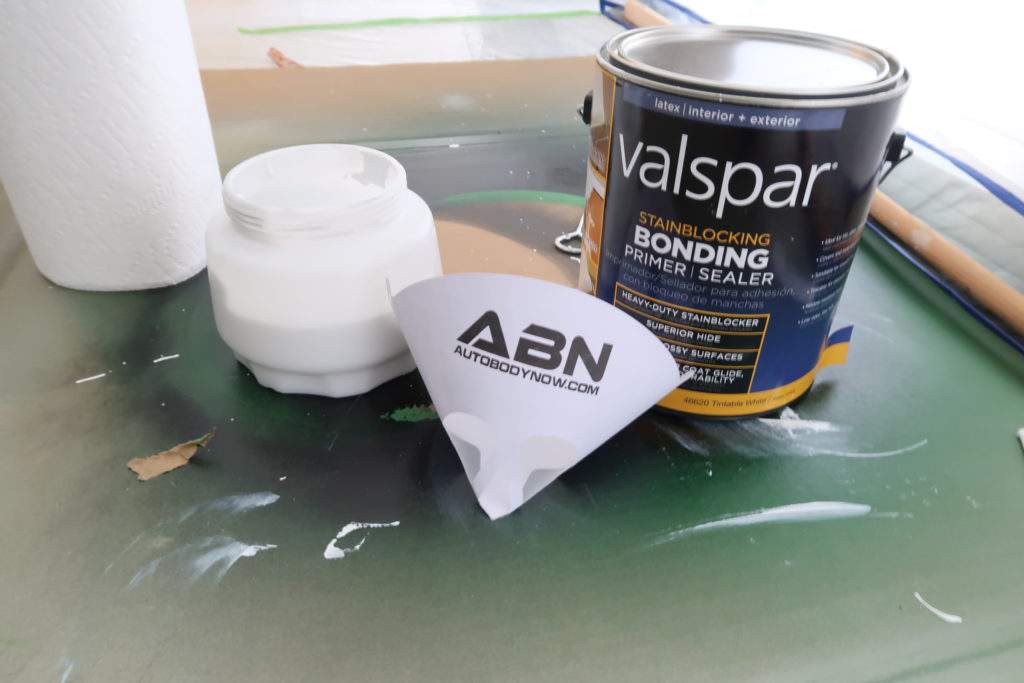
- To prevent the stain from bleeding through to the final color, I always use Valspar’s Bonding Primer – it sticks to anything!
- Choose a semi-gloss finish for the hardest most durable finish that is cleanable.
- The paint ALWAYS recommend is Valspar Cabinet and Furniture Enamel for painting furniture. (my review of VCFE)
Since I am a person who has learned to work smarter not harder, I reached out to Wagner Spray Tech (after meeting them at the Haven bloggers conference) in a plea for help.
Can I use one of your paint sprayers to spray this armoire INSIDE my home? Is this a crazy idea?
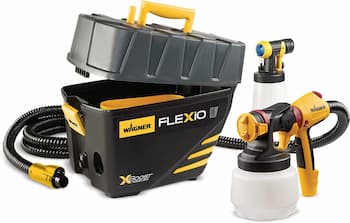
Luckily, they answered you ABSOLUTELY CAN and provided me with a free Wagner Studio Pro Sprayer (NOW Flexio II) and sponsored this post to show what is possible!
My experience and advice about the products used in this post are my own and unbiased.
Contains hand selected products, with affiliate marketing links where I may earn a small commission if a purchase is made. {full disclosure here}
What You Need to Paint with a HVLP Paint Sprayer
Combining my YEARS of paint expertise (I am the QUEEN of PAINTING EVERYTHING), along with just some common sense I came up with a plan to spray paint the entertainment center INSIDE of my home.
Plus I worked for one of the world’s largest paint brands Valspar and helped launch Valspar Cabinet and Furniture Enamel. Better Homes & Gardens used my expertise during their review of paint sprayers too!
I’m a SUPER fan and have used it on COUNTLESS furniture painting projects.
furniture paint sprayer project Supplies
Here is what you will need to spray your furniture. Yes, a paint sprayer and shelter are an investment.
If you need help deciding if a paint sprayer is for you, read this.
- Paint Strainer – optional, but helpful for removing any debris from the paint before spraying.
- Painter’s Tape – use the inexpensive stuff for taping the floor (I made the mistake of using Frog Tape, which is more expensive).
- Frog Tape – to tape the painter’s plastic to walls so it doesn’t damage the walls.
- Painter’s Plastic – this was used to protect the floors, walls, and furniture and is MUCH cheaper than drop cloths.
- Spray Shelter (large)- great all purpose shelter for spray painting anything. Helps contain overspray.
- Wagner Paint Sprayer – airless painting tool.
- Valspar Cabinet and Furniture Enamel
- Valspar Bonding Primer
Paint Color: Lowe’s / Valspar Light Raffia 3008-10B
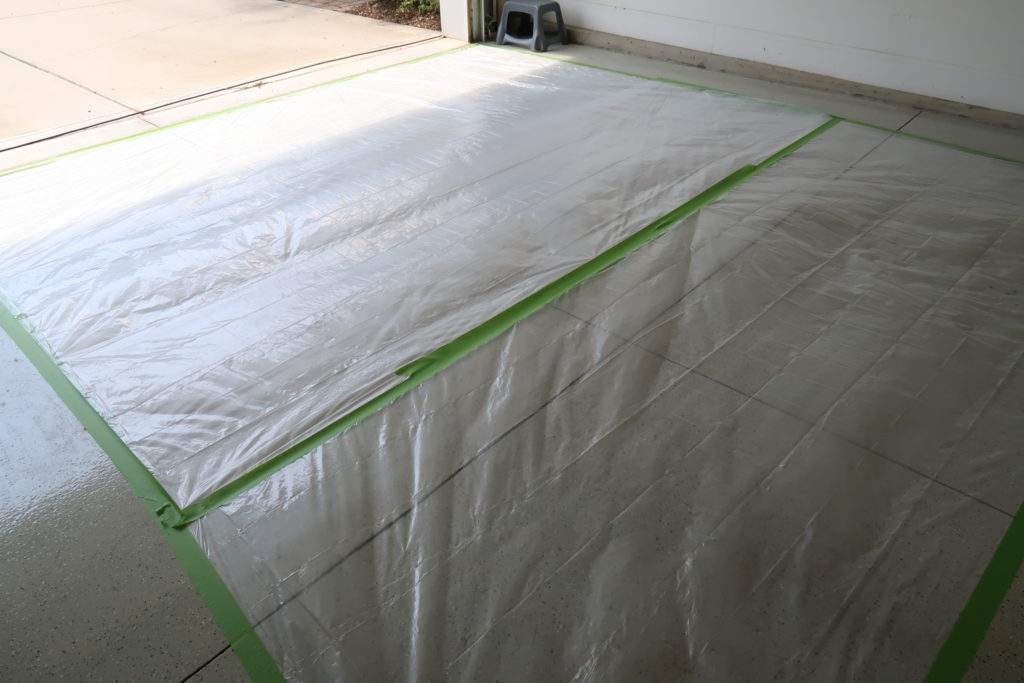
First of all, ideally it’s best to use a paint sprayer in a protect area outside of your house.
If the size of the furniture is small enough to move, then that is the best practice.
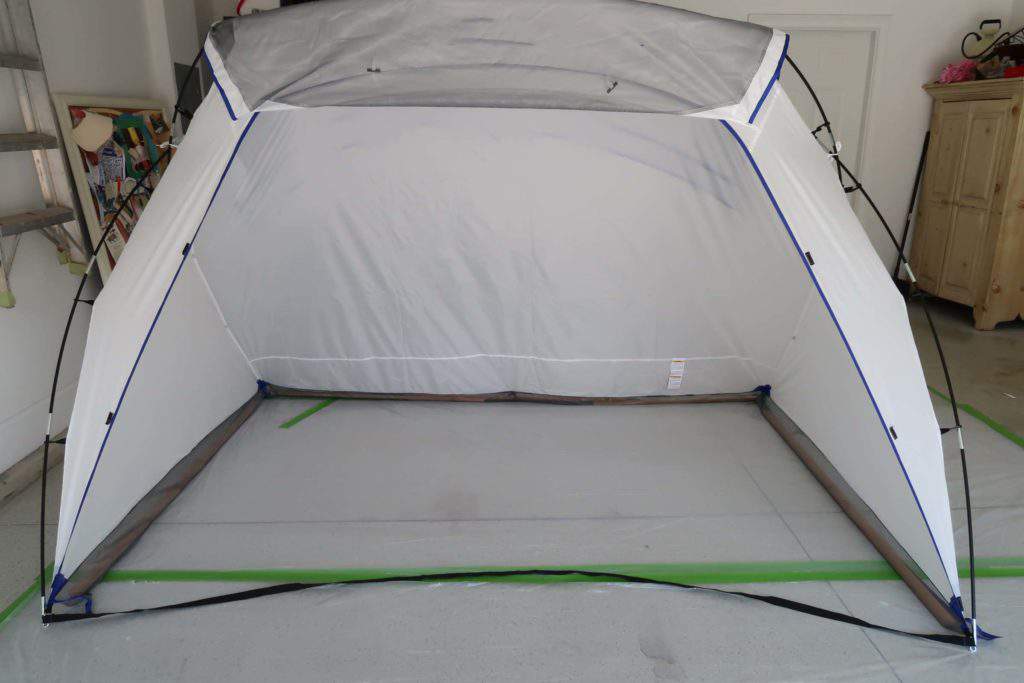
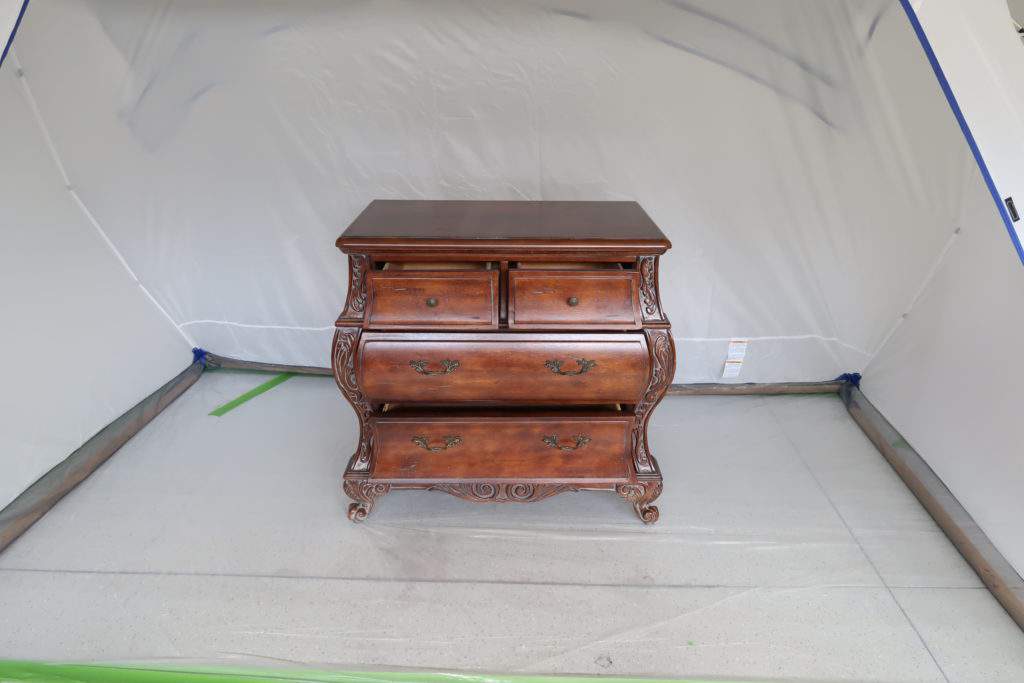
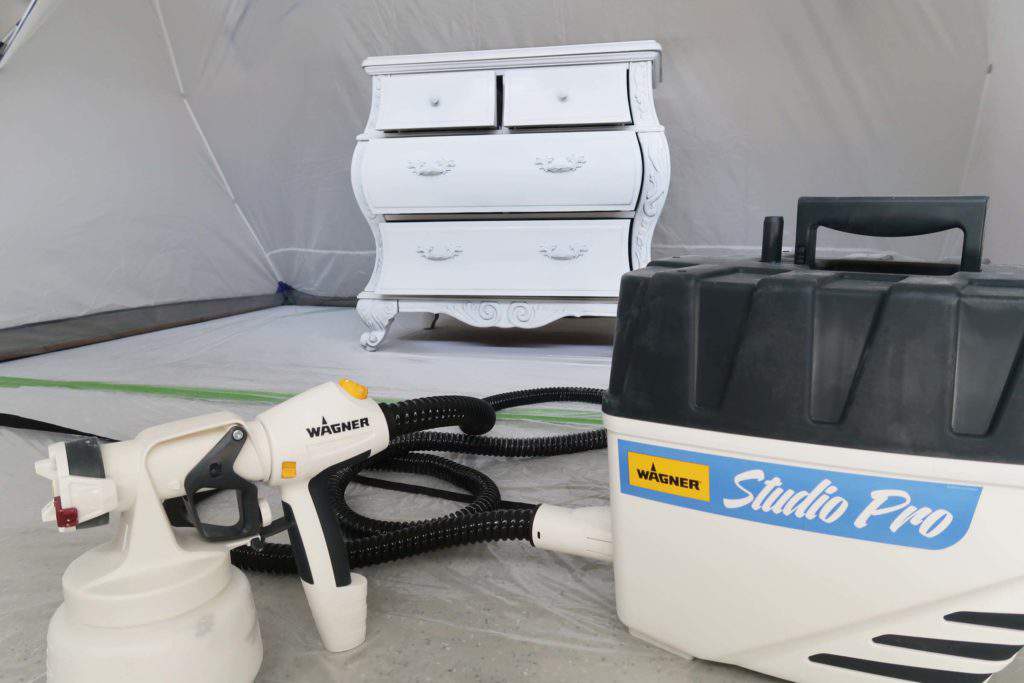
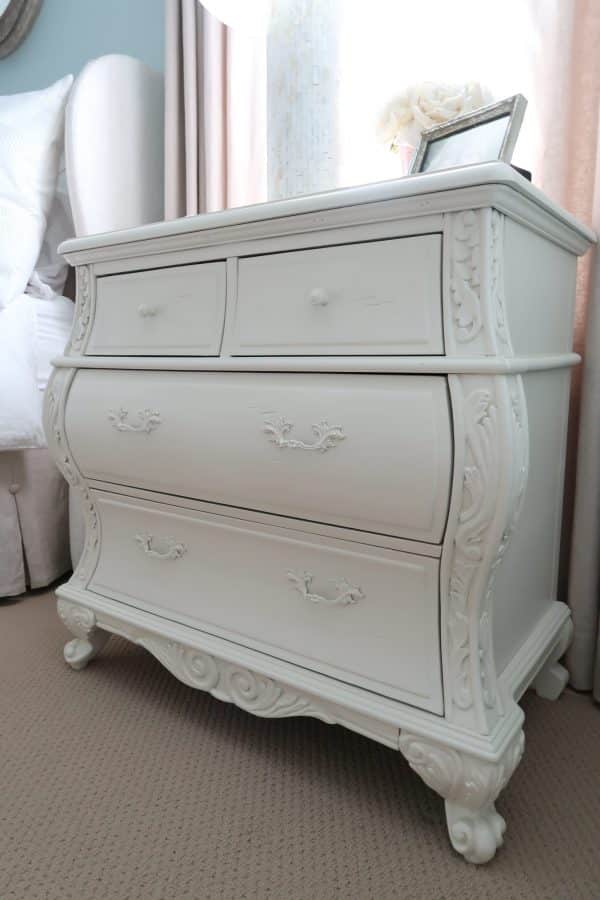
For this project, I sprayed both of the nightstands out in my garage using a spray shelter.
Here is everything you need to know on how to protect the area and using a spray shelter.
Honestly, assembling the spray shelter was the HARDEST part of this project LOL.
Set-Up for Using a Paint Sprayer with a Spray Shelter
- Within a garage, move out any cars to an alternate location and sweep or blow all debris from the floor.
- Mask floor or a driveway with two layers of painter’s plastic and adhere with tape.
- Assemble and place spray shelter – this took 10 minutes and I HIGHLY recommend watching this video first
- Place assembled spray shelter over the plastic on the floor. Make sure the plastic extends beyond the shelter to protect it.
- Place furniture in center and toward back of shelter to minimize over spray.
- Use heavy objects like bricks or boards to hold down the back of the shelter and eliminate overspray.
The Wagner Paint Sprayer Gave me Back 4 Days of my LIFE! That’s 2 weekends people!
Now I need to share why the paint sprayer turned a dreaded paint project into the best ever!
The truth is dry time is the real enemy, but hand painting requires so much more time.
Spraying inside of the shelter and my garage was a piece of cake!
The only issue I faced is bugging my neighbor every few hours to help me rotate out nightstands, but if you have a willing person to help you then you eliminate that issue.
How to Paint Furniture with a Paint Sprayer
It’s time to be honest. After I sprayed inside the shelter, I got scared to spray inside of my house.
I wasn’t sure how I was going to contain the overspray and that is a huge concern.
Because of my initial FEAR, I proceeded to hand prime the armoire in my bedroom and it took 5 HOURS of unpleasant time I can’t get back.
I was so upset that I’d started this project and worried I couldn’t finish it.
What finally pushed my decision over the edge was the carved piece at the top. It was impossible to get my brush behind it.
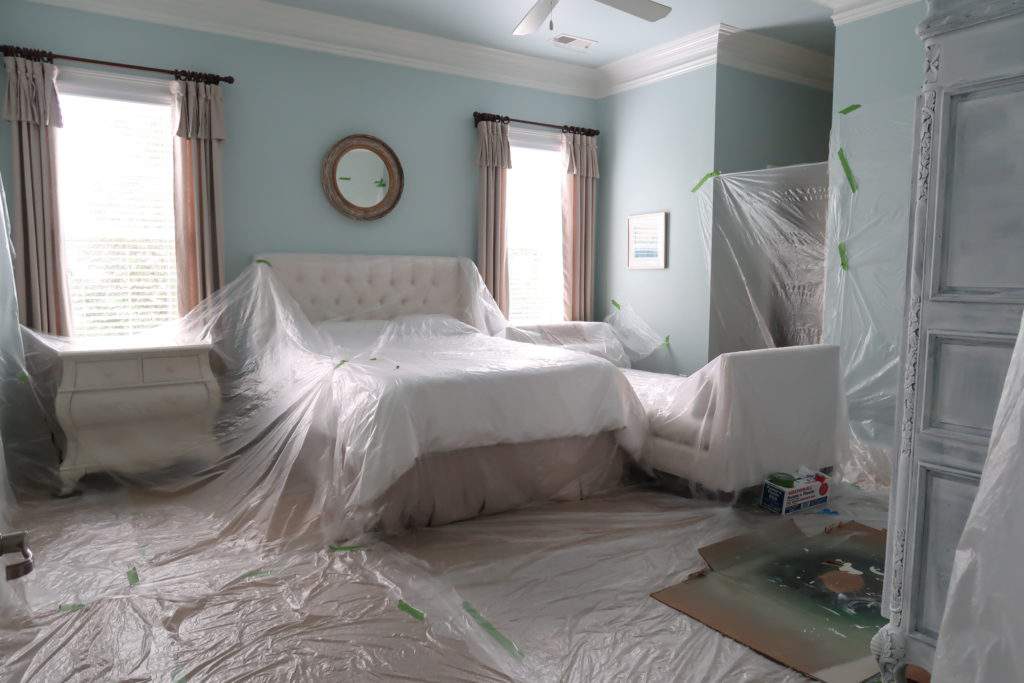
I decided to do the unthinkable and use a paint sprayer INSIDE of my bedroom!
As a mini-test of spraying inside of the bedroom, I covered the walls and all horizontal surfaces near the entertainment center.
I sprayed that section VERY carefully with the iSpray attachment. Joy! It worked SO WELL and I could contain the overspray.
Before I went to bed that night, I planned the fortress of plastic for the bedroom.
The other thing I was AMAZED by is I was able to get FULL COVERAGE of paint with only ONE COAT applied with the paint sprayer!
This set up is CRITICAL!. Using a HVLP Paint Sprayer leaves a fine mist of dried paint EVERYWHERE.
Wait for a day that no rain is the forecast and LOW humidity. You’ll want to paint on cool enough day to keep the windows open for most of the day.
DON’T PAINT WHEN IT’S HOT AND HUMID. The paint won’t dry properly.
Now let’s talk about how you will make yourself a plastic FORTRESS inside of the room!
I used furniture sliders to help move all of my furniture. Click here for what I used.
Set-Up for Using a Paint Sprayer Inside a Room
- OPEN windows for ventilation and turn-off ceiling fans. TURN OFF HVAC, so you don’t pull paint dust into system.
- Push all additional furniture pieces away from furniture being sprayed. Take down adjacent art from walls.
- Cover ALL horizontal surfaces with painter’s plastic and tape gaps.
- Use painter’s plastic up walls behind, to the left, and right of the furniture piece you are spraying. Mask off door openings to adjacent rooms.
- Place extra tape around the feet of the furniture you spraying to avoid the force of the paint spray to make it through to the floor.
- For an additional layer of protection around the furniture being sprayed, place cardboard.
How to Use an HVLP Paint Sprayer to Paint Furniture
Let’s talk about this fabulous paint sprayer and how to use it to paint furniture!
The pictures featured throughout this tutorial are of an older Wagner Paint Sprayer model.
They have since updated it and renamed it. The sprayer settings are the SAME.
Buy the Paint Sprayer Here! UPDATED Paint Sprayer
![]() Are you intimidated by the thought of using an airless HVLP paint sprayer? Please don’t be!
Are you intimidated by the thought of using an airless HVLP paint sprayer? Please don’t be!
Trust me, I sighed when I saw everything included with the sprayer. I thought it was going to be hard to figure out how to use two different attachments. It’s NOT!
This was the first time I used a paint sprayer. You can become a pro with a little practice on the paper they include or on some cardboard.
I was up and running plus comfortable with the paint sprayer in under 30 minutes.
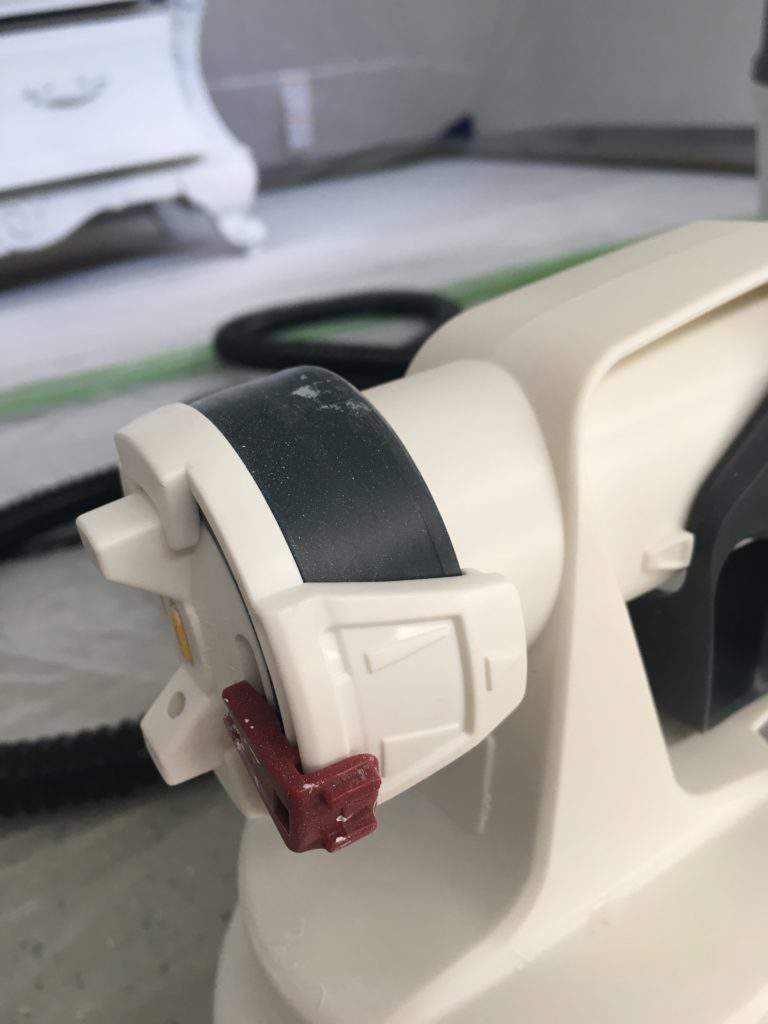
The sprayer itself looks large, but the box is really a handy storage unit that holds:
- Handle/Air Hose Assembly
- Black Tubing
- Control Finish Nozzle
- iSpray Nozzle
- Practice Paper
- Manual
Wagner included really easy to understand instructions and the two sprayer attachments are simple to use.
iSpray Nozzle – Broad surface coverage for thicker materials and leaves a coarse finish. I used this for the Valspar Bonding Primer, which I strained.
Control Finish Nozzle – Smaller project coverage for thinner materials and leaves a fine finish. I used this for the Valspar Cabinet Enamel:
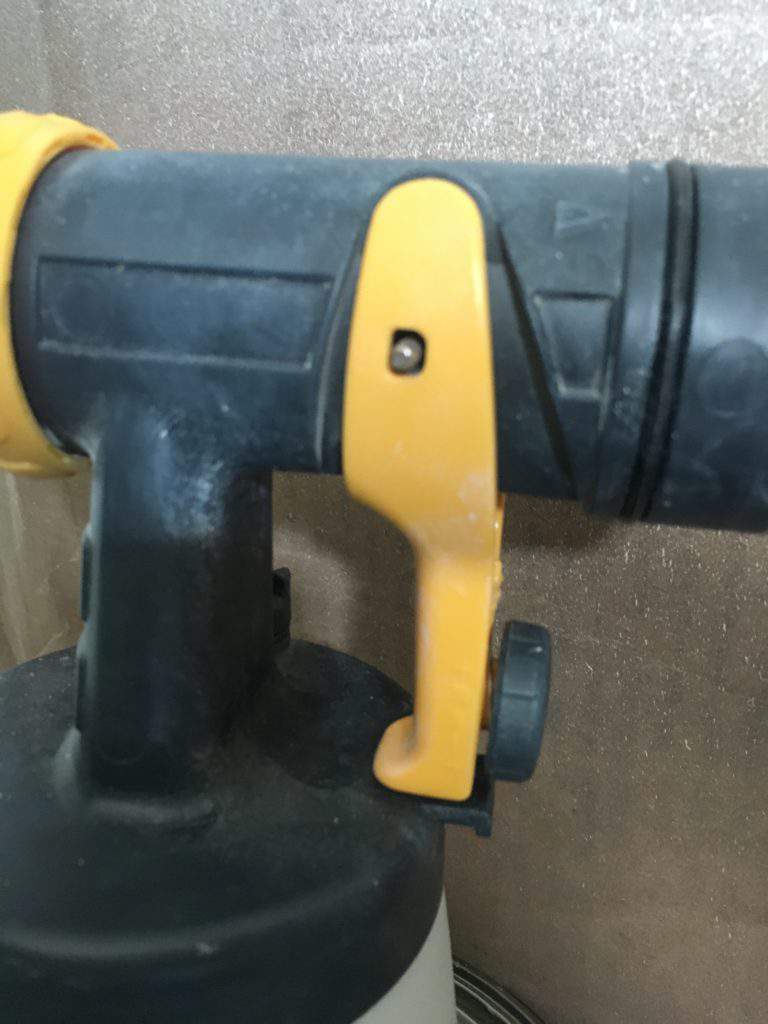
Paint Sprayer Settings for Primer and Paint
Please follow the instructions that come with the Wagner Sprayer and adjust while practicing on a piece of cardboard.
NO THINNING WAS REQUIRED ON EITHER THE PAINT OR PRIMER.
For the iSpray attachment and Primer, I used Max Output (dial on trigger) and Max Air Power plus a wide spray.
Valspar Bonding Primer is thick primer so I wanted as much coverage and force as possible.

For the Control Finish Nozzle, I used Mid Output (black dial on trigger) and 8 Air Power for a finer finish. There is not a setting for the spray width.
Applying paint with the HVLP sprayer
Nightstands sprayed in the garage in the spray shelter:
- Each coat of primer and paint took 15 minutes at MOST to apply and this was me being a perfectionist!
- The primer and paint was ready to recoat in 2 to 3 hours.
- Only ONE coat of primer and ONE coat of paint was required!
- The paint was fully dry overnight and fully cured in 2 days and objects could be placed on the surface of the nightstand.
- Clean-up of the sprayer required hot water and some patience, but wasn’t difficult. Follow the instructions!
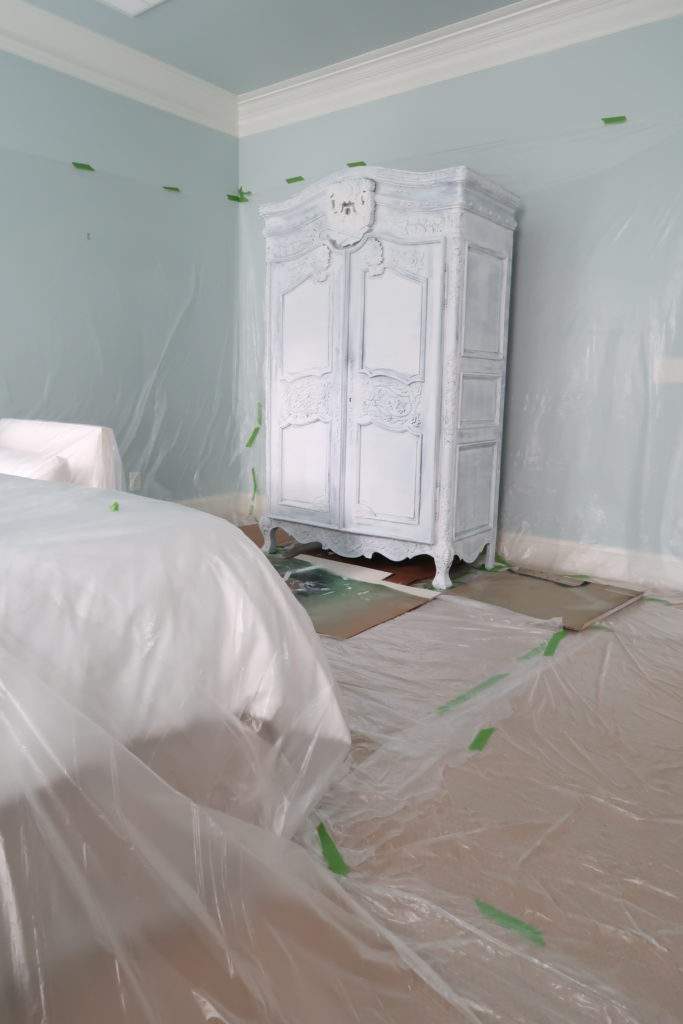
Entertainment Center sprayed inside of the bedroom:
Set Up and Time to Apply
- Plastic draping = 1 hour
- Painting = 45 minutes
- Dry time = 2 hours
- Clean up = 1 hour
The entertainment paint project started at 8am and by 1pm the room was back in use. AMAZING!
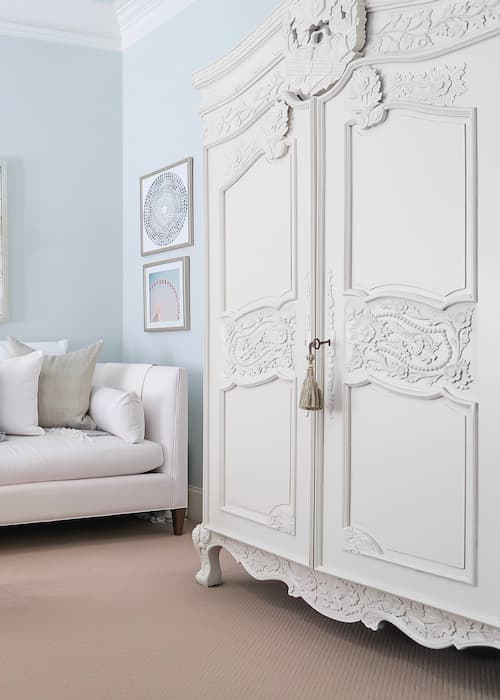
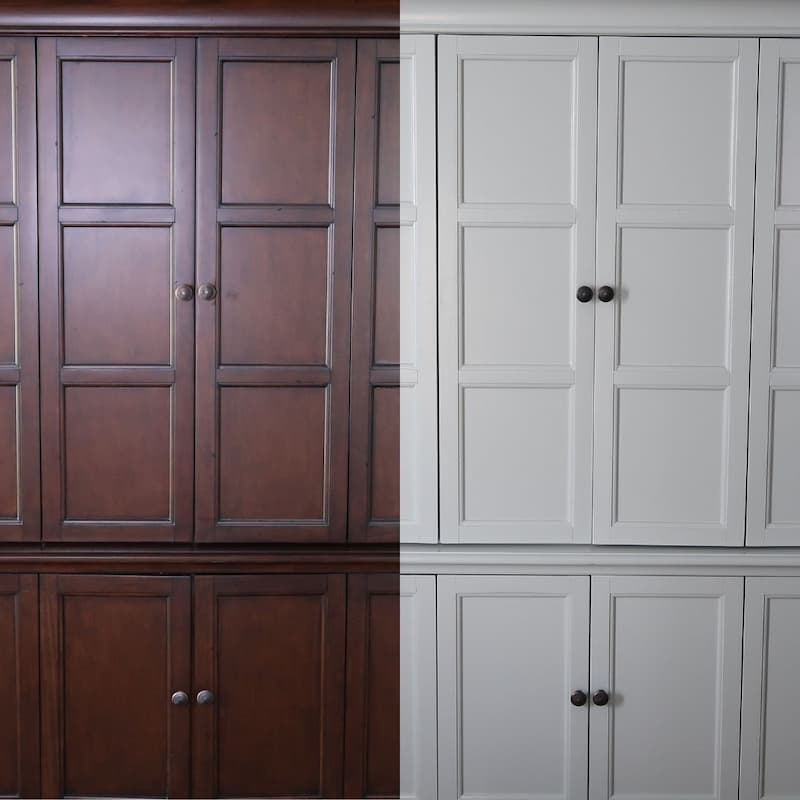
The After: Entertainment Center Paint with a HVLP Sprayer
Look at the beautiful finish the Wagner paint sprayer delivered with one coat!
Applying the paint to all of the stained wood furniture with a paint sprayer saved 2 weekends!
If I would have tried to hand paint the armoire, it would have taken one day per coat of paint because I would have needed 2 coats.
Each coat would have had to dry overnight between coats to ensure it dried properly.
That is 3 days alone and because hand painting creates a thicker coat I wouldn’t have been able to touch the armoire until it dried overnight.
ALL OF THE DRY TIME BETWEEN COATS would have taken 4 days of my life. A hand applied finish NEVER be as smooth as with a paint sprayer.
I would have had a very hard time getting into all of the carved detail creating a frustrating experience.
Yes, the paint is amazing but the way it was applied using a sprayer provided the deep coverage in the carved areas of the nightstands and armoire.
This went from the worst paint project to the best paint project EVER and I’ve done a ton of painting.
At this point, I hope you are as impressed as I am with the Wagner Paint Sprayer and are now inspired to try some of your own projects!
Not only can you paint furniture with a sprayer, but they are the BEST option for painting cabinets too!


I’m loving all that you do!! Maybe I missed it but what color are you using on moldings (lv, kitchen, dining)? Thanks, T
Thanks! The paint color came with the house, but when I’ve painted trim I use Valspar Blanched Pine. My paint colors are in my home tours, if you ever want more details.
Love this!!! I just sprayed my masterbath vanity cabinets after looking at your blog and LOVE them!! They turned out amazing!!! Next up was redo of the master bedroom, but after painting, our dark cherry furniture is not looking great. We also have a large armoire. I am inspried and going to paint the all the furniture after reading your post. Just have to pick a great color!
Thanks so much!!!
Wonderful! I’m SO excited to hear this 🙂
I am looking to paint my kitchen cabinets, and purchased the Valspar Cabinet Paint. I’m wondering if I can use it in my sprayer? I have used other paint, and we needed to add some water to thin the paint out, so it would go through our sprayer. But I can’t find how it will affect the Valspar paint. Did you dilute the paint? Does your sprayer require you to dilute for other paints? Thanks in advance
Hey, Pam! Yes, you can absolutely spray Valspar Cabinet Enamel and I have 3 time. DO NOT THIN THE PAINT. Spraying is the best option and I have a comparison in this post: https://porchdaydreamer.com/hand-painting-or-spraying-cabinets-what-is-better/
I’m a new subscriber and you have me so inspired! I am seriously considering painting a heavy looking, old oak armoire that I was tempted to sell (but there are so many available for resale). I can now envision how it could look beautiful and fresh with some paint near its beveled glass and mirror.
Question: Is it reasonable to paint it in the bedroom if I safely cover the floor and furnishings? I can’t imagine moving it to the garage without hiring movers 🙂
Hi, Pam! As you can see I sprayed mine in the bedroom and explained how to prepare your space to protect everything. Painter’s plastic is your friend!
I have several pieces of furniture to paint and have found your information so helpful. Thank you. I have a question about the Valspar Cabinet paint. Does it come in different finishes? Your end results look like it has a matte finish, which is what I’m looking for. I love the look of chalk paint but don’t want to use it because I need something durable for dining room table tops. I’ve ready about making DIY chalk paint with “any paint” but does that really work? One last question…sorry. If using the Valspar cabinet paint for a dining room table that will get used daily do you think I need to use a poly top coat?
This is my first comment on this blog, and I’m a new follower:) I wanted to chime in on the comment about how someone disagreed with your choice of painting these pieces. For me, I can’t understand why people are so turned off about painting anything! I would rather “update” great pieces of furniture and breath new life into them, than to try and sell them for pennies only to turn around and have to spend $2-3K for a new Amoire like that! And if you did buy an Armoire that was cheaper, it was made from junk materials as well. Bottom line, if you like wood- HOORAY! If you like paint- HOORAY! Do your thing because it doesn’t matter. BTW, I’ve been a painter for over 30 years and you’ve done a magnificent job to your home. Having a little ingenuity is a great thing;)
Cindy, you made my day and I second everything you just said about upcycling good furniture 🙂 Thank you for your kind words!
Hi Tracey,
Did you spray the inside of the armoire too? And did you take the drawers out of the nightstand to paint them or just paint it all at once with the drawers pulled open a little? I read your kitchen cabinet painting instructions in which you stated you took everything apart. Then read this post and you didn’t mention how you did the drawers so I was wondering how you managed these details. Forgive me if I sound stupid… I have an entire bedroom set that needs painting and I’m partially disabled and it’s wishful thinking on my part to think I can get away with not having to take out all the drawers and paint them one by one the way you did the kitchen cabinet doors.
Patrice, no worries I am happy to answer your questions. To save myself time and trouble, I didn’t spray inside of the armoire because I always leave the doors closed. Then the nightstand drawers are NOT removable, so I just pulled them out a bit to spray. Recently, I’ve repainted them for another bedroom makeover but by hand this time and did the same thing just pulling out the drawers a bit! If you want to see what they look like now, here is that post https://porchdaydreamer.com/master-bedroom-mini-makeover-reveal/.
Good luck 😉
Thanks for your information
Some furniture looks better painted, but not these pieces. I am certainly more traditional when it comes to wood finishes. Spiffing up an old flea market find with paint is one thing, but covering beautiful natural wood furniture, not so much.
Marianne, I address how long I’ve owned this piece and that I took time to consider whether to paint it or not. You clearly just wanted to post your opinion, which adds no value to others, but I’m allowing it. This would have become a flea market find for someone else, if I didn’t paint it. Now it has a new life in my home and will for many years to come. It’s the first piece people compliment me on when they enter my home and walk up to get a closer look at the details. I believe it is even more beautiful following my artful paint job and mimics antiques you find in France that have been hand painted generations ago. Beauty is in the eye of the beholder…
Tracey, couldn’t agree more!
I also had (very expensive)
bedroom furniture that had great lines, but I had never cared for the wood tone. Besides, my husband had passed, & I needed to start my own life.
Rather than donate/sell something that I liked(but didn’t love), I chose to repaint it, following your directions. It turned out beautifully!
So now I have pieces that suit ME, & I didn’t have to spend a fortune to replace!
I’m SO happy to hear that 🙂 Sorry for your loss, but happy you have found a way to move forward and create a new life.
I agree! I’ve painted many large pieces in my home when I no longer cared for the wood tones and those are the first ones that guests are drawn to and complement. Thank you so much for the step by step process using a sprayer- that’s my next challenge. Looks like lots of prep but your results are gorgeous!
Jeanne, thank you! I just grabbed a BIG cup of coffee, turned on some music, and prepped. Wasn’t too terrible and the results are definitely worth it! Good luck 🙂
I absolutely love how your bedroom furniture turned out. I have very expensive French country bedroom furniture that I would love to paint, but my husband won’t agree. 🙁 Not yet anyway!
Your blog and Home are amazing- I just found it via Southern Hospitality and I’ll enjoy looking at every single post you’ve ever posted! And of course I’ve subscribed.
Thank you for all the inspiration!
Jeanne! Awww that makes me sooo happy. Blogging is tough because it’s something you do alone and HOPE someone reads what you wrote 🙂 So glad you are enjoying what I’ve created. That made my day! Yes, I’ve had my furniture a LONG time and didn’t take painting it lightly. My mom thought I was crazy, but after I was finished said – yep I see what you saw now and love it. Now I am thinking of sanding the paint off of the hardware on the nightstands, after seeing how well my credenza came out. Maybe that will be part of my fall makeover???
. Sorry, but I come down on the side that the furniture is ruined. I think that it might have been a better idea to remove the dark stain and restrain in a lighter color. But, to each her own, or, as my mother used to say: “that’s what makes horse racing.”
Define “ruined. ” Her painted pieces are being used to hold clothing and enjoyed as part of a beautiful cohesively decorated bedroom. The paint can be removed at any point and the furniture can be stained again. If she had removed the original stain just to apply a lighter one the factory finish would still be forever, and worse still she wouldn’t have executed her design. I have a bedroom full of mahogany pieces all painted a cream white at the factory. Was the furniture ruined when it came out of the North Carolina Henredon factory? Are the black lacquered chairs and nesting tables in Edith Biltmore’s bedroom ruined? Did Micheal Angelo “ruin” the ceiling of Sistine Chapel? Should he have stained it instead and shown off all that “beautiful wood?” A beautifully decorated space needs a mixture of finishes. The fear of paint (and change in general) inhibits good design. It isn’t just a matter of “vive la difference” either. Name one great celebrated decorator who is afraid of painting wood. You can’t. So you have people who love design and those who love wood.
I normally would have preferred the original wood pieces, but the painted pieces are really beautiful. What a great job. Thanks for sharing.
Thanks you for saying that! My mom questioned my paint decision, but after I completed the project said the same thing 🙂
Wow-I definitely want to do our bedroom furniture, I have handles that swing, can I handpaint them and reattach? Thank you
You can! Those are called pendant pulls (used to work for Amerock). I left mine on when I painted with the sprayer and did the same with another piece I did by hand.
This is really, wonderful! The transformation in the furniture doesn’t affect its beauty at all, but rather the ‘feel’- you have created a beautiful room- thank you so much for sharing. I hope you have inspired others to take their furniture from “old”, to “new”-
Cynthia, yes I couldn’t have said it better! It’s so soft and serene. I hope I’ve inspired others too 🙂
The wood on these two pieces was so beautiful, I am so sorry you could not see that.
I did for 20 years. It was time for a change and I have no regrets. I understand why some would think they should stay stained.
I love all your projects! I was intimidated by the idea of a paint sprayer but this year thought what the heck just go for it after trying to hand paint one dining chair that was taking hours of frustration to paint. Like you I had to paint indoors. I brought all six chairs to the basement. I did use two coats of primer just to be extra safe as I didn’t want to do this again. Then two coats of paint. So three days of painting and WOW they are amazing now. I would have included a photo but there is no option to do so. Just a another little comment….You are a very beautiful woman and a joy to watch!
Sheri, that is amazing! So happy you like my projects and videos – that means so much to me 🙂 My paint sprayer has been such a time saver and the finish is perfection!
This is exactly what I want to do with my bedroom set! Mine also dates back to my marriage (however, my husbandpassed away), & I’ve finally realized that I need to transform this furniture to something that suits ME, not WE.
Thanks for giving me the courage to take the plunge!
Oh, thank you! That makes me happy to hear you found the inspiration to make a change after a difficult time. It’s time to have courage in many ways and ME time is great!
Beautiful! Now I want this sprayer!!
Thank you! It’s worth every penny!
This is perfect timing! I’m getting ready to do a 25 foot kitchen table and chairs!