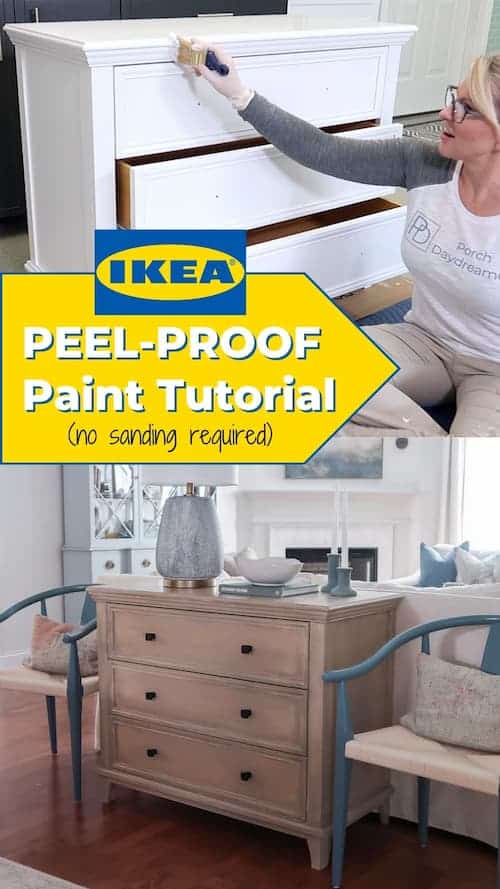
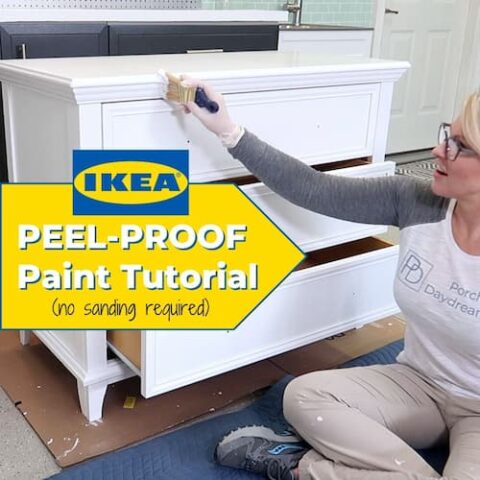
Easiest Way to Paint Laminate or IKEA Furniture (so it won’t peel)

My no-fail hack to paint laminate furniture so it won’t peel. Beginner friendly step by step guide with the easiest way to paint laminate or IKEA furniture without sanding.
Thinking about changing color of your IKEA furniture by painting it? I’ve seen some bad information on social media lately recommending the wrong primer for painting IKEA furniture or for painting laminate furniture in general.
It’s time to set the record straight and as the Queen of Painting Everything I’m going to teach everything that you need to know about painting IKEA furniture.
I have an ACT – Architectural Coating Technologist certification and worked for one of the world’s largest paint companies launching new paint technologies. Not only know how to paint, but the science behind it. Paint nerd alert!
You’ll learn my easy hack to properly prepare the surface and the best primer to use. Plus how to paint IKEA furniture and how to paint laminate furniture too!
This is the EASIEST most cost effective way to get a peel proof paint finish that is long lasting and durable too.
Pin It for Later!
Plus I’ll walk through your paint and primer options for painting IKEA furniture and show you the best most affordable way of painting furniture that has a shiny surface.
What is IKEA Furniture Made Of?
IKEA furniture can be made of a variety of materials, depending on the specific piece of furniture. Here are some of the most common materials used in IKEA furniture:
- Particle board: This is a low-cost material made from wood chips and sawdust that are pressed together with glue.
- Medium-density fiberboard (MDF): This is a type of engineered wood made from wood fibers that are pressed together with adhesive.
- Veneer: Veneer is a thin layer of wood that is applied to the surface of a piece of furniture to give it the appearance of solid wood.
- Laminate: Laminate is a thin layer of plastic or vinyl that is bonded to a core material, such as particleboard or MDF, to give it the appearance of wood or other materials. IKEA laminate furniture durable and easy-to-clean.
All of these surfaces can be painting using the same process I’m going to teach you.
So you don’t have to be too concerned with knowing exactly what the surface is made of.
What is Laminate Furniture?
Laminated furniture is furniture that has a thin layer of decorative material (often a type of plastic) bonded to a core material.
This decorative layer is usually printed with a pattern or color that mimics the look of wood or a solid painted surface.
Laminated furniture is popular because it’s affordable, durable, and easy to clean.
It’s often used for furniture that needs to withstand wear and tear, such as desks, bookshelves, and cabinets.

Because of the slick and shiny surface laminated furniture can be more difficult to paint or refinish than solid wood furniture.
The good news is it’s fairly easy to paint IKEA laminate furniture.
There are specialty primers specifically designed for use on laminate or slick shiny surfaces.
What’s even better is that the method I’m going to teach you doesn’t require any sanding!
Can I Paint IKEA Furniture with Chalk Paint?
The manufacturer’s of one step paint and chalk paint would say yes. But I’m going to tell you it’s not the best option for painting laminate furniture or for painting IKEA furniture.
Chalk paint brands tell you that you can skip primer too! Again I am going to tell you that you shouldn’t skip primer when you paint furniture.
You can read all about why it’s a must to prime, before painting anything with chalk paint.
Another disadvantage to using chalk paint for painting laminate furniture is that you MUST apply a clear protective top coat over the final paint layer to protect it. That means applying multiple coats of a wax or polyurethane.
This adds additional steps to paint your IKEA furniture. Instead, I’m going to recommend a paint that dries to a hard finish allowing you to skip a clear coat most of the time.
So avoid using chalk paint when painting IKEA laminate furniture.
Can I Apply Paint Straight onto IKEA Furniture without a Primer?
This is an easy answer. Absolutely not! You can’t successfully paint IKEA furniture without a primer.
To paint IKEA laminate furniture without preparing the surface properly is asking for trouble.
It may look like the paint is sticking and it will for a bit.
The reality is the surface is TOO slick for the paint to properly adhere to laminate IKEA furniture.
After the paint dries, you’ll be able to scratch off the paint with your fingernail! The paint will flake and chip almost immediately.
What Paint will Stick to IKEA Furniture?
If you want a durable long lasting finish, the only paint that MAY stick to IKEA or laminate furniture is chalk paint or one step types of paint.
I DON’T recommend EVER applying paint directly to the surface of shiny laminate furniture or IKEA furniture without prepping and priming.
Can I Paint IKEA Furniture without Sanding?
I’m ready for you old time painters in the comments who think the only way to paint anything is by sanding off the finish first
That simply isn’t true if you use the method I teach. In 20 years, I’ve NEVER sanded off the finish and everything has lasted without chipping or peeling.
I’ve successfully painted COUNTLESS of shiny surfaces like polyurethane, ceramic tile and lamps, outdoor resin wicker furniture, and cabinet hardware using the same process in this tutorial without issue.
I can assure you that you DON’T have to SAND before painting IKEA furniture.
The ONLY time you DO need to sand is if any of the surface is peeling. You can’t paint over something that is failing. You have to sand it smooth.
Read this post if you are new to painting furniture: Painting Furniture? Avoid these 4 Mistakes!
If you use the RIGHT process for preparing the surface and the RIGHT primer, you can skip sanding completely.
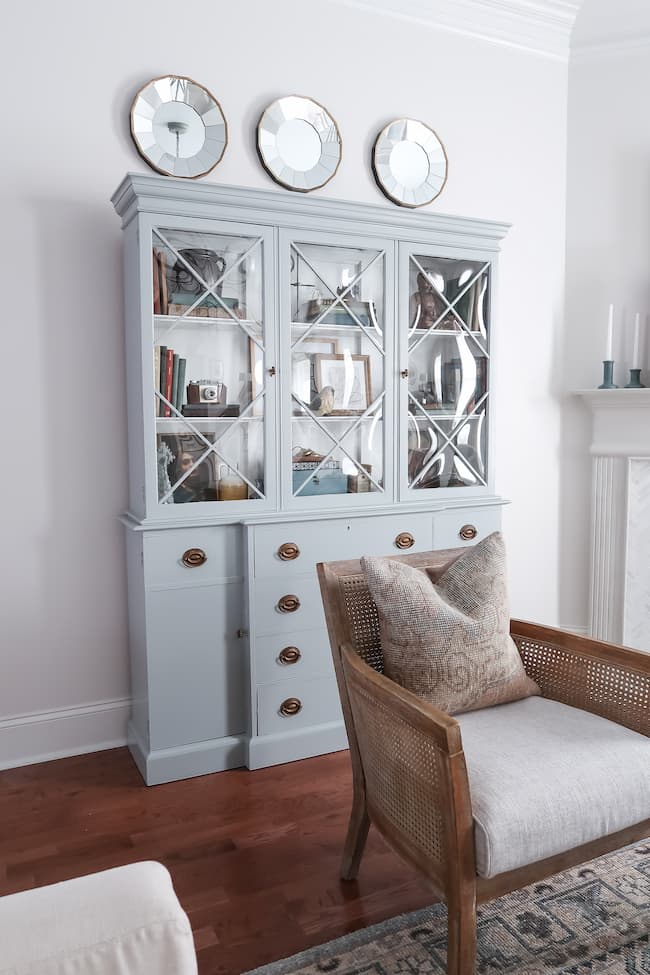
The laminate furniture in this tutorial was painted without sanding and no the paint hasn’t chipped or scratched off.
Only if it makes you feel better do you need to sand before you paint laminate furniture.
You can use 220 grit sand paper and lightly sand laminate IKEA furniture as a prep step.
Just make sure to clean off the sanding dust thoroughly and then follow the rest of my tutorial.
What is the Best Primer for IKEA Furniture?
Now that you know paint won’t adhere long term to the slick surface of laminated furniture you know you need the right primer prior to painting.
You may have Googled or saw on social media to use BIN Shellac based primer.
Shellac based primer is OVERKILL and not necessary. Shellac based primers are EXPENSIVE because they are for extreme uses.
What is a Shellac Based Primer?
Shellac based primer is a type of primer that is made from shellac, which is a resin secreted by the female lac bug. Eeew right?
This type of primer is known for its excellent adhesion, stain-blocking, and sealing properties. Shellac based primer permanently blocks stains, odors and wood knots.
Shellac based primers are recommended in extreme situations like sealing in musty pet and smoke odors. It’s great for blocking tannin from bleeding through from knotty wood varieties.
So while a shellac based primer will stick to IKEA laminate furniture, it isn’t necessary and it’s really expensive $80+ a gallon!
Instead I’m going to recommend a bonding primer, which is HALF the price of a shellac based primer.
What is a Bonding Primer?
A bonding primer is a type of primer that is specifically designed to provide a strong bond between the surface being painted and the paint itself.
I’ve written an entire blog post about when to use a bonding primer and all of the surfaces you can paint with it.
This type of primer is ideal as a prep step when painting slick or shiny surfaces that paint can’t adhere to on its own.
Bonding primer makes it possible to paint just about any surface. Tile, glass, metal, and many plastics. It’s like super glue for paint!
Bonding primer can also be used on previously painted surfaces too, as it helps to create a rough surface for the new paint to adhere to. An example of this is priming over an oil based semi-gloss paint.
Like a shellac based primer, bonding primer is also effective at sealing and blocking stains.
I’ve used it to paint tile, cabinet hardware, outdoor resin wicker furniture, to seal moldy drywall and to stop bleed through when painting stained furniture.
My Favorite Bonding Primers
Buy a gallon because you will use it for EVERYTHING!
My EASY HACK? Thoroughly clean the surface with a de-glosser BEFORE priming.
It creates extra holding power for the bonding primer, which creates a rough surface for the paint to adhere to.
What Type of Paint Should I Use to Paint IKEA Furniture?
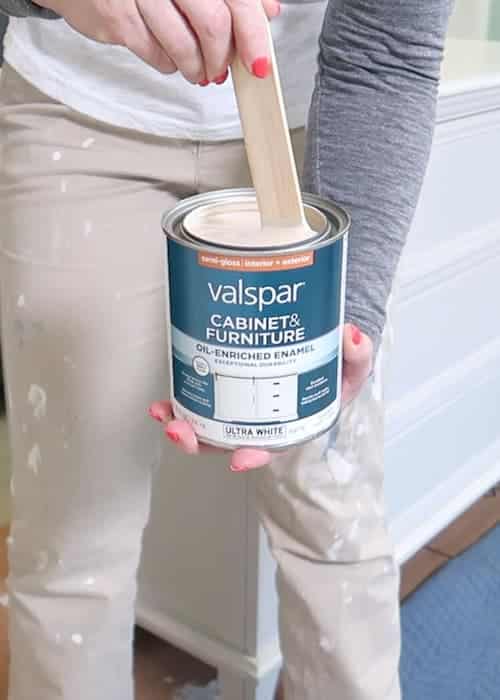
My FAVORITE paint is hybrid oil enamel paint. The brand I’ve used the past 10 years is Valspar Cabinet and Furniture Enamel.
You can read my read my review of the NEW formula of Valspar Cabinet and Furniture Enamel here and why I love it so much.
It’s available for purchase at Lowe’s Home Improvement Stores.
Another great option if you are a Sherwin Williams fan is to use their ProClassic Waterborne Interior Acrylic-Alkyd Enamel.
I’ve used this on a large cabinet and absolutely love how durable and smooth the finish is.
Why I recommend a hybrid enamel is you get the best of everything in a water based paint.
Both enamel paints I am recommending are soap and water clean up and dry to a harder finish than a regular acrylic latex paint in a semi-gloss finish.
In my how-to paint IKEA furniture tutorial, I’ll be teaching you all about Valspar Cabinet and Furniture Enamel plus how to properly apply the paint so you get a smooth finish.
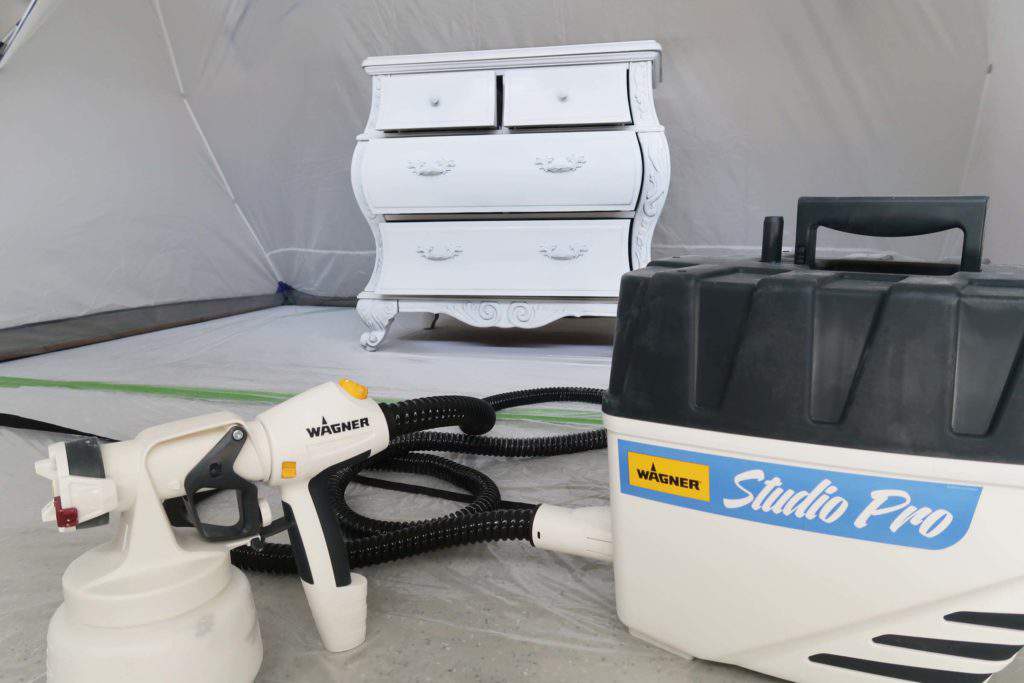
Can I use a Paint Sprayer to Spray Paint IKEA Furniture?
If you are wondering if you can use a paint sprayer to paint IKEA laminate furniture, you absolutely can!
In my how-to paint IKEA furniture tutorial, I’m hand applying everything. What’s nice about hand applying with a paint brush and foam roller, is you can paint indoors in a controlled environment.
There are costs associated with purchasing a paint sprayer and spray paint shelter.
A paint sprayer will definitely speed up the paint job and create a smooth factory level finish.
If you decided to spray paint IKEA laminate furniture, here are some recommendations:
- Use a HVLP paint sprayer (make sure it’s designed for paint and not stain). My favorite paint sprayer is made by Wagner
- Purchase a large spray shelter (here’s the one I use)
- Use cup liners to make clean up easier
You can spray on both the primer and the paint. I’ve got a great tutorial about how to use a paint sprayer here.
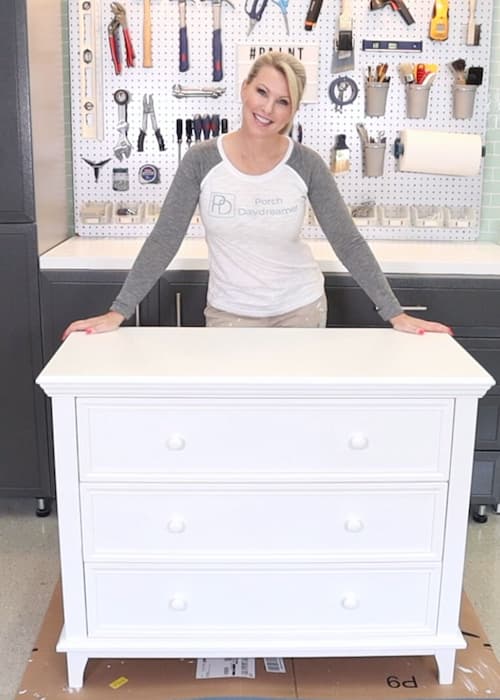
How-to Paint IKEA Furniture so it Lasts!
This is going to be the MOST comprehensive how-to paint IKEA furniture or any laminate furniture tutorial you will find.
Using my science backed approach, years of experience in the paint industry, and my love of making paint projects easier, I’m going to teach the simplest method to paint your IKEA furniture.
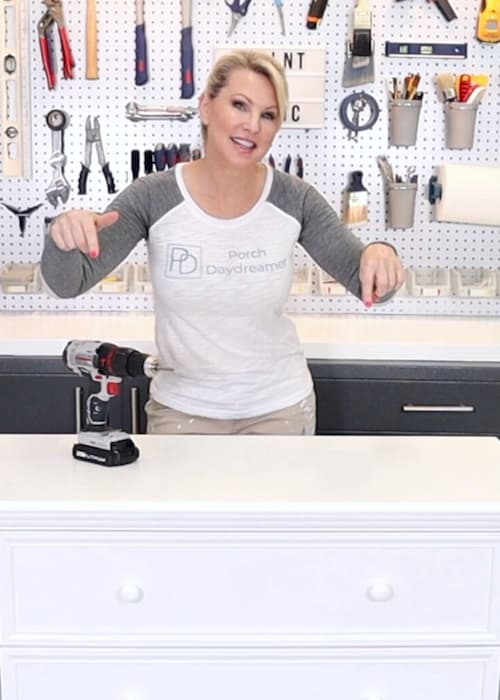
If you want to change out the hardware, I’ve got a great post all about cabinet hardware.
YouTube Video: Paint Laminate Furniture the Easy Way
How-to Paint Ikea Furniture so it's Peel-Proof
Yes! You can paint IKEA laminate furniture. No sanding required...my easy hack guarantees a peel-proof paint job that lasts!
Materials
- Krud Kutter Gloss Off
- Microfiber Rags
- Valspar Bonding Primer Quart (Lowe's)
- Valspar Cabinet and Furniture Enamel in SEMI-GLOSS (Lowe's)
- Cardboard
- Painter's Plastic and Painter's Tape
- Latex Gloves
- Polycrylic Waterbased Polyurethane (optional)
Tools
- Spray Bottle
- Wooster Brush
- Foam Roller and Cage
- Paint Tray and Paint Liners
Instructions
Clean and Prime the IKEA Laminate Furniture
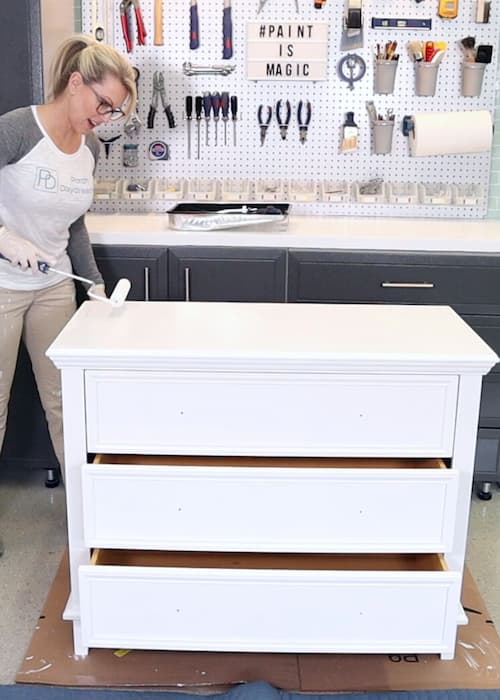
- Remove all hardware from your furniture first. Make sure to prop open any drawers or doors, before you start painting. Protect surrounding area and place cardboard under your furniture.

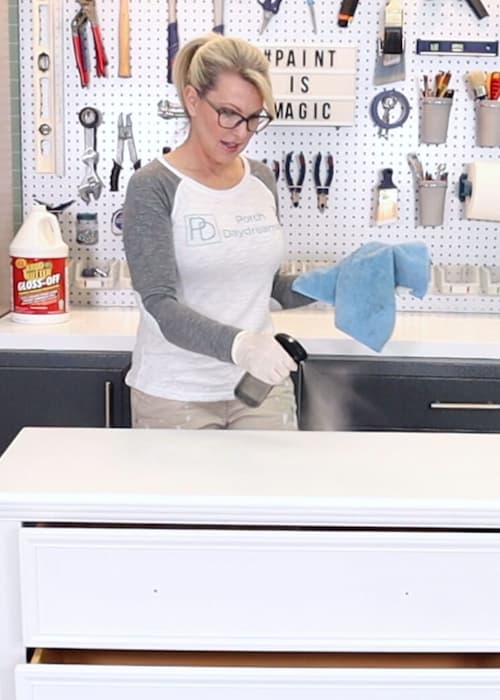
- WEAR GLOVES! Use Gloss-Off to prepare the laminate surface. Spray onto a microfiber rag and directly on the surface to clean and de-gloss. This will knock down the sheen of the IKEA furniture or laminate, to help the primer more thoroughly adhere to the surface.
- Repeat this process twice to make sure ALL surfaces are covered with the de-glosser. Don't miss any of the detailed grooves. LET DRY 10 minutes, before priming.
- Gather your supplies for priming. Valspar Bonding Primer, Foam Roller and Cage, Wooster Nylon Polyester Brush, Paint Tray with plastic liner. I leave the drawers in place, so I don't damage the finish trying to put them back in place after painting.
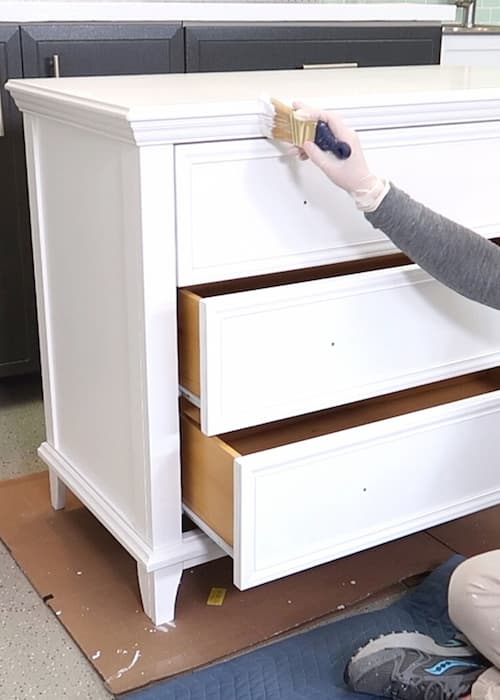
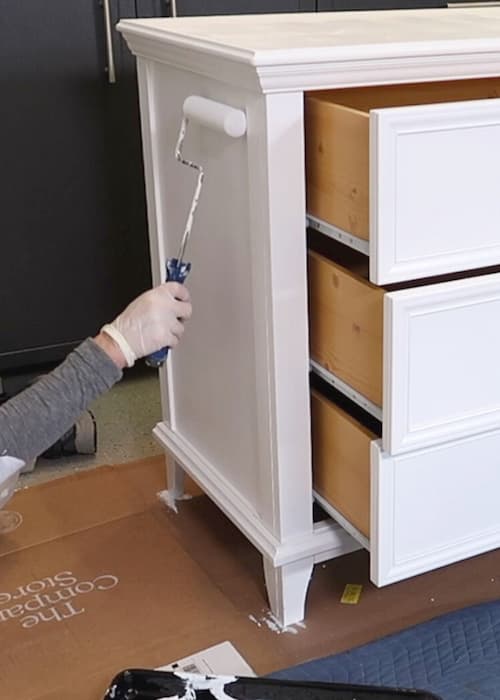
- Start applying the primer with the brush on all detailed surfaces you can't roll. Work top to bottom - DON'T brush the horizontal top (you will roll that). If you get primer on the horizontal top, feather it in as you go with light brush strokes so there aren't any heavy areas.
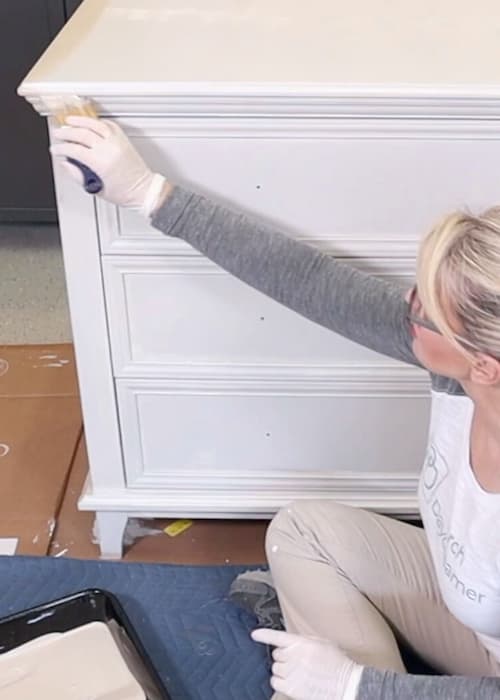
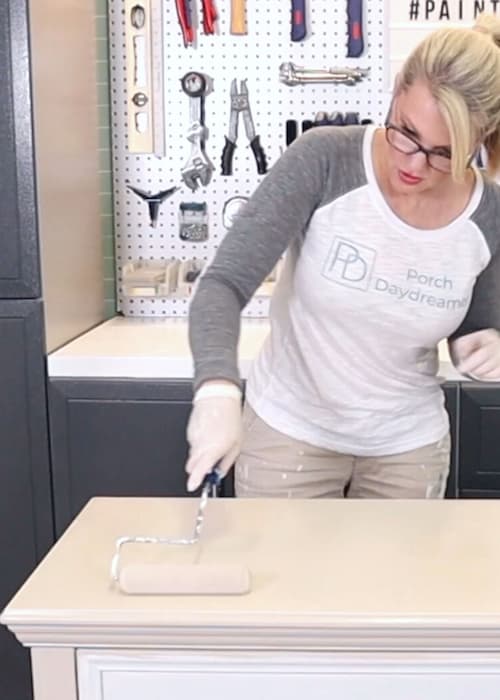
- After you finish the top edge (if you have molding like I did), immediately roll the top to smooth out any brush marks. Make sure to "strike-off" and run your roller in the same direction once you have a thorough coating of primer.
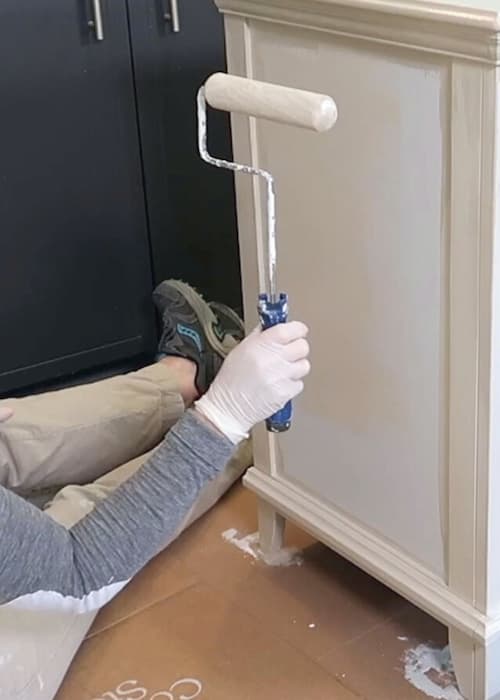
- Keep a wet edge from the area you brush and then roll. After you frame in the sides and legs, immediately use the foam roller to apply the primer to the smooth panels.
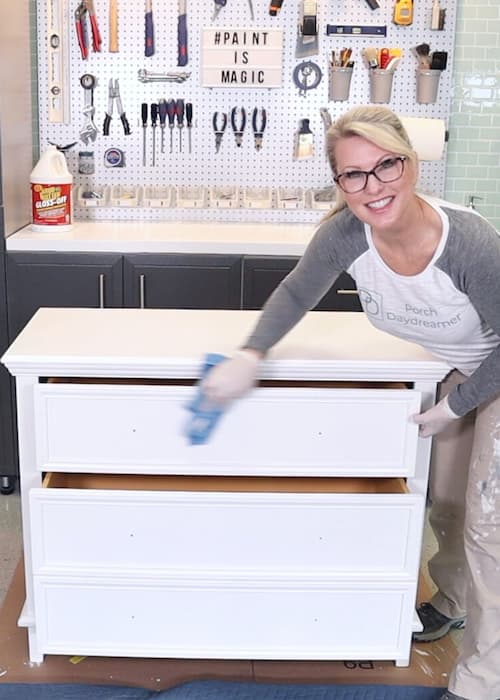
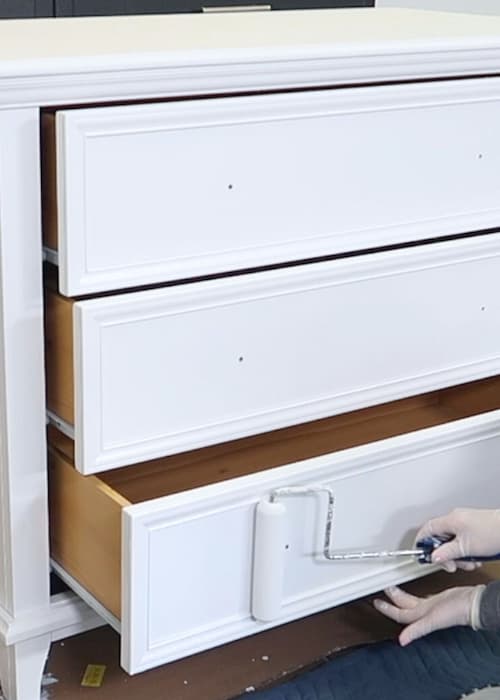
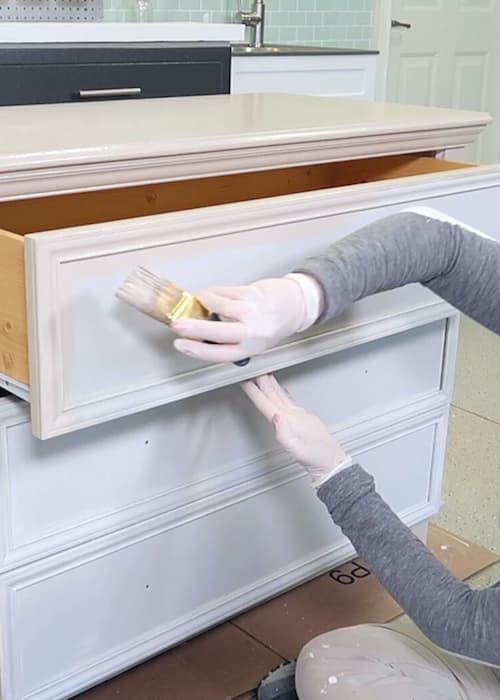
- Follow this same process for drawer fronts. Brush the detailed areas and then immediately roll the smooth surfaces. If thorough, you should only need 1 coat of primer. If you want to apply 2, wait 1 hour between coats.
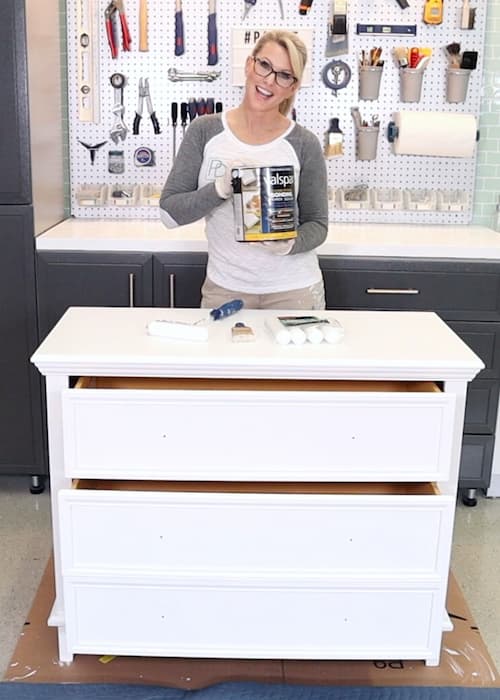
How-to Paint IKEA Laminate Furniture
- Gather supplies: new tray liner, new brush, new foam roller and Valspar Cabinet and Furniture Enamel. DON'T SHAKE. Stir THOROUGHLY to mix the paint.
- Use the same method as you did to apply the primer, Start by brushing any details starting at the top. Feather in brush strokes that hit the top.
- Immediately roll top in long even strokes applying a thin coat. DO NOT OVER APPLY. It's better to apply 2 to 3 thin coats. If some of the primer shows through, that's OK. Once coated, "strike off" running the roller from end to end in the same direction to align the paint,
- Keep a wet edge from the area you brush and then roll. After you frame in the sides and legs, immediately use the foam roller to apply the paint to the smooth panels.
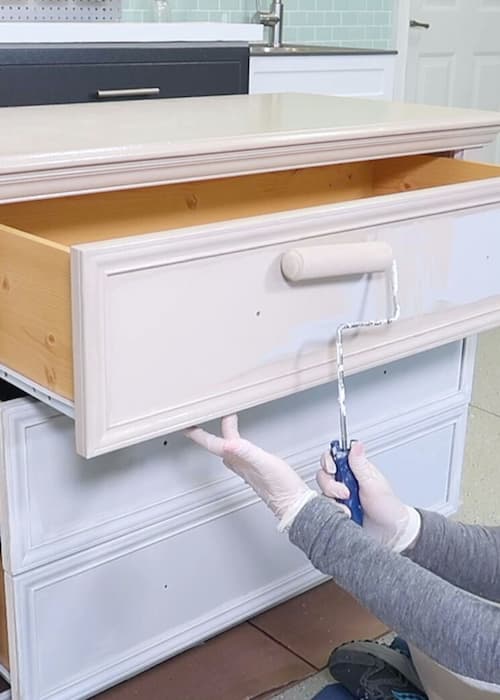
- Follow this same process for drawer fronts. Brush the detailed areas and then immediately roll the smooth surfaces.
- If you roll excess paint onto the drawer frame detail, make sure to blend in the paint and strike off. Hold any drawers or doors open as you paint, so they don't close and stick while drying! DRY AT LEAST 4 HOURS (overnight is best) before applying the 2nd coat.
- For the 2nd coat and 3rd coat if needed, repeat steps 1 to 6 above.
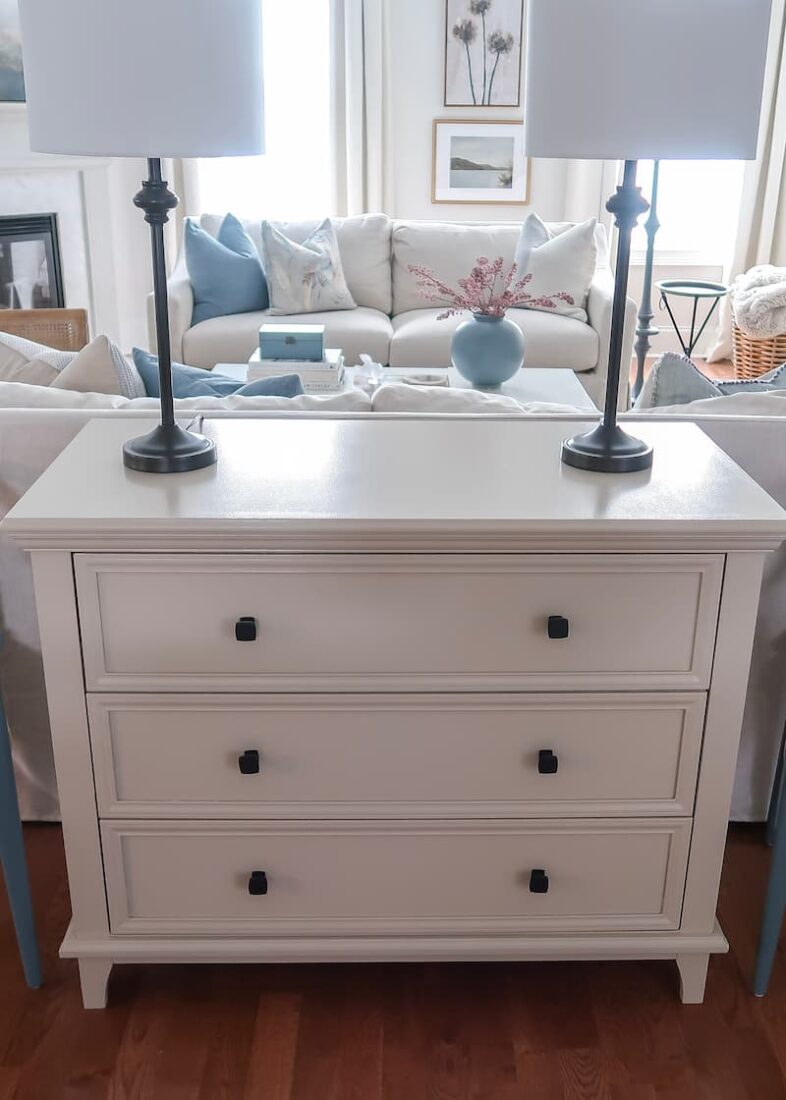
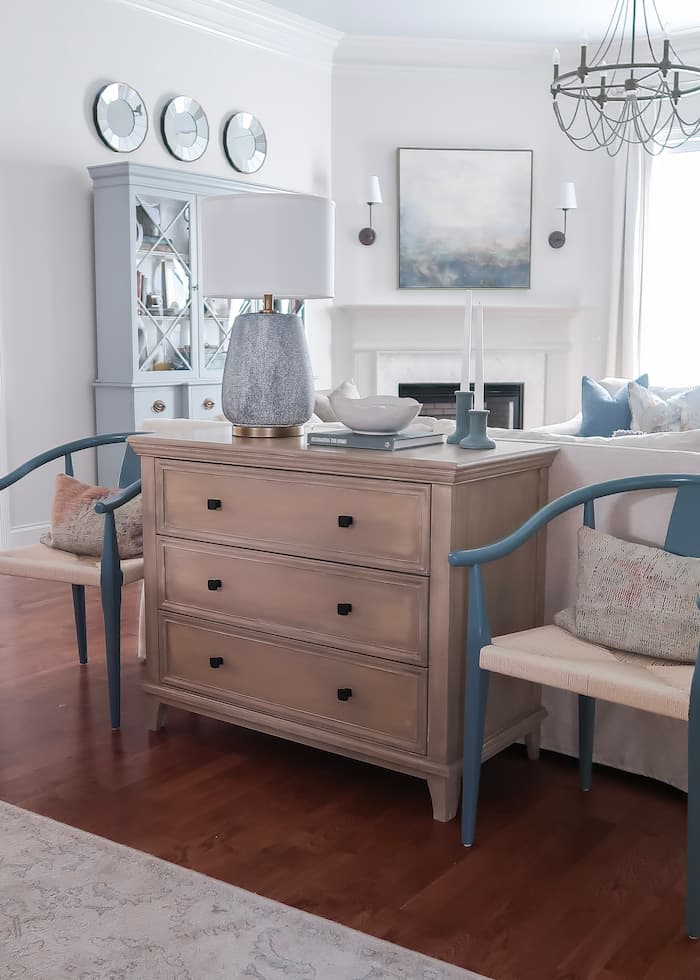
- DRY at least 48 HOURS with drawers and cabinets open, before reattaching hardware and using your furniture. If this is a heavy use piece you want may want extra protection. After 48 hours, apply 3 coats of Polycrylic in the sheen of your choice, following the manufacturer's directions. Here is my finished piece without any polyurethane.

- In the end I faux finished it to look like driftwood and coated with polyurethane.


Notes
- Ideal painting conditions are above 55F and below 85F, with LOW humidity.
- NEVER shake Valspar Cabinet and Furniture Enamel to mix. This will create air bubbles that can pop and wreck the smooth finish.
- ONLY use a foam roll. This will help apply everything in a thin smooth coat. A regular roller will leave an orange peel effect and over apply the paint.
- If you prefer Sherwin Williams paint products, use ProClassic Interior Acrylic-Alkyd Enamel.
- CONSTANTLY WATCH for drips. This type of paint is thinner than wall paint.
- I've painted my bedroom nightstands with Valspar Cabinet and Furniture Enamel and didn't apply any polyurethane to the top. If you are hard on your furniture or if you are painting a high use item like a desk or table, I recommend 3 coats of Polycrylic on the top.
- The color I used is Sherwin Williams Antler Velvet, which can be tinted into Valspar Cabinet and Furniture Enamel at Lowe's Home Improvement stores.
- After creating the driftwood finish, I applied 3 coats of Polycrylic in Matte sanding between coats 2 and 3.
Recommended Products
As an Amazon Associate and member of other affiliate programs, I earn from qualifying purchases.


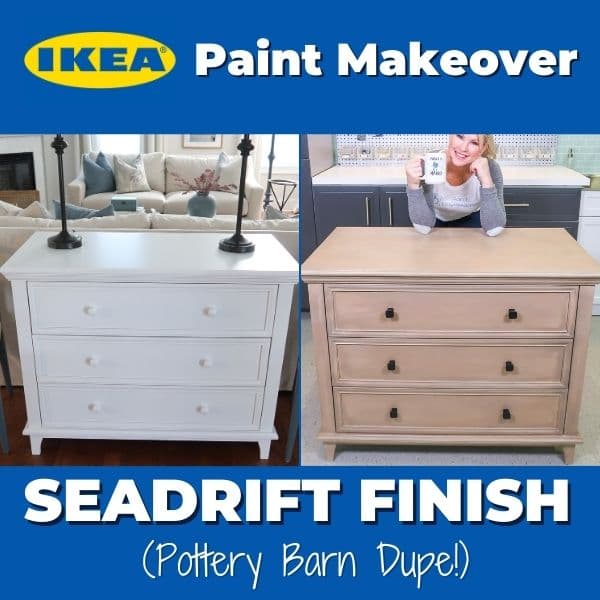
How-to Paint Your IKEA Furniture to Look Like Driftwood
Love the final look of my furniture and are interested in trying a painted faux driftwood finish?
I’ve perfected the art of driftwood finishes and can teach you the easy layers of paint to achieve this beautiful wood finish.
It will look like you spent $1,000+ on your furniture not just a couple hundred 🙂
How-to Paint IKEA Furniture the Pottery Barn Seadrift Finish (aka driftwood)!
Do I Need to Protect Newly Painted IKEA Furniture?
The paint I recommend doesn’t require a clear top coat like a polyurethane.
I’ve written and entire post on how to decide if you should clear coat your painted furniture.
If it’s a heavy use item with a top (like a kitchen table or desk), I’d say yes you should apply 2 to 3 coats of polyurethane to the top at a minimum.
- The top/horizontal areas will experience a lot more wear and tear plus be exposed to spills, sliding dishes, cleaning chemicals and water.
- The sides or vertical areas will be extremely durable once the Valspar Cabinet & Furniture Enamel fully cures (7 days). I’m ROUGH on my bathroom cabinets and haven’t had issues.
- For chair seats, if you are concerned about buttons scraping the surface when people sit down, then polyurethane is a good idea.
ONCE THE PAINT HAS DRIED FOR 2 DAYS: Apply a water-based polyurethane like Minwax Polycrylic in the sheen of your choice.
- You can use the same nylon/polyester brush you used for your paint project.
- Lightly sand between coats of poly with 320 grit sand paper and thoroughly clean off the sanding dust, before applying the next coat. Follow the manufacturer’s instructions on re-coat times between layers.
- Water based polyurethane dries quickly, so it won’t take too long for this extra step!
- I typically apply 3 coats of polyurethane to be extra sure it’s fully covered.
- Note: water based polyurethane looks milky in the can but dries crystal clear.
How-to Care for Your Painted IKEA Furniture
Please be realistic with your expectations because nothing that is painted is permanent.
Being as gentle as you can will ensure the paint lasts! My painted laminate furniture has held up without issue. I set a drink on it every day.
Everything I’ve painted with Valspar Cabinet and Furniture Enamel or with Sherwin Williams ProClassic Enamel is extremely durable.
I clean everything with BABY WIPES! Yes, just dust and wipe down with a baby wipe.
You can also clean with a gentle all purpose spray cleaner for tougher jobs.
I hope you now feel fully armed to transform your IKEA or laminate furniture with a new color using the easy steps I’ve outline to create a peel proof finish!
Why the Krud Kutter Gloss Off vs TSP?
TSP is just a degreaser and Gloss Off dulls the finish making it tacky for better adhesion. I’ve tested both and get better results using the gloss off 🙂
Very informative and I learned quite a bit about painting laminate furniture. Thanks PS: beautiful finish
Thank you! I am so glad I was able to teach you something new 🙂
Thank you. Your experience is a gift to all of us DIY’ers. I have always believed that good prep makes for a good result and short cuts are short lived.
Thanks so much Vicki! I totally agree that prep is everything 🙂
Thank you! I run my hand over this dresser every day and think WOW!
Absolutely Beautiful!
Thank you so much!