Yes! You Can Use Chalk Paint Over Stain
Are you wondering if you can use chalk paint over stained furniture? Yes, you can and even over polyurethane too!
Many people may disagree with my decision to paint my stained and marble topped credenza with chalk paint. I’m ready for the negative comments.
There is a long term love affair with stained wood that runs deep because stain brings out the natural beauty of wood. Part of my career was selling and marketing Cabot Wood Stain, so I get it! I really do.
However, I am all about “to each their own.” Also, I LOVE to transform just about anything with paint.
My blog is filled with painting projects and I address how to decide to whether paint something or not CLICK HERE to read that story.
Now you are thinking about using chalk paint to transform a stained piece of furniture.
Well, I am here to help and explain exactly how to use chalk paint over stain and polyurethane!
Why Chalk Paint?
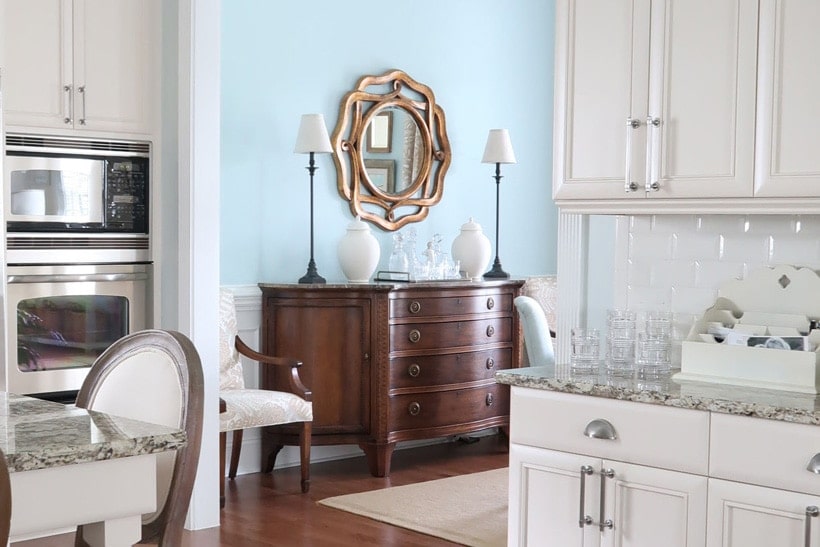
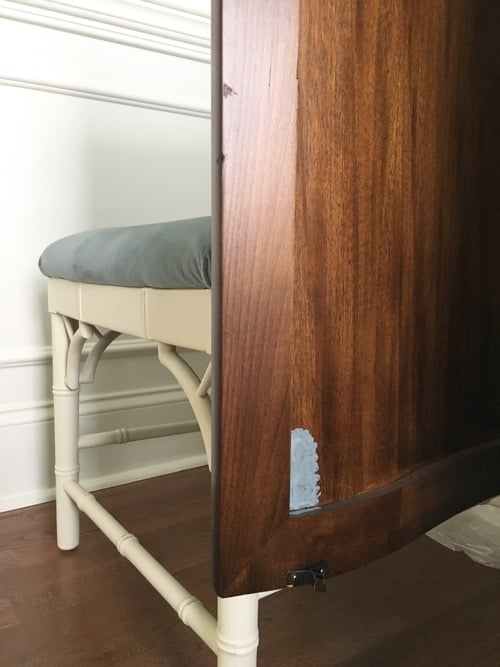
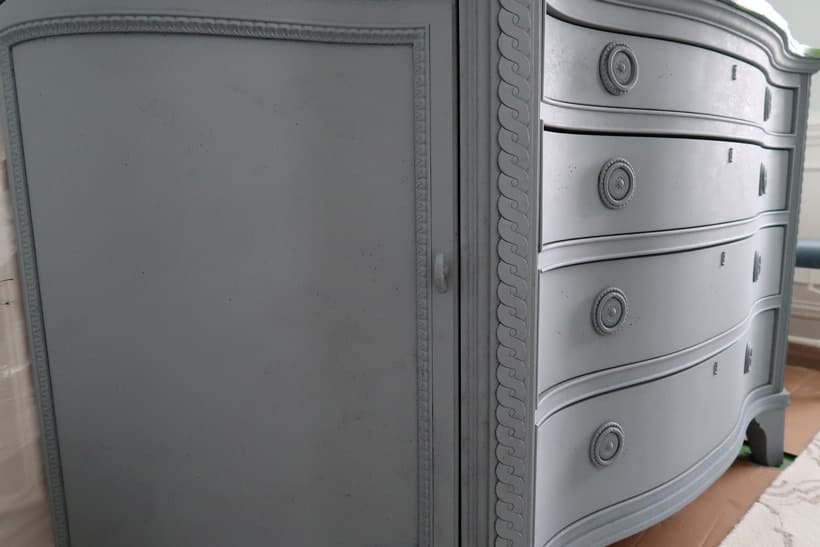
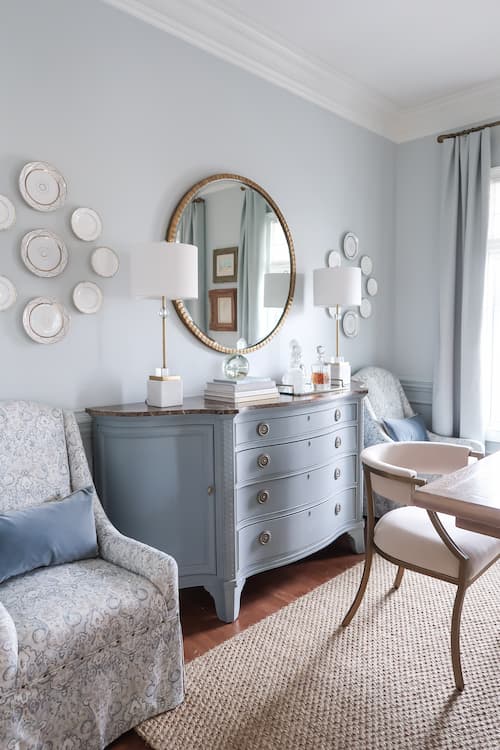
The credenza in my dining room has lived a LONG life. It’s over 20 years old and lived in 4 homes so far.
It’s amazing and holds china, silver and crystal beautifully – selling it was not an option.
But in my dining room makeover and the French Country design the dark stain felt too heavy.
If you’d like to see my dining room makeover from the start CLICK HERE.
In the past when painting furniture and even over stained furniture, I usually started with primer and then cabinet & furniture enamel.
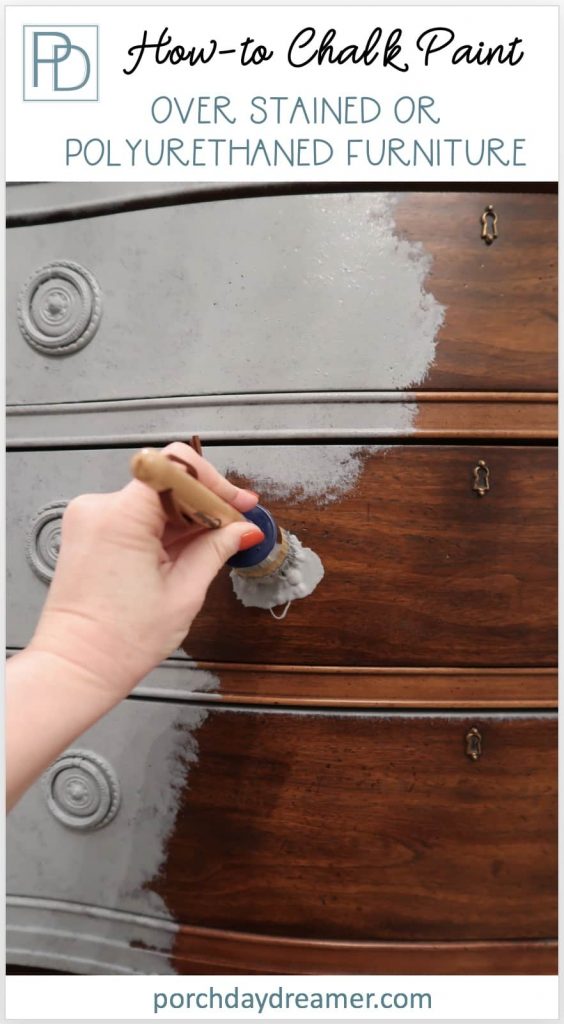
For this furniture painting project I wanted to try something new that I hadn’t used before – Chalk Paint. I’ll test it out for both of us!
One of my friends actually launched Chalky Finish Paint at Valspar (this has now been replaced by Krylon Chalky Finish Paint).
Luckily, she talked me through what brush to use and how to apply.
It basically it came down to “slap that stuff on” ha, ha. This was very foreign to me, after trying to avoid brush marks during every other paint project!
The one draw back to chalk paint is that you HAVE to apply a protective layer – either a wax or polyurethane (notice the can says Step 1).
Waxing scared me and wax needs to be reapplied, so that was off the table.
Pin It for Later!
Fortunately for me, another friend who works for Valspar was in Lowe’s the day I bought the chalk paint!
I proceeded to ask him LOTS of questions 🙂
He recommended top coating with a matte polyurethane – what they make that? YES! I’m in…
What is especially unique about the Krylon Chalky Finish Paint is it can be tinted into ANY color from their rack or one you want to match.
Annie Sloan doesn’t have that option and one of the primary reasons I chose the Krylon brand.
Post contains hand selected products, with some affiliate marketing links {full disclosure here}
How I Transformed My Stained Credenza with Chalk Paint
I’m not going to lie I was VERY nervous the night I decided to cover over my beautiful credenza.
I may have even teared up, but I KNEW the look I wanted and chalk paint was the answer.
Paint Supplies
- Painter’s Plastic
- Frog Tape
- Valspar Bonding Primer
- Valspar Chalky Finish Paint in pictures, but use Krylon Chalky Finish Paint tinted to Sherwin Williams, Cadet 9143
- Annie Sloan Brush
- Craft Brush
- Flexible 220 Grit Sandpaper
- Matte Polyurethane
As a preparation step, I attached a couple of swatches of the color I was considering and watched it throughout the day.
It’s a simple trick that helps a ton! The accent color of the credenza was just about the same color, so I knew I chosen the right option.
Base Chalk Paint Color Used
In my original tutorial I used Valspar, Sharkfin 4007-2A. However, it was DISCONTINUED when Sherwin Williams acquired Valspar.
I found a PERFECT MATCH! Replace with Sherwin Williams, Cadet 9143 (buy peel and stick sample)
Remember: matte paint will look lighter than the sample.
The paint color was really the crucial decision and you’ll see that it was the perfect choice to highlight the beautiful details, stay in keeping with the french country vibe, and become a statement piece in the dining room!
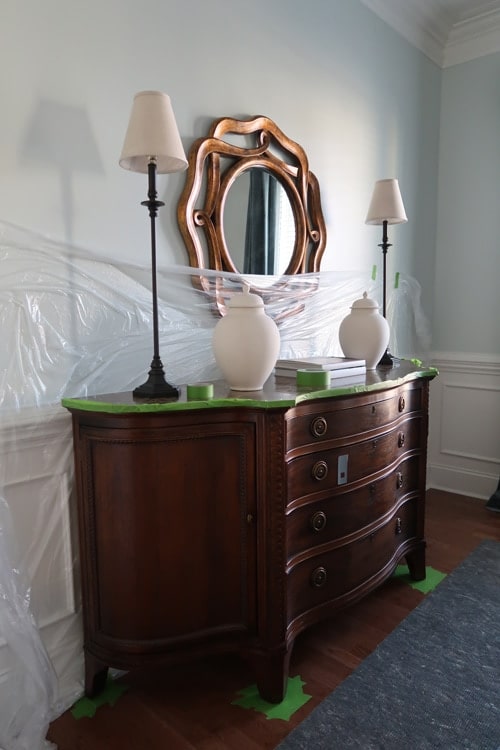
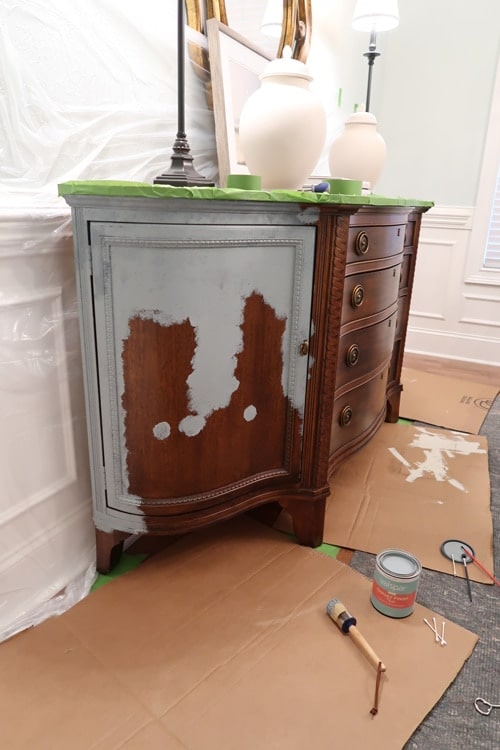
Step 1 – Prep the Area Before Applying Chalk Paint
Prep the area: floor and walls. Tape painter’s plastic up the adjacent wall, tape around the feet at the floor, and I also taped off the marble top.
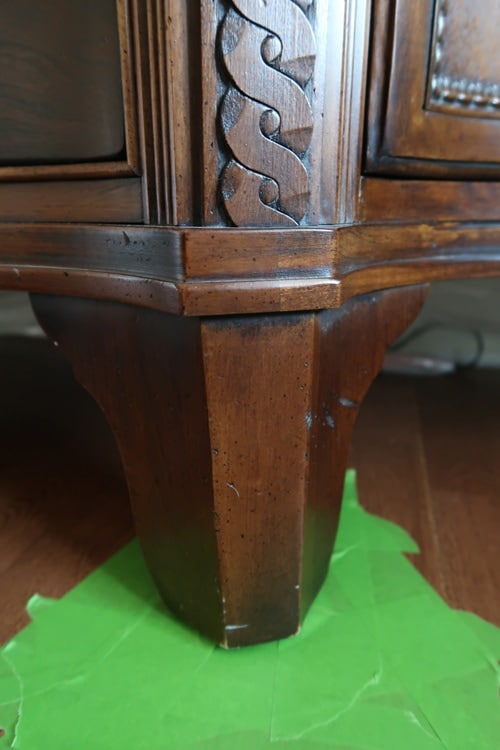
Obviously, this is a large piece that I wasn’t going to move to paint :).
Shown later: lay drop cloths or cardboard to protect the floor.
Step 2 – Clean the Furniture Surface
Clean and dust thoroughly! You want the cleanest surface possible, so the paint adheres.
Frankly, I don’t use a special cleaner just some Windex and a microfiber cloth.
Step 3 – Test For Chalk Paint Bleed Through
Test an inconspicuous area FIRST. You want to make sure the stain doesn’t bleed through!
Wait 8 hours for the test to dry. If you have bleed through?
You must prime first with Bonding or Stain Blocking Primer.
Luckily I didn’t have issues with this piece.
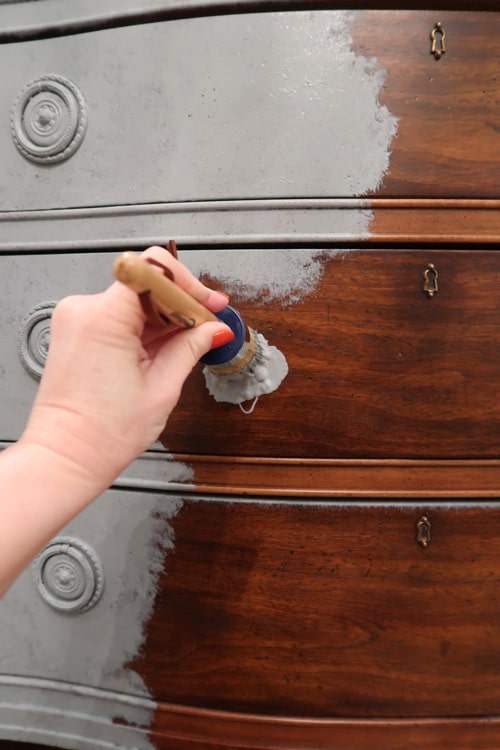
Step 4 – Chalk Paint Over the Stain and Polyurethane
No bleed through, then get painting!
If it’s an older piece from the 60’s or 70’s, you should apply one coat of Bonding Primer as a safety net to avoid issues.
The Annie Sloan brush is not like a typical paint brush, so please follow her instructions on the package and “prime” it before using.
Also, hanging the brush to dry after cleaning it is really important.
I literally “pounced” on the paint which pushed it into the details in the wood and carved areas.
The motion is more like tapping than brushing.
It was easy and FAST. The first coat took maybe an hour!
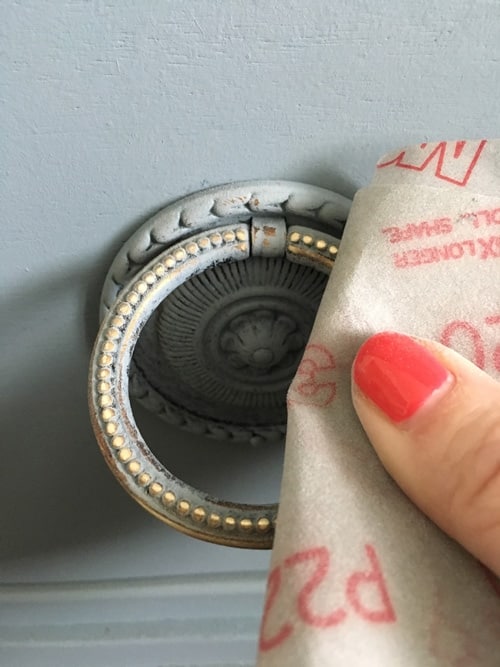
Originally, I didn’t plan to paint the hardware.
Unfortunately, his hardware wasn’t removable so I painted over it but sanded the paint off – below.
You can see NO brush marks and I wasn’t being careful 🙂
Step 5 – Let Chalk Paint Dry and Re-Coat
Let dry at least overnight and apply 2nd coat!
One Coat
Two Coats

Step 6 – Sand Chalk Paint off of Hardware
Sand off chalk paint from hardware using the 220 Grit Flexible Sand Paper.
I LOVE this stuff because you can wrap it around your finger to get into small areas.
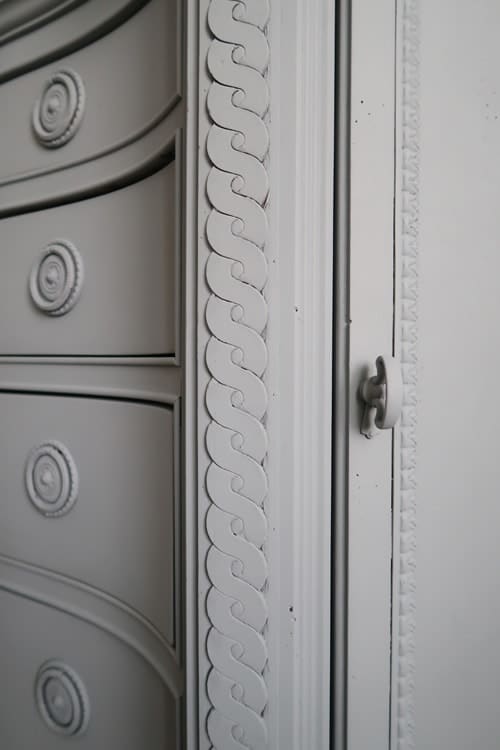
You can see the beautiful gold come through, with an antique effect where the paint remained in the crevices.
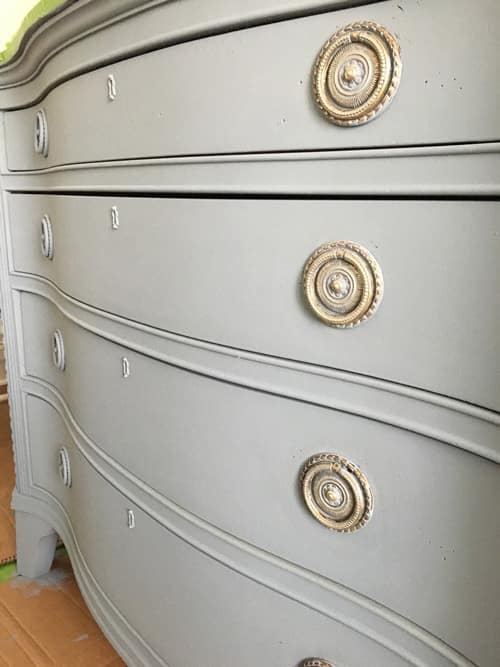
I was pleasantly surprised by the new gold, which was previously more of an antiqued gold.
This gold looks more like a gold leaf and softer!
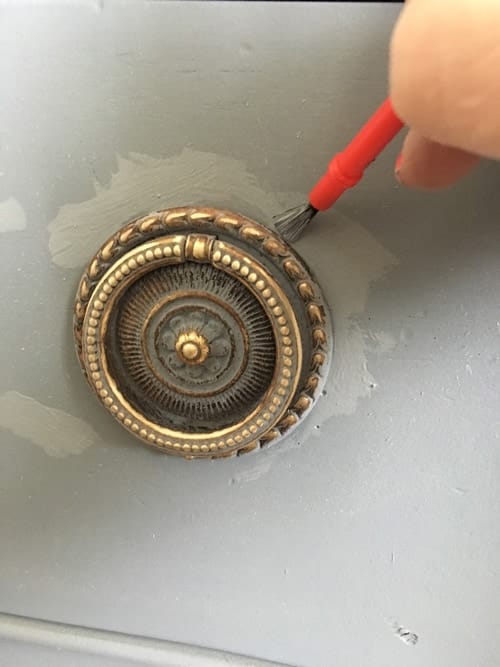
Step 6 – Touch Up Areas of Chalk Paint
It was IMPOSSIBLE to not remove the paint from around the hardware, so you will have to touch up.
Make sure to wipe off any sanding dust first.
Using a little craft brush, I touched up around each piece of hardware and looked for any other small areas to touch up.
Don’t worry it will dry the same color and blend right into the original paint!
Step 7 – Polyurethane or Wax Over Chalk Paint (or skip to OPTIONAL color washing)
You may want to use a wax and if so, please follow the manufacturer’s instructions.
I chose to use a Polyurethane, so this piece can be easily painted over later in life.
When to Polyurethane Painted Furniture
Dry for 7 DAYS, before applying Matte Polyurethane.
You want the chalk paint to be CURED, before applying the protective coat.
This will ensure the chalk paint is completely adhered to the surface.
- Apply with a high quality brush in a very thin coat. Allow to dry overnight.
- Lightly sand with the 220 grit sandpaper over areas that feel rough to the touch
- Apply 2nd coat of polyurethane. Allow to dry overnight.
- Sand any areas that feel rough and you’re done!
Sorry, I didn’t photograph this stage!
OPTIONAL STEP: Color Wash Over Chalk Paint
Because this piece has so much detail and I wanted to add a little dimension I decided to add a color wash.
I chose to wash it in a blend of light cream and light gray, to lighten the overall look.
Dark gray or brown could have also been used, for a totally different antique effect.
How-to Make a Paint Color Wash
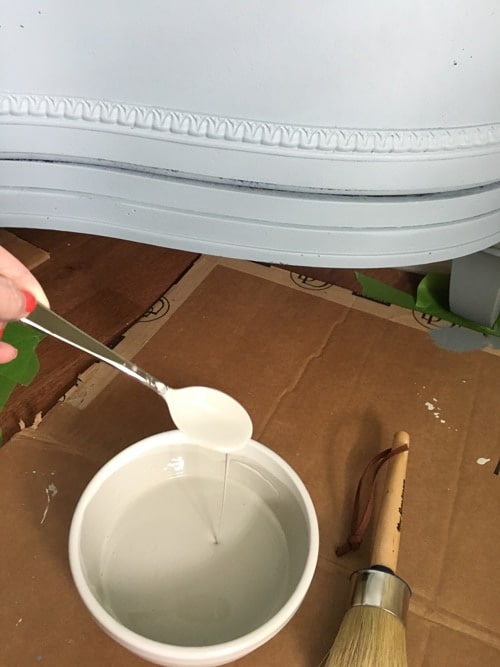
Old paint samples were laying around my house and I mixed them together to get the color I wanted.
Then I added 50% water to make the color wash. Simple!
The wash should be thin and run fast off of your spoon (this is plastic spoon and I’d recommend one!).
The little dark spots you see in the photographs are where the credenza is distressed.
Tip: Don’t get a manicure before applying a color wash because it will ruin it or wear gloves 🙂
Step 1 – Apply Color Wash Over Chalk Paint
Starting in an inconspicuous area (like the back of the door), so you can adjust your technique, apply color wash with the Annie Sloan brush.
You can see I was aggressive in my application!
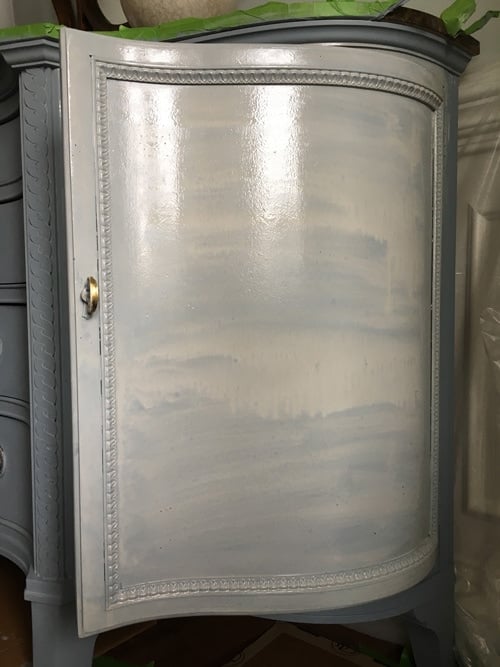
You must work FAST because the wash is so runny and you don’t want it to dry.
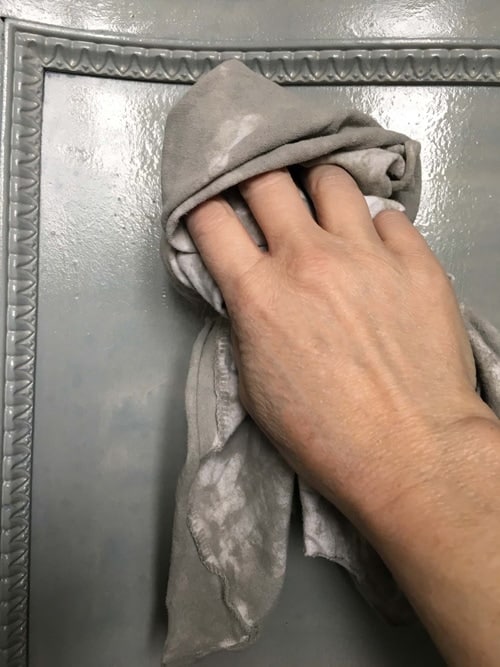
Step 2 – Work In Color Wash
Cut up an old T-Shirt to wipe the color wash.
Important: Don’t use paper towels or anything that may be too rough or leave lint!
Wipe down gently to remove excess color and push the wash into the crevices and carved areas.
I added extra wash to the carved segments, in a second application.
The wash will come off WITHOUT A LOT OF PRESSURE – you don’t want to remove the chalk paint underneath.
I used the same T-Shirt for the whole project and just kept using new areas.
I ended up moving left to right and finished late in the day – sorry for the dark final image.
That’s it! Complete with color wash!
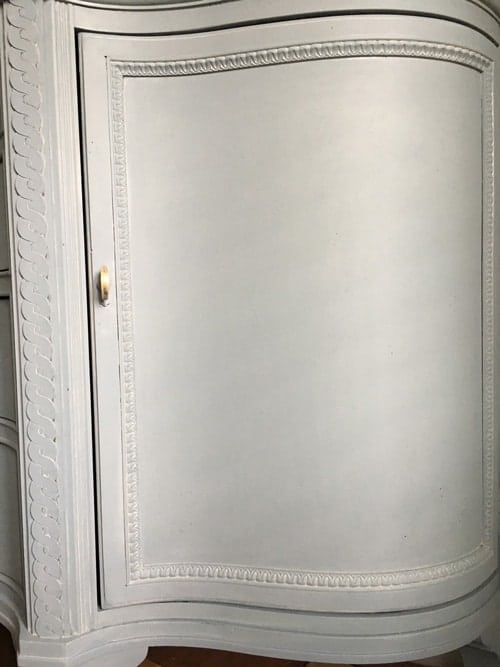
You can see it is a very subtle color change that adds highlights.
The lighter wash gives it a very dusty feel of an old world piece.
It tricks the eye into seeing the recessed areas, but without making the original paint color darker.
GO BACK to the Polyurethane Step for FULL Protection
The Final Credenza Transformed
What a difference a little paint can make. The credenza has a whole new look and feels lighter.
It was the perfect complement to the dining room makeover and is a true show stopper.
The chalk painted credenza is the first thing people gravitate toward when they enter my home!
Shop the Look

I hope you feel inspired to tackle a piece of furniture and transform it with chalk paint!
NEW POST: The Best Way to Test a Paint Color Before Painting Furniture
My Favorite Furniture Paint
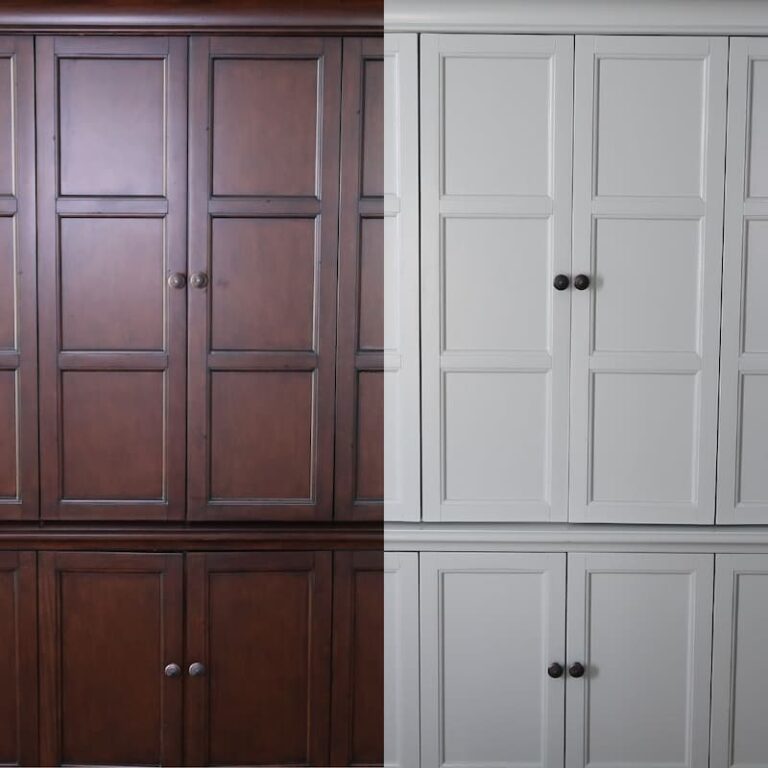
Are you surprised to hear that chalk paint is not my favorite furniture paint?
Before you paint your furniture, please read this post about a furniture paint that requires NO TOPCOAT.
In fact, almost ALL of my paint projects have been completed with my favorite furniture paint.
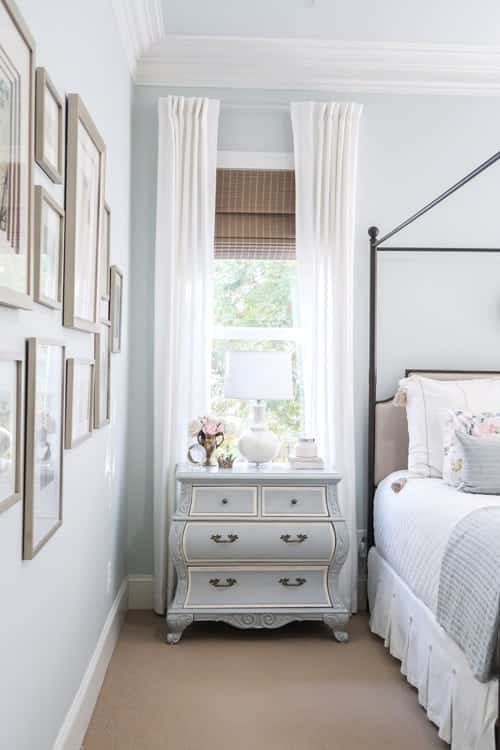
Here is another beautiful blue paint makeover of my nightstands! French Blue Paint Nightstand Makeover
If you’d like to see more of my home and learn about the different paint colors I’ve used, please head to this HOME TOUR.
Or if you want to see some amazing room transformations, read my Before & After Home Tour to see what is possible.
Good luck on your next painting adventure!
Here are more how-to paint posts!


Please consider following me on Pinterest and Instagram for daily inspiration.
Until next time…
Porch Daydreamer
Tracey
I started mine, thank you for the step by step . Just got them all painted now wait for a few days before the Polyurethane
Great! Hope you love it.
I’ve been scrolling through the comments desperately seeking information about this buffet/credenza piece and haven’t seen any info. Any way I can find out where you purchased this original piece of furniture?
Thanks! It’s simply beautiful!
Hi Pat, I purchase it over 25 years ago at a furniture store in NC. The manufacturer is Century. It’s no longer available. I’d recommend trying to find something similar 2nd hand.
“Only one paint product gives a matte finish and that is chalk paint”
This is so untrue. Have you never looked in any paint store or big box store at the paint selection? Flat paint. It is in all of those stores.
No overpriced “chalk paint” necessary.
Hi, Sue. I painted this furniture and wrote this in 2017. At the time Chalk paint was my only option for a true matte finish. People continue to choose chalk paint for its ease of use and “one step” coverage. It’s still a great option and I am happy to report in 2023 my furniture still looks amazing. If I were to paint it again, I would use Valspar Cabinet and Furniture Enamel in Satin which mimics the same finish but adds durability. I find the flat and matte paints to be too rough and they are not cleanable like a satin. Just used the satin VCFE for cabinets in this bathroom makeover and it looks like chalk paint, but I’ve been able to clean off make up from it easily without damaging the finish. Thanks for letting me know I need to change that one line.
Hi! I love your blog! This article has been very helpful. I was going to go straight to chalk paint (which I’ve used before) but I’m about to paint a big wall piece (china cabinet/hutch) and frost the windows to use for pantry space. I can’t wait to see it finished; it has such unique “bones” and lines in it. But it’s big so removing a top coat would be ideal. I’m excited about the cabinet enamel option! One question! I read that you recommend a primer. The wood I’m painting over is a lighter oak color and I’m covering with a navy (something close to SW “Naval”) and I want to distress it in parts with sand paper. If I’m ok with a little bit of a distressed look and some wood showing through, and also being that I’m going from light to dark; do you think it would be ok to skip the primer?
Hey, Jessica! Sorry for the late response. Apply some paint to see if you get any bleed through first. I’d really read my whole post linked about chalk paint bleed through. Primer will make is harder to distress and since it a dark color you may be OK. I can’t know for sure 🙂
I just finished painting my wall unit with Rustoleum chalk paint in a cream color. I want to glaze the wood grooves and details in a brown glaze/wax. Do I apply the final clear topcoat to the entire unit, even over the brown areas, at the very end? This is my first chalk paint project and it’s a very large piece.
And what is the easiest topcoat to use to apply to a large area? I see you mentioned a matte polyurethane…..
Thanks!
Hey, Jodi! If you are using a brown wax then you wouldn’t be able to add a polyurethane clear coat. If you are using a brown antique glaze, then yes you would want to use the matte polyurethane over all of that 🙂
Gorgeous! I can’t wait to do this to a piece I have that is a golden oak color currently. Thank you so much for this tutorial!
Andrea, I’m SO happy you found this helpful! Please make sure to check for bleed through first 🙂 You’ll know how to handle it if it happens. Enjoy transforming your furniture!
Wow! What a lovely job! I have two questions:
1) you only used round brush to pounce details, correct? What type brush did you use for the rest as I don’t see any brush marks?
2) why the wash? What does it do? And how do you not get a wet wash to not remove the chalk paint? I read what you said but am still flummoxed.
Thanks so much for your help!
Jo
Hey, Jo! Yes, I used the round brush to apply all of the chalk paint. The Valspar Chalky Paint is REALLY good and thick hiding any brush marks. The wash is to add dimension to the color. I felt it look to solid in color without it and wanted to highlight the carved details even more. It’s not necessary, but does ad something special! I let the chalk paint DRY completely and overnight, so it was adhered when I did the wash. It didn’t come off and I was gentle. Hope that make sense 🙂
Loved the finished product. I’ve painted and waxed several pieces using Annie Sloan products. And I just want to point out that the round brush you used is intended for her various waxes. It’s quite expensive to purchase. I’ve always just used a good regular paintbrush for the paint application and it works great. No need to buy the round brush unless you are waxing. Just wanted you and readers know you can save money this way.
Nanci, thank you! I enjoyed using the round brush and it’s high quality, so not regrets on the purchase. It was useful for “pouncing” the Valspar Chalky paint (I didn’t use Annie Sloan product) into grooves and textured area versus a regular brush. I felt I had more control of the product that way.
I just finished painting a pieces with the Rustoleum chalk paint, I sealed it with the rustoleum chalk matte sealant. I used your painting technique and it looked exactly like I wanted it. However when I applied the sealant, it’s drying all streaky with white. I’m super sad because it’s the second time I painted and sealed it because of the white streaks. Any help would be appreciated.
I’m sorry that happened. I’ve never used the Rustoleum chalk paint, so I don’t have any experience with it or how it may react to top coating it. The only time I’ve seen water based polyurethane streak is when it is first applied, but then it dries clear. If you over applied, maybe it’s taking a long time to dry?
Did you sand between polyurethane coats? You can lightly sand with 220 fine grit sand paper to see if that improves the look? Hopefully, that works!
My heart doesn’t breaks over a bit of painted wood. I crave a mix of finishes and I am willing to paint anything I own. On the other hand I rarely admire DIY chalk painted pieces on Pinterest either. I prefer spray lacquer or conversion varnish done by the manufacturer or a professional. So when I clicked on to your link I was prepared to be disappointed. Instead I was blown away by the transformation of your buffet which you took from okay handsome to drop dead gorgeous. That sublime blue finish has a subtle depth and dimension you usually see only in very high end pieces or in nature itself. Somehow even the proportions of the buffet improved. It went from bordering on bulky to practically floating. I haven’t seen such an impressive color transformation since Rachel Ashwell’s ” The Shabby Chic Home.” I find myself looking around my house looking for something I can paint that exact shade of blue with the same exact wash. You have talent and a real eye. You are a true artist. Please transform more items for us to admire.
Kathryn, WOW! What a beautifully written note that made my heart sing! Thank you for your kind words. They truly are appreciated 🙂
Was the paint that you used to color wash a specific type of paint or chalk paint as well? Thanks so much for such awesome inspo & tips 👏🏼
Thanks, Sandi! I THINK I mixed Valspar Notre Dame with a bit of Presidential white. It was a light gray and an off-white combo. They were just laying around and I grabbed them 🙂
Awesome thank u so much! So sounds like those are just regular interior paint samples? And not chalk paint samples?
Ty again for ur help ❣️
Exactly! The Valspar paint samples and they are usually around $5
Woohooo! That’s amazing. Haha! 🙌🏼 Thanks again!
While I do not agree with you painting over such beautifully (undamaged) stained wood, I must say your finished work looks fantastic and matches your decor nicely. This gave me ideas on painting a severely damaged (thrown out by someone with 2 legs broken off) table that I salvaged and was able to partially repair. Rather than having to replace either broken off leg I had reversed the two legs, after cutting to match on the undamaged side and reattached the damaged legs, and got it functional again. However even with the broken legs happening to be in the back of the table, and mostly hidden when it is against the wall, the damage is still there and visible at certain angles. With your advice I can finish repairing the table by use wood putty to fill in the missing parts of the wood, after sanding it to match. Then, using this page as a guide, paint the entire table making a new looking table out of a damaged one. Glad you came out with this guide, thanks you for presenting it.
Mike, it’s great to hear you salvaged a piece of furniture and gave it new life! Good luck with painting.
Hi love your post the finish is amazing! What a transformation.
I have just started on a small vanity unit and wall cabinet in my WC.
I have used grey chalkpaint but looking to wash with a darker possibly navy coat. I noticed that you did the wash after the varnish would it be ok to wash over it before the varnish? Or is that a no no?
Thanks for any advice you can give
Yvonne
Hey, Yvonne! I did the wash BEFORE top coating with a polyurethane. The way I wrote the instructions was to provide people the option to paint and stop, then top coat OR paint, wash, then top coat. So I am glad you asked the question 🙂 You definitely need to do the wash before any top clear coat. Good luck and happy painting!
WOW! That is exactly what I’d like to do to my china buffet and another buffet. Fixing to build a farmhouse- like home . This is just so beautiful.
Jane, Thank you! It’s my favorite piece of furniture and I love the new color too! It’s held up beautifully too. Good luck!
I love this! So glad you had the courage to make it your own – and share it! Can you give me the reference info. for the blue you used? It’s beautiful!
Thank you! The post has a swatch of the paint color and the name plus the custom wash I applied to get the final look.
Hi! I love this so much! I went to my local Lowe’s to get this color and was told the Valspar Chalky Finish Paint only comes on 40 colors. They said the color swatch you referenced in your article only comes in the Valspar Furniture Paint. I’m so sad!
Stacey, that is a shame! When Sherwin Williams bought Valspar, they changed the formulas and tints. I just had the Chalky Paint tinted in April of 2018, so not that long ago. It was my favorite part of recommending the paint. I’ll go to my main paint person / colorist at Lowe’s and find out if there is a work around. Unless they changed the tint base, it should be tintable into more than 40 colors. SORRY!
I’m late to the party, but I had my Valspar Chalky paint tinted in a SW color. It might be possible that it can be tinted in other brands’ colors, too. Just a thought.
Yes! I use colors from other manufacturers too. Here is a good post for others who may not know you can color match: https://porchdaydreamer.com/kitchen-cabinets-chipped-baseboards-peeling/
Tracey, I have a wood tv stand, in a cranberry stain, with polyurethane over it. Do I have to sand it or can I just chalk paint over it?
There are several of my posts that will help you:
https://porchdaydreamer.com/dont-sand-before-painting/
https://porchdaydreamer.com/stop-chalk-paint-bleed-through/
https://porchdaydreamer.com/when-bonding-primer-is-a-must-before-painting/
I’m concerned most about bleed through, so I’d recommend a bonding primer before painting with any type of paint. This is my preferred furniture paint:https://porchdaydreamer.com/valspar-cabinet-furniture-enamel-review/
Beautiful piece.
Thank you!
I am a huge fan of your gorgeous work and directions. Thank you!!
I was so inspired with your Pottery Barn dining table that I am trying the look on an old smaller. After trying to find the softening brush at several paint stores without any luck, I clicked the Amazon link on your directions and ordered it. Just arrived and I am excited to try it on the last coat. It is unlike any paint brush I have ever used – such long and ultra soft bristles 👍. I need advice and you seem to be the best possible person for advice. I am thinking of painting my LARGE oak entertainment center which has a coat of polyurethane or something because I love the piece, but oak seems to be less popular these days. Thinking of Pottery Barn type paint look in light gray/white. Would this be a huge mistake, or would you agree? I can send a pic. If you need to see it to advise. Thank you again on behalf of another “do it yourself” creative souls!
Wow! Thank you for saying such nice things and I am glad you like the softening brush. It’s a special tool to have for sure – there is nothing like it! Honestly, to paint a piece is a very personal decision. I NEVER thought I would paint my credenza in this tutorial, but am so happy I did. It’s all about personal preference and know you are asking someone who paints just about everything to make it over 🙂 Here is a post I wrote about making that decision: https://porchdaydreamer.com/to-paint-or-not-to-paint/.
If you are tired of the finish of the entertainment center, painting it will bring it new life. Know that the pattern of the oak grain will show through but could look very nice with the paint finish – a whole extra texture for dimension. Make sure to PRIME first with Valspar Bonding Primer. You will see it mentioned throughout my painting tutorials. It’s a life saver and makes it so you don’t have to sand off the polyurethane!
I’ve been staring at my LARGE espresso stained entertainment center wondering the same thing 🙂 We shall see and I’ll share if I do paint it of course. GOOD LUCK!
Thank you so much for your speedy and helpful reply. Based on my desire to create new looks, and have had this piece for over 35 years, I am going to paint it!!! . Bought the primer today and checked out the Valspar Chalklike paint. The display showed only (I think) 37 possible colors. The employee was not one who liked to answer questions, so I will try another Lowes tomorrow in hopes of finding that I can choose my colors. I will take “before” and “after” pics and share them with you when done…unless I create something ghastly 😉
Wow! You are on it! Just pick a paint chip off of the Valspar rack you like. Tell the person at the paint desk you want it tinted into Valspar Chalky Paint. They will find the paint base color for you, after they scan the paint chip. Hope that helps!
I’ve read to ALWAYS sand before painting – even when using chalk paint – because the paint will adhere better and not chip off. Have u not had that problem?
Heather, such a coincidence that I have a draft post all about sanding vs. priming. All I can say is in 98% of circumstances you don’t have to sand, if you use the correct primer. I’ll give lots of examples of things I’ve painted and have had no issues 😉 This is over 20 years!
Would this work on laminate or mdf?
Yes, to be on the safe side since both materials have a glossy surface you may want to scuff up the surface with sand paper before applying the primer. Just make sure to remove any sanding dust first 🙂
Would the directions be the same for a painted piece of furniture? I am refinishing an old buffet and was glad to find your chalk paint directions. Also I am stripping the top, do you have any recommendations about what to finish it with? I loved your credenza and I don’t like blue but yours was beautiful. Glad to find your blog.
Doris, glad you found my blog too 🙂 So much of this “depends”. Is the paint finish “glossy” if it is I’d either prime it with bonding primer or lightly sand it to de-gloss it. If it is more of a satin finish, you should be able to go over the top with the chalk paint without issue. Then for the top (assuming you don’t want to paint), Minwax stains are very forgiving and come in small sizes. Then cover the stained top with a water-based acrylic because they don’t yellow. I use Minwax Poly-Acrylic for that and usually 2 coats and 3 if it’s going to be heavily used. Hope it helps!
What a beautiful makeover. You have definitely breathed new life into this piece! Thanks for the tips you provided in the post.
Thank you so much and I am glad you enjoyed the post!
Can you clarify something for me? I’m looking to do something similar on wooden beams in my home. Did you poly then do the color wash, or color wash then poly?
Let’s see. I think you mean chalk paint, then color wash, and then poly. Same order as my credenza. Hope that helps and doing beams sounds cool!
This is just lovely! I hope to do my dining room table and chairs and love this technique, we’ll see, wish me luck. You’re directions are great.
Wonderful! I just love chalk paint now and glad you found the instructions helpful 😁
I love this!! I have chalk painted several antique pieces about 4 yes ago. ( I gave some of them away to a sweet couple who were getting married, and some to a friend who loved them the moment she saw them)
You gave me inspiration to do some more! I love your instructions the best!
Rose, my whole mission in life is to be helpful and inspire others! I’m SO happy I was able to do both. Share what you do!
This is just beautiful! Great instructions.
Thanks, Kathryn! Glad they help 🙂 That’s my goal.
I love this!
I’m so glad you do! It’s the prettiest piece of furniture in my home 🙂
When you did the wash with the Annie Sloan brush did u use the same pouncing technique or regular painting technique.. it’s hard to tell in the photo. I love your work.
Thank you! I just brushed back and forth from the top to the bottom of an area. Then pounced it into the detailed carvings. Hope that helps!
I cant wait to try this! Curious if you can use a spray poly to seal the finished paint.
Good luck! Yes you sure can, but I’d only spray if you can do it in a well ventilated area. When painting or staining smaller pieces in the garage, I’ve sprayed on poly 🙂 Just lightly sand between coats with 220 grit sand paper regardless of how you apply.