REVIEW: New Formula Valspar Cabinet and Furniture Enamel

Valspar Cabinet and Furniture Enamel is the paint I recommend the MOST! Here is my review plus extra tips and application tricks for the best finish possible.
Valspar Cabinet and Furniture Enamel is the paint I am most passionate about! It’s not only great for cabinets but furniture too.
After using it to paint 10+ projects in my home, along with Porch Daydreamer fan reviews it’s a paint you need to know about.
You’ve come to the right place to learn all about Valspar Cabinet and Furniture Enamel because I have in depth knowledge of the paint technology and how to apply it the right way!
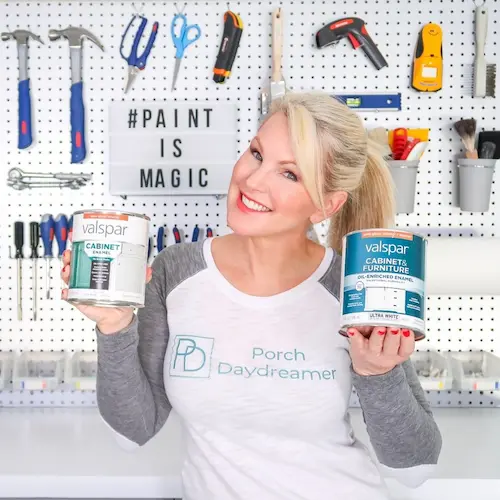
I worked for Valspar for over 5 years and helped launch the product in Lowe’s Home Improvement stores training the paint store staff.
Self proclaimed paint nerd over here! You may have noticed that there is a new label and may be wondering if it’s the same formula?
Do I still think it’s a great paint to use? After using the NEW Valspar Cabinet and Furniture paint on a recent project, here’s my honest review.
But FIRST I’m going to tell you all of the reasons I loved the original formula. ALSO READ: Best Furniture Paint for Every Project: Pros, Cons and Tips
Contains hand selected products, with affiliate marketing links where I may make a small commission if a purchase is made. {full disclosure here}
Top 10 reasons I LOVE Valspar Cabinet and Furniture Paint
Honesty, it was hard to stop at just 10! So I honed in on the most important features.
After painting cabinets and furniture both plus applying glazes over the top, I have a lot of experience with how it performs.
Buy Valspar Cabinet and Furniture Enamel
There are so many reasons I love this paint, but here are the key reasons:
- NO TOP COAT NEEDED!
- This is a paint technology that acts like an oil and cures to a hard tough finish
- Water based, which means soap and water clean up
- Low odor, low VOC (volatile organic compounds/gasses)
- Available in almost all of Valspar’s paint colors (2,000+) plus custom tintable into other manufacturer’s colors
- Flows and levels beautifully, which means virtually no brush marks!
- Dries to a durable scratch and scuff resistant finish
- Non-yellowing like the old oil paints
- Can be sprayed or hand applied for a smooth finish
- Easy to touch up when needed
Number 1 and 10 go hand in hand.
If you just used a semi-gloss paint for your cabinets or furniture, I would always recommend a top coat of a water based polyurethane.
Since a top coat isn’t required with Valspar Cabinet and Furniture Paint, you can easily touch up any scuffs or chips if they occur.
Just sand and reapply where needed.
If you had the same issue with semi-gloss latex paint and a top coat, it gets WAY more complicated having to sand, reapply and hope you match the top coat.
Forget about it if you have a chalk paint with wax over it!
Valspar Cabinet and Furniture Enamel Paint Technology
This really is a new paint technology called an alkyd oil.
What that means in plain terms is there is a molecule of oil trapped inside the latex paint.
So once the paint dries and cures, it ends up being as tough as an oil based paint without the yellowing or environmental concerns.
Plus it has a very mild smell compared to the old oil paints. Cool!
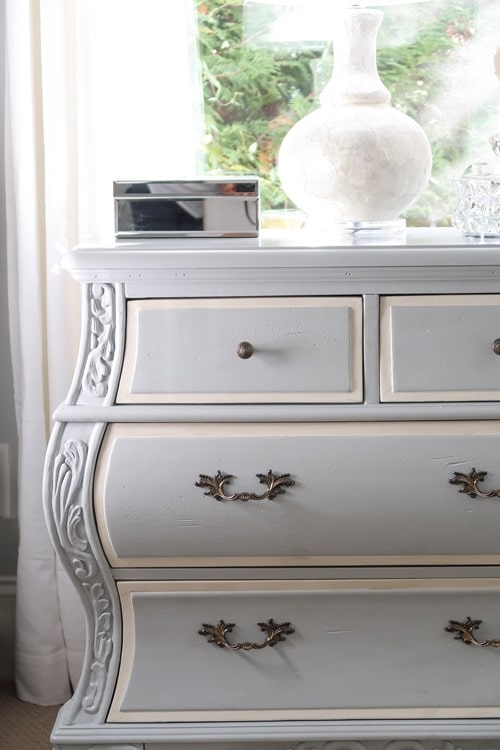
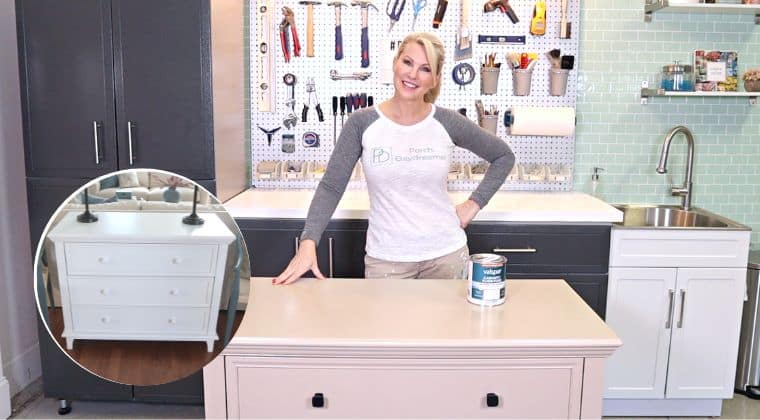
Here is my nightstand which has been painted with Valspar Cabinet and Furniture Enamel.
I’ve never had any chipping or scuffing on the horizontal surface, where a lamp and knick knacks are placed.
At night, I’ll leave a glass of water on my nightstand have never gotten a ring or watermark.
The furniture has distressing and the enamel creates a finish that highlights and doesn’t mask the distressing.
Want to see more of my furniture painting projects? Click Here
Shop My Favorite Paint Supplies!
- Wagner Paint Sprayer
- Spray Tent
- Cordless Sander
- Foam Roller
- Nylon/Polyester Brush
- Paint Tray
- Paint Tray Liners
- Painter’s Plastic
- Painter’s Tape
- Drop Cloth
- Valspar Bonding Primer
- Valspar Cabinet and Furniture Enamel
Is the NEW FORMULA as good as the OLD?
Please watch the video for the FULL review of this product.
So you want to know is it just a label change or did the formula change too?
If it’s a label change, then I like to call that “same girl, different” dress or is it a completely transformed formula?
What is really weird, since I KNOW this product SO WELL is that the minute I opened the can I SMELLED the difference.
Yep folks, the paint smelled totally different and that told with without a shadow of a doubt that it is a NEW FORMULA – not just a label change.
When the smell was different it alerted me to the fact that they are using a NEW RESIN package, so was it going to perform the same?
The first thing I did is turn around and look at the instructions to see if they were different too and they ARE!
I put the paint through a couple of REAL WORLD tests painting an exterior bench and a dresser.
What is different about the new formula versus the original?
- The resin in the oil-hybrid formula is DIFFERENT from the original and it smells different.
- Recoat time is CUT IN HALF! It is now only 4 hours not 8 which is a huge PLUS.
- There are MORE SHEENS: Satin, Semi-Gloss and now FLAT.
- Semi-Gloss Sheen is SLIGHTLY higher versus the original formula. Satin Sheen finish feels like CHALK PAINT. It’s rough and not smooth. If you want a cleanable finish, go with semi-gloss.
- It’s EXTERIOR RATED the last formula was too, but now it’s obvious on the label.
The good news is the PERFORMANCE of the new formula of Valspar Cabinet and Furniture Enamel is the SAME!
Applying it felt the same and it even seemed a tiny bit thicker, which is GREAT to prevent drips.
My vote: The new formula is still my FAVORITE Cabinet and Furniture paint!
My favorite part is the ability to recoat in as little as 4 hours, which will speed up your projects.
The original formula recoat time was 8 hours, so this is a HUGE improvement.
When the paint coating fully cured after 7 days, its dried to the same hard finish that I expect.
Applying Valspar Cabinet and Furniture Enamel
Let’s talk about applying this enamel, which is DIFFERENT than applying a regular latex paint.
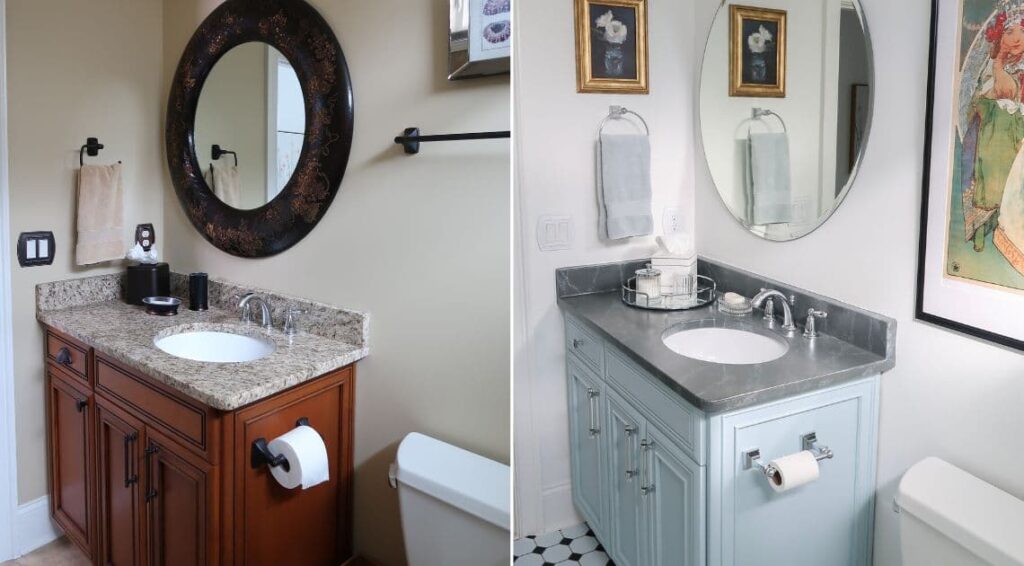
If you are painting cabinets, please always use a semi-gloss sheen for durability.
Also, semi-gloss sheens are smoother so you can wipe them clean which is really important on cabinets.
A satin sheen would be nice for a piece of furniture, if you want less of a shiny finish.
Just know a satin sheen won’t look as smooth as a semi-gloss.
Before Painting
- If the surface has any chipping or peeling paint or polyurethane, sand smooth and clean all sanding dust. Tack cloth is a great option to remove sanding dust.
- No surface blemishes? Then clean with a degreaser like Krud Kutter Pre-Paint Cleaner.
- Once clean, you can paint within 10 minutes after using Krud Kutter.
Most of the Time a Primer Is Needed with Valspar Cabinet & Furniture Enamel
- Despite what the label says I always prime with a Bonding Primer for the best adhesion and most durable results.
- It’s critical to apply a primer if you are painting over a STAIN, so you don’t experience brown streaking or bleed through.
- If you are painting over a regular semi-gloss paint, then you can clean and head straight to paint.
If you don’t know what bleed through is, please read: My Solution to Stop Chalk Paint Bleed Through
It can happen with ANY water based paint over a stain…not just chalk paint.
Hand Painting oil-Hybrid paints
If you are painting cabinets, even if you are spraying the drawers and doors, you will still have to hand apply the paint to the base cabinets.
99% of the time, when the finish isn’t smooth, it is a result of the applicator and the person applying 🙂
Part of my job at Valspar was working with customer complaints that ended up with our lawyers.
I can tell you, after we lab tested products that “supposedly failed”, the product was fine.
It was the person that didn’t read or follow the instructions, so I can’t emphasize enough to save yourself time and heartache FOLLOW THE INSTRUCTIONS!
Tips when hand applying:
Use only these applicators: FOAM ROLLER and NYLON/POLYESTER BRUSH
Any other applicators will leave brush marks and an orange peel finish.
If you are digging into your stash of paint supplies and think nah, I’ll use my regular nap rollers laying around…YOU WILL REGRET IT!
Nap rollers will OVER APPLY the enamel and pull up the paint as you roll not giving you the smoothest finish.
Why is over applying an issue? It will dry tacky or not fully dry…ever.
You heard me right and why do I know this? IT HAPPENED TO ME the first time I used it and didn’t follow the dry time instructions.
I over applied Valspar Cabinet Enamel and it was sticky in the most annoying way.
This is an enamel and not a regular latex paint that you use to paint the walls.
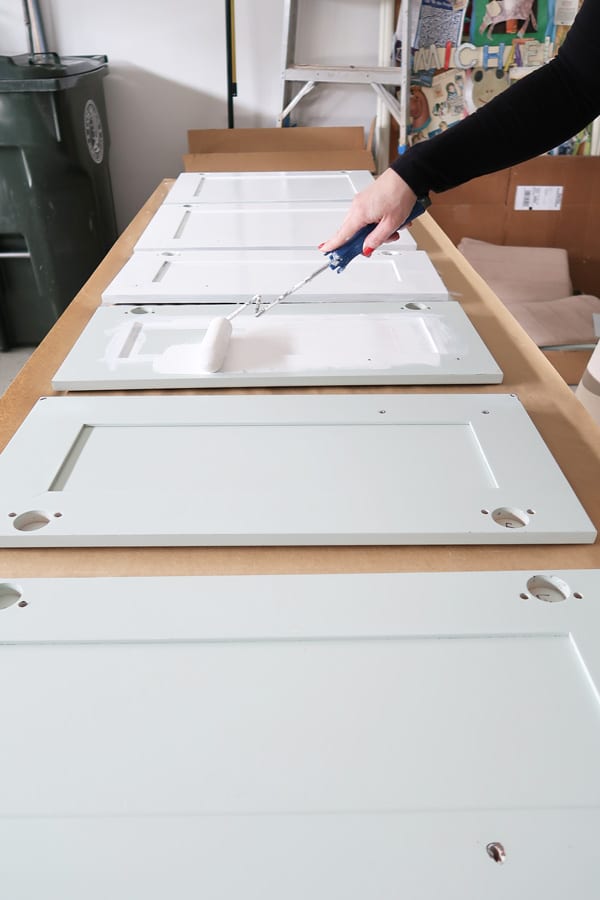
Applying Valspar Cabinet & Furniture Enamel with a Brush
- Start with brushing before rolling and keep a wet edge rolling immediately after brushing
- The consistency is thinner than a latex paint, so you must watch for drips because it can run if heavily applied.
- Don’t overwork the paint by brushing it to much, which will create brush marks.
- Avoid over applying. Apply in a thin layer and let dry 4 hours or more, before the 2nd coat.
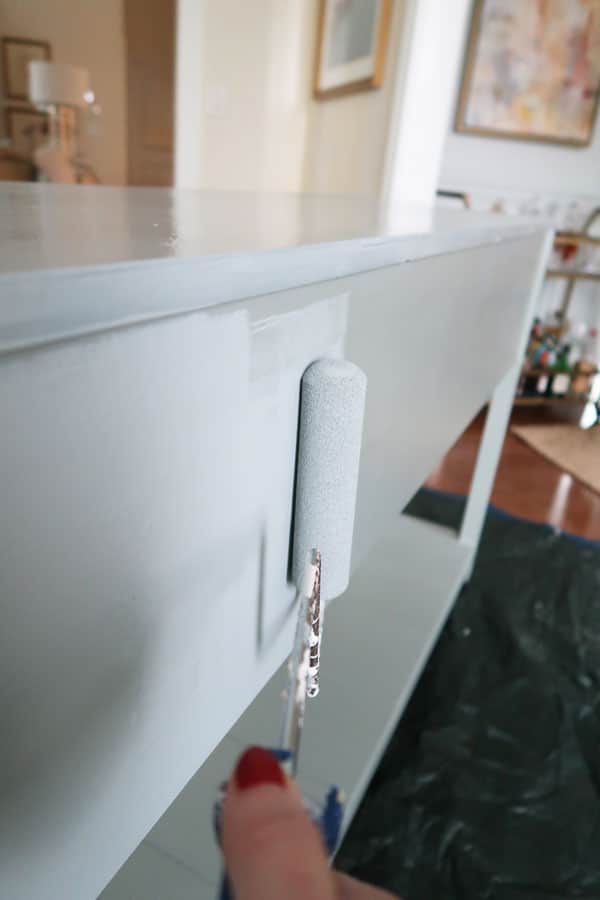
Applying Valspar Cabinet & Furniture Enamel with a Foam Roller
- Roll the largest expanses and in long consistent strokes follow the direction of the item, i.e. from top to bottom on a cabinet door and side to side on a drawer.
- Don’t overwork the paint by rolling it too much…the paint will start to come away from the surface.
- Avoid over applying. Apply in a thin layer and let dry 4 or more hours, before the 2nd coat.
SERIOUSLY, wait for each thin coat to dry because if you don’t the next coat may not stick properly.
It’s called “blocking” and then the paint will never fully dry.
TIP: If the paint is drying slowly or it’s humid outside, you can run a heated fan over the paint.
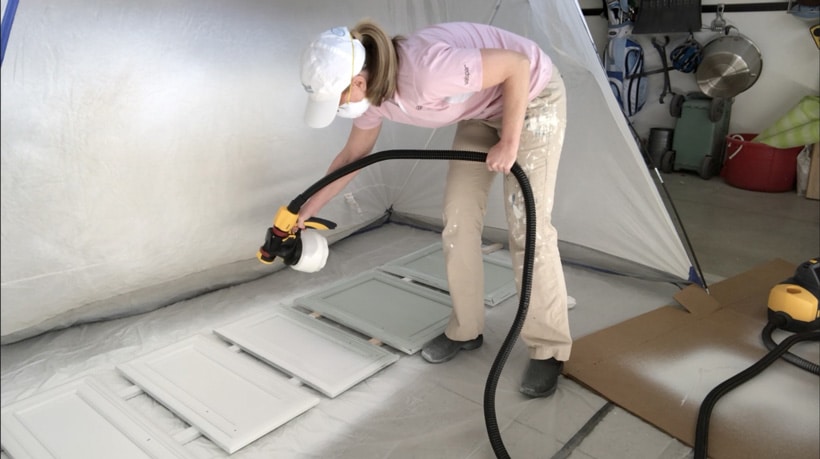
Spraying Valspar Cabinet & Furniture Enamel
If you feel confident enough to use an airless paint sprayer, I highly recommend it!
Spraying helps you apply the thinnest coat possible, so it’s the smoothest finish.
That is how I usually apply the enamel and learned how-to use a sprayer on my own.
Want to know if it is time to invest in a paint sprayer?
When It’s Time to Buy a Paint Sprayer
Each high pressure low volume paint sprayer is a little different, so follow the manufacturer’s recommended settings.
Here are a few general tips, when applying with a paint sprayer
- Fill the sprayer with water and practice spraying on a piece of cardboard to get accustomed to the output.
- When in doubt about settings, start will the lowest force to see how much paint comes out.
- ALWAYS test spray the paint on a piece of cardboard before moving to the object you are painting…sprayers can sputter.
- Wipe the spray tip with a damp paper towel to avoid paint drying and spraying onto your object.
Are you thoroughly convinced this is the BEST PAINT EVER?
I sure hope it becomes your go to paint…it is SO worth the price.
Valspar Cabinet & Furniture Paint Tutorials
- NO-SAND Method to Painting Kitchen Cabinets
- When to Polyurethane Painted Furniture
- How-to Paint Cabinets and Get a Smooth Finish
- Hand Painting or Spraying Cabinets: What is Better?
- Paint Sprayer Turned a Dreaded Project into the Best Ever!
- French Blue Paint Nightstand Makeover
- The Best Cabinet Paint You Need to Know About
- My Favorite Furniture Paint and Why
- 20 Cabinet Paint Color Combos for the Kitchen
- How-to Test a Paint Color Before Painting Furniture
It’s time to get painting and transform your cabinets or furniture into something special!
Check out my Paint Project Resource Guide for lots of helpful advice around paint and painting.
Please consider following me on Pinterest and Instagram for daily inspiration.
I’d appreciate you Pinning from this post to help me grow!
Until next time…
Porch Daydreamer
Tracey
Hello! I am painting a china cabinet with the Valspar Cabinet and Furniture paint. I’ve been trying to use my Wagner HVLP sprayer and the coverage is not as smooth as I was expecting. Can you tell me what level you used for the air and material settings? I practiced on cardboard first, but it’s a bit different when actually painting wood. Thanks!
Hi, Katie! Here a video tutorial with how to spray it. https://youtu.be/1h1kYU0SiYY
Thank you so much!
I fell in love with the Valspar paint about 5 years ago when I lived in Florida and had to paint my kitchen cabinets. Since that time I have moved and now live in South Carolina and need to paint my house. Would you recommend this enamel to paint the exterior of the house since it has wood siding? I just don’t want to have to repaint the house 3 years from now. What are your thoughts?
Hi! I’ve written a whole post on exterior paint and you can read it here with my recommendations. Use an exterior rated trim paint it will be more cost effective.
Love your article on this product. I am about to redo my kiddos bathroom cabinets and it is a high traffic area so I got a semi gloss. My current cabinets feel cheap not wood like so I assume they are laminate… Based on your post I plan to degrease with simple green and prime with your recommended primer. If I understand correctly though I do not need to do any sort of top coat? Also any other recommendations before I tackle this?
Hi, I don’t recommend simple green but instead a degreaser and de-glosser too. I’ve had my bathroom cabinets painted without a top coat and they’ve held up perfectly. I’ve only experienced one chip when I dropped my hair dryer on the very edge of my drawer. You can always go back and add a clear coat if you think they aren’t holding up well.
I apologize if you already answered this in the previous comments, but I’m wondering if you can use a water based glaze over this paint.
Absolutely! All of my driftwood and seadrift tutorials use a water based glaze over the top of this paint 🙂
Hello! I accidentally used satin finish for my cabinets before finding this helpful article! The finish is too chalky and I need to fix them. Can I apply semi-gloss directly over the satin paint? Thank you! 💚
You are correct! I address this in this cabinet painting post, where I advise if you aren’t happy with the sheen move up to semi-gloss!
hello. I’m sanding my kitchen cabinets. do you still suggest a primer all the time?
also I’m painting white (the whitest they have)
but I’m not sure of the sheen. my contractor Said for kitchen it should always be semi gloss but I seen people do satin. which one would you recommend for kitchen cabinets painting white (I understand semi gloss is shinner but it’s hard to imagine what my kitchen would look like semi gloss vs satin so I need people’s expert opinion
I answer a lot of these questions about painting cabinets in this post that should help!
Hi there!
I’ve left a comment on your blog before about this paint, and now I’m back again about the new formula. I truly LOVED the old formula, but I’m very disappointed in the new formula. I’ve been a painter for over 30 years, and like you I’ve painted lots of furniture with the old formula and have no regrets! I’ve always used the satin finish and it’s very durable, washable, and has a smooth finish. This new formula has a chalky-like feel and is very matte feeling. Washing it I’m sure will absolutely be a pain! It completely amazes me if Valspar chose to reformulate this paint due to dry time?! Sorry I showed up to be “Negative Nancy”, but this stuff is terrible. Anyone out there reading this, make sure you use the semi-gloss if using this on cabinets, or any furniture that will be used daily! Time to find a new paint.
Hi, Cindy!
Yes, I used the Satin on my recent guest bathroom cabinets (applied with HVLP sprayer). Boy was I surprised that it was rough and looked like a chalk paint finish. Pretty, but not what I wanted on cabinets that will need to be wiped and cleaned often. Luckily, it was my guest bathroom and not MY bathroom. My mom used the cabinets for a week and they held strong. I cleaned off any makeup stains using baby wipes without issue. That’s my go to for cleaning cabinets! Totally agree that semi-gloss is the only option for cabinets and high use furniture in the new formula. The whole point of this formula is to not have to clear coat, but if it becomes a problem I’ve loved how well Polycryic is holding up over the top of the new formula on a dresser I painted to look like driftwood. I used the satin sheen, which gave me the smooth feel that is easier to clean.
This is a review post, so NO you are not being negative. I want people to leave their thoughts on old vs. new. I agree the old is a better formula, but I’ll learn to work with the new. Getting ready for a couple more paint projects with it and will have to update this post with my thoughts 🙂
Thank you for your article, I only wish I had found it sooner becausenow i need some help. I sanded and painted over old laminate furniture. The paint has dried for nearly a week. But now, every time you touch the furniture, it leaves a white mark, almost like wiping a chalkboard. Any ideas how to make it stop or does it need more time to dry?
You may be experiencing blocking, which means you recoated the next layer of primer or paint too soon. If it feels sticky to the touch, then that would be the issue. I’ve never experienced what you are describing, so I am not sure what happened based on that description. If it is blocking, more time won’t fix the issue because the paint has adhered to itself and won’t dry. You would have to sand and start over. My recommendations before you do that, is to take pictures of what you are experiencing and show it to the store paint desk staff and have them advise you based on what they see.
Hi there! I love your posts and have been following you for some time now. Thanks for all the great painting tips! I had a problem with “blocking” after painting the frame around one of my interior doors with semi-gloss paint. Since I had painted it white I rubbed baking soda over the frame until it was no longer tacky. I just put the baking soda in my hands, rubbed them together and then rubbed it onto the frame. I think it took 3-4 times of doing this before the tackiness was gone. My thinking is that I needed something that would absorb into the paint to help it dry. I chose baking soda because it is non toxic but I guess you could use any powder. I am not sure this would work when using a colored paint but I guess it may be worth a try if you are going to have to paint over it anyway. I also think you should do it very lightly in several coats until the tackiness is gone. I’m not sure this would work on a piece of furniture with a smooth finish since it might make it look like there is something in the paint. I just thought I would pass on something that worked for me.
Hi,Candice! That’s an interesting approach. I usually recommend getting a heated oscillating fan and run it over the furniture for a day to see if that helps to dry out the paint. I’ve also had luck doing that and then prime with bonding primer and repainting. Just some thoughts to keep in mind 🙂
I too have fallen in love with this paint! I rehab antique furniture and have tried dozens of paints with this one being my favorite! So glad I found your blog! I am wanting to use a sprayer and have now tried 3 different HVLP versions (including a different Wagner). The can itself says it needs airless. The sprayer your recommending is HVLP. If I use airless it will go through to much product just to prime the machine. I am going to try the Wagner you recommend but the link you have is taking me to a different machine then the version you actually used in your pictures. Please advise as I am in the middle of a project and don’t want to proceed without giving you a credit with purchase nor want this mess waiting in my garage. Please confirm you were comfortable with the HVLP version of Wagner for this exact type of paint and give me a link to give you the credit. Thank you so much!
So glad you are in love too! Yes, the one I used they discontinued and I ended up buying the newer one linked and love it! Back off the pressure because the paint is a bit thinner than a regular latex. Practice on a piece of cardboard too. I appreciate you buying through my link too.
Thank you so much for all this information. I learned so much!! I have wood paneled cabinets in my kitchen plus a built in etagere. I read the label and asked the clerk about not using primer so I didn’t get any. Definitely making another trip to Lowe’s! My question is, I have decided I got the paint too dark/bright. Can I have them add white or a lightening agent to calm the color down?
Glad this helped! You can ask them to reduce the tint strength by a %. I usually get a sample at 50% less tint strength to see if I like it first!
Can you use this over OIL based paints – like crown molding and base boards? (sorry if you addressed somewhere and I missed it.) If so, can we paint directly over (like we could if using another oil based paint) or would we have to use primer first? thanks!
I would suggest priming first, before applying a water based paint over oil based paint. You can use a general primer and I wouldn’t recommend this paint, but instead a semi-gloss latex paint. Here is a post that is a good guide for what paint to use by project type. https://porchdaydreamer.com/best-paint-sheen-by-project/
Hi! I am so glad to find your information today. I don’t know if you can help, but going to try. We had raw poplar shaker fronts for our poplar base cabinets. I painted Zinsser 123 primer and then sprayed two coats of Valspar Signature on the fronts. About 3 days later the frames started cracking and then popping. The frame part on the board kind of “exploded” and broke like lightening bolts on about 8 of them. The cabinet maker said it was my fault for putting that primer on them and that I should have just painted with the one coat. I definitely have a case of blocking as it’s been 3 weeks and it’s still tacky/sticky. So now I am repurchasing ones to replace the “exploded/split” fronts. But. I’m planning to sand and redo all of them with Cabinet paint this time. In your experience, have you ever heard of poplar cabinets behaving that way? Was it the 123 primer? Or was it the Valspar Signature? So weird. I don’t have access to any other the other paint stores so I can only go to Lowes for this. Hoping Cabinet paint helps this growing expensive new construction kitchen.
Sorry, but I can’t advise you on your previous project issues. All I can recommend is you follow my cabinet painting tutorial and the recoat times for Valspar Cabinet & Furniture enamel, which is at least 8 hours between coats.
Hello, we had a desk painted with the Valspar Cabinet & Furniture enamel paint The gentleman who did it for us used a sprayer and did several thin coats. It’s been two months and the desk top is still so sticky that papers stick to it. Not at all the outcome we were hoping for. I’ve always used oil paint on my projects before because it dries hard and is not sticky like normal latex is on drawers/doors. However, I decided to use this new hybrid paint this time for ease of use. Is this the “blocking” you mention and what can we do besides sand the entire desk and start over? Can we apply a poly acrylic top coat in order to make it less sticky?
That is blocking. The painter likely didn’t follow the 8 hour re-coat time. You can try running a heated blower fan over it for a day to see if it helps at all. The top coat will just sit on top of the paint and it will still be soft underneath. Try the dryer, then a small test area of bonding primer and one coat of VCFE paint. After it dries, see if it’s still tacky. If it isn’t, you can apply the primer and start from scratch with the paint drying 8 hours between coats. If not, sanding is the answer. Sorry, I don’t have better news!
I just used this paint and have the exact same issue, two weeks later. sanded, primed, painted two coats. I waited a full 8-12 hours between all coats. it’s a dark color, I’ve heard that can affect dry time. either way, these valspar instructions (or product) are awful if it’s blocking while following directions to the letter.
I’d go back to the store and take the paint back so they can test it, find out what the issue is, and then provide you with a refund if the paint isn’t performing to expectation. I just used the new formula in two different mid-tone colors and haven’t had any issues. Sorry you are.
Love love love the paint however any tips to knock down the sheen (I used the satin finish.
Do you sand between coats?
Hi, Bill! Only if I see surface irregularities like brush marks or debris that got trapped. So I only sand that area and not the whole surface. As a general rule, I don’t sand between coats.
Question about your Wagner Sprayer. Do you know if there is a difference between the one you recommended and the Flexio Sprayers by Wagner? I wasn’t able to find any info on their site for the model you recommended. Thanks
Sorry, I don’t have a direct comparison. I’d recommend comparing the models on the Wagner site. https://www.wagnerspraytech.com/sprayer-selector/
I wish I read this yesterday! This was so helpful. Thank you! As the can and directions said, I did not sand or prime as you recommend. Now after waiting over 12 hours for my second coat, I still see the stain. Do you happen to have any recommendations? I am painting a stained wood dresser. I appreciate your help. Thank you!
Apply Valspar Bonding Primer over everything and then paint again. It will fix it! Sorry this happened…so much work.
Hi! Would you mind sharing the colors used on your nightstands? I thought I wanted navy blue and white. But I like what you have done here. Thanks much!
Nightstand Tutorial Thank you! Please visit the full tutorial to see how I got the look.
I’ll be painting our wood built-ins white. They’re currently stained but in good condition. Do I still need to sand before priming over them? Or can I just go right to priming?
Please visit this tutorial: https://porchdaydreamer.com/painting-cabinets-get-a-smooth-finish-every-time/
I. Getting very frustrated! I lightly sanded a cabinet, used the bonding primer, have applied 3 coats of white cabinet and furniture enamel and still have bleed through. How many coats does it take to fully cover without bleed through and streaking?
Sorry for your frustration and I have not had this happen on any of my projects. Sounds like either you didn’t fully cover the surface with the primer allowing the stain or wood tanin to bleed through or the primer didn’t dry long enough before applying the paint. The best option is to apply the Valspar Bonding Primer (assuming this is what you used) over the top of the last coat of Valspar Cabinet Enamel. Let dry overnight and then apply the paint. Every project has variables and hard for me to know exactly what went wrong in your project.
Hi, we just painted our tabletop a week ago and it came out beautifully. Last night, I accidentally dropped a wooden block on it and it marred up three areas. The paint is not chipped, but the paint looked scuffed. We tried to touch it up by just blending in more paint, but after letting it dry, you can still see the marks. Please help – Is there any way to save it? If it scuffs this easily, should we definitely apply polycrylic to the tabletop?
Are the scuff marks actually dents? You’d have to fill in those with sandable wood putty. If they are truly scuffs, I’d recommend a light sand of the entire top with 220 grit paper, clean well, then apply bonding primer to the scuffed areas (assuming you used bonding primer before painting?). If you didn’t, I’d then apply bonding primer to the entire top after sanding, two coats of paint drying 8 hours in between…then 2 coats of Minwax Polycrylic to protect it.
Hey I painted over a really dark,piece with snowflake white…after finishing,can I hit the edges with sand paper and give it a distressed look or is it recommended not to? Thanks
It’s up to you! If you want a distressed look, then go for it. You may have trouble sanding by hand – I have and ended up using a battery powered sander to distress.
Hi there and thanks for your tutorials! I am getting ready to paint my kitchen cabinets, inside and out! I am going to buy the wagner sprayer. My question is can I spray on the bonding primer, to the drawer fronts and cabinet doors? They are all just painted without polyuerethane finish, maybe I can skip the bonding primer? They are in okay shape, seem to be an eggshell finish, a few chips, but the color is terrible, so I ‘m brightening them.
I’m a fan of always priming first and if there are chips definitely sand those first to make sure the surface is sound. Good luck!
Awesome help – thanks! Do you have an idea of how long it takes to “cure”. I painted a file cabinet that’s the base for my standing desk and I’m wondering how long before I can put my VariDesk and computer equipment on top without fear of damaging the new finish?
The dry time is 4 hours, recoat 8 hours and full cure is 7 days. I usually wait at least 2 days before placing anything on the surface.
Hi! Thank you so much for this info! I have a question. I recently painted my cabinets with the Valspar Cabinet Paint, and I do not like the color at ALL. Mainly because I was given the wrong color and didn’t realize it until I was done with the first coat (I kept telling myself it wasn’t dry yet and would change colors… but they just tinted it wrong). Anyway, I now want to paint over the green Secret Moss & instead paint it a black color using the same type of paint! Do I need to sand down the previous semi-gloss green paint?
Hi, Michael! No, I painted over my bathroom cabinets that were previously painted with the Valspar Cabinet enamel without priming first. It’s held up really well and without issue.
I’m not sure if you know the answer but hopefully you can help me. I have used this paint in satin and it really is fantastic!!! I would like to know if you have maybe used it on IKEA furniture ( you know the crappy laminate bookcases)? If so could you tell me the steps to make the paint stick to this stuff? Thank you for your time.
I am looking for an Ikea piece to paint to make a tutorial, but for now I can tell you to use Bonding Primer. Read this which expains what it is: https://porchdaydreamer.com/when-bonding-primer-is-a-must-before-painting/
On the can is says do not dilute with water. But it was way too think for my sprayer. I had to add a bit of water. What effect will this have on the paint? It looks great and I gave it about 12 hours between coats. Should I put a top coat on because I had to think it a bit?? Thanks so much!!
Sorry, I can’t tell you how it will be because I’ve never had this issue and don’t know how much you had to thin. My paint sprayer handles the product really well to the point I have to back off the force, so I’m not sure why yours didn’t work. It’s really no thicker than regular paint.
I can’t thank you enough for your tutorials and tips for painting cabinets. I painted my kitchen cabinets last week and followed your directions to a “T” and I’m thrilled with the results! I was so nervous about doing this and too bad I waited so long. And the Valspar cabinet paint is AMAZING!
Yay! That is so nice to hear and I’m glad you got good results. It is amazing stuff 🙂
Thank you for all of the information you have posted on Valspar Cabinet & Furniture paint. I painted my kitchen island with this product and it looks great! It was my first painting project too. I know you wrote NOT to use a top coat, but since this is the kitchen island and gets a real beating, could I use a polyurethane top coat on it for extra protection? If so, which one would you recommend?
Thank you in advance for your help!
Michele W
Hey, Michelle! Happy to help 🙂 My kitchen and bathroom cabinets have held up well without a top coat. It’s easier to touch up if you don’t do a top coat. It’s really not necessary. I wouldn’t recommend it unless it is a kitchen table or kids play table.
The back of the Valspar can says in all CAPS, DO NOT USE FOAM ROLLER. I just did all my cabinets with a foam roller and they look fantastic. Why would the can say that if it works great?
No clue…they need to call me 😉 I have videos and images of me using a foam roller with beautiful results. Nap rollers leave an odd texture and over applies it. Trust me I made that mistake ONCE!
My daughters furniture was done with chalk paint and we are not pleased with the outcome…not sure what happened as we have used chalk paint in other areas and were pleased. Does your comment “Forget about it if you have a chalk paint with wax over it!” mean I cannot use this Valspar furniture paint over top of the chalk paint?
I need to play around with painting over wax, but everything I have read the only way it really works is to sand the wax off completely. Then prime and paint. Sorry, but I don’t have experience with this…yet 🙂
I found your older paint tutorial and information on this paint and bonding primer a few months ago. Thank you, Thank you, Thank you!!! I love the way my furniture turned out! I have painted two complete bedrooms suites, and a dresser. They look great! My old dated furniture looks brand new and so fresh! Great products! Side note: If you can sell my hubby on it, you’ve done a remarkable thing! He hates to paint! lol. Thanks so much!
Jessica, that is amazing and I am SO happy to hear you found my info helpful. Very funny about your hubby 🙂
I think your paint information is the best! After some bad experiences with painting over chalk paint ( and wax). Lots of peeling, sanding and stripping. Ugh! I would like to try the Valspar furniture paint on a stained dresser. Do I need to sand it before priming or just clean it with Krud Kutter ? The surface is in great shape. Also which white paint color do you recommend for furniture?
Thank you so much!
Suzanne
Thank you! Please check out the tutorials I have linked in the post for in depth information. Just clean and prime first 🙂 I’ve linked my favorite whites in the post about the top 20 kitchen cabinet combos.
Hello!
I just finished a cabinet paint project with this product. We painted over new factory painted cabinets and we primed first with valspar extreme adhesion bonding primer. We applied the paint with our sprayer and wound up doing 3 coats for full coverage, and I’m afraid we didn’t wait long enough in between coats. The finish is beautiful and factory like, but the paint is still tacky and scratching/peeling very easily 3 days later. I know we need to wait a full 7 for full curing but since we had only waited a few hours in between color coats, I’m worried about “blocking” like you described. Is there any way to salvage this? A clear coat of any sort?
Sorry, that sounds like classic blocking where the paint adheres to itself and not the thing you are painting…ugh! The only way to fix it is to sand off the paint and start again, with a bonding primer and then wait at least 8 hours in between coats of paint.