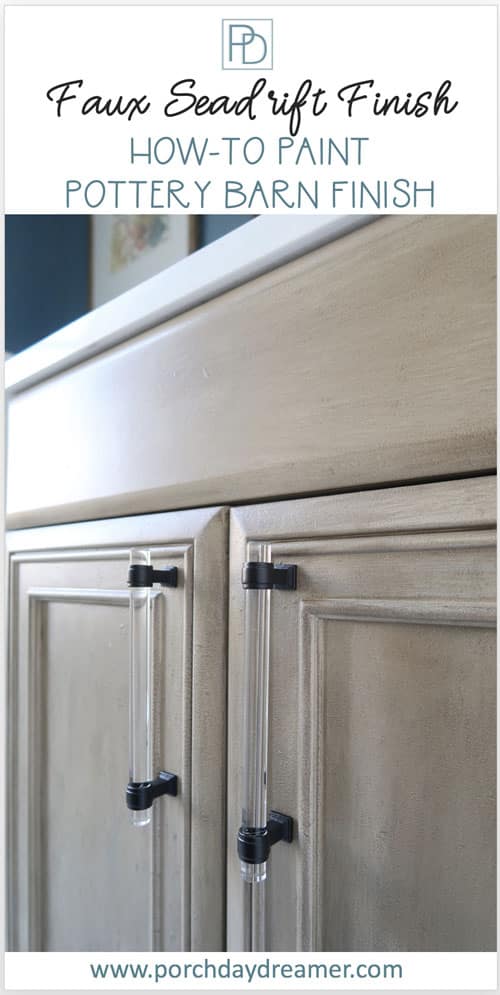
How-to Paint Cabinets the Pottery Barn Seadrift Finish
Do you love the Seadrift finish of the Sausalito collection at Pottery Barn, but can’t afford the price? I’ll show you that with a little bit of paint, you can recreate the same finish on any furniture or cabinetry!
Creating a driftwood finish with layers of paint is something I’ve become quite obsessed with lately!
With all of the blonde oak floors and bleached out wood tones getting more popular, everything with a dark espresso stain is starting to look dated.
Yes, paint can change the look quickly and inexpensively, but what if you want more texture like real wood?
Well, I’ve developed a quick and fairly easy way to fake a Pottery Barn Seadrift finish in just a few layers of paint.
Contains hand selected products, with affiliate marketing links where I may earn a small commission if a purchase is made. {full disclosure here}
The Pottery Barn Seadrift Finish
Let’s start with showing you the Seadrift finish, to make sure you know what I am talking about 🙂
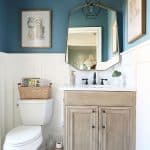
It looks like a driftwood type finish that has warm undertones and a minimal wood grain pattern.
It’s very soft and a bit coastal. The Seadrift finish works really well in many types of decor, but especially in a Modern Coastal room.
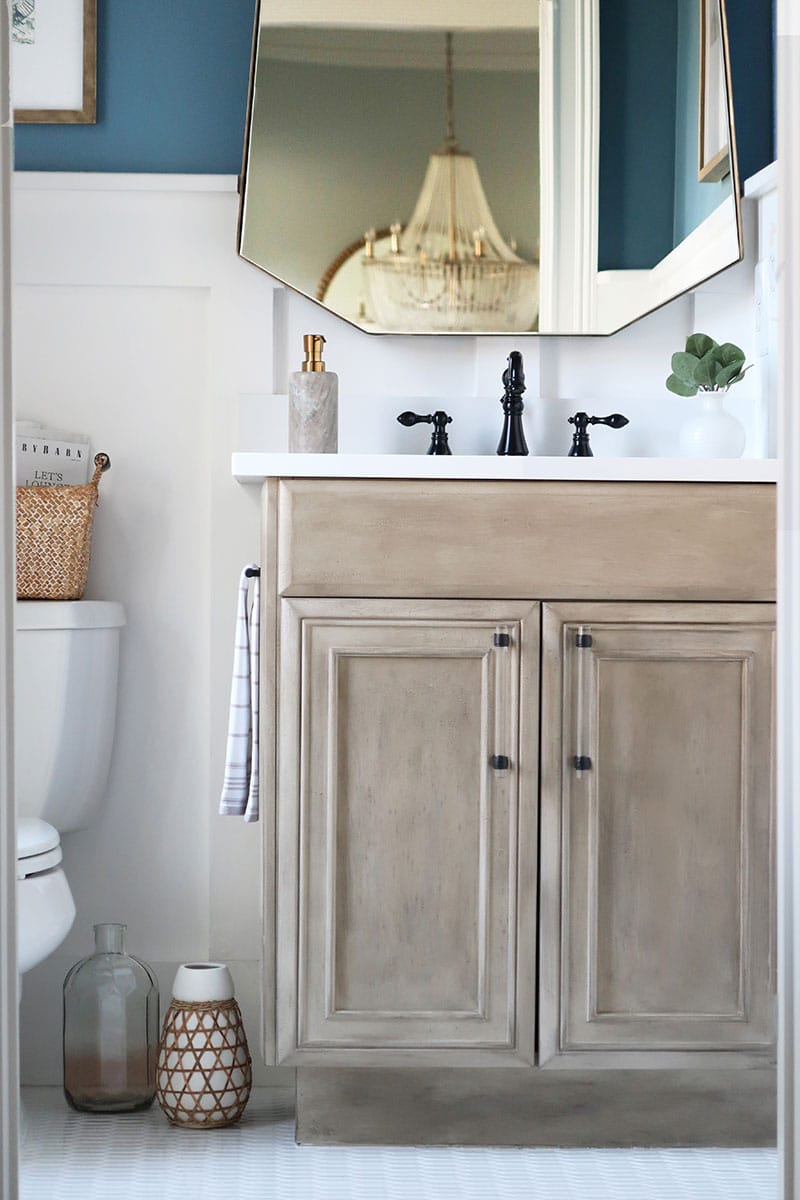
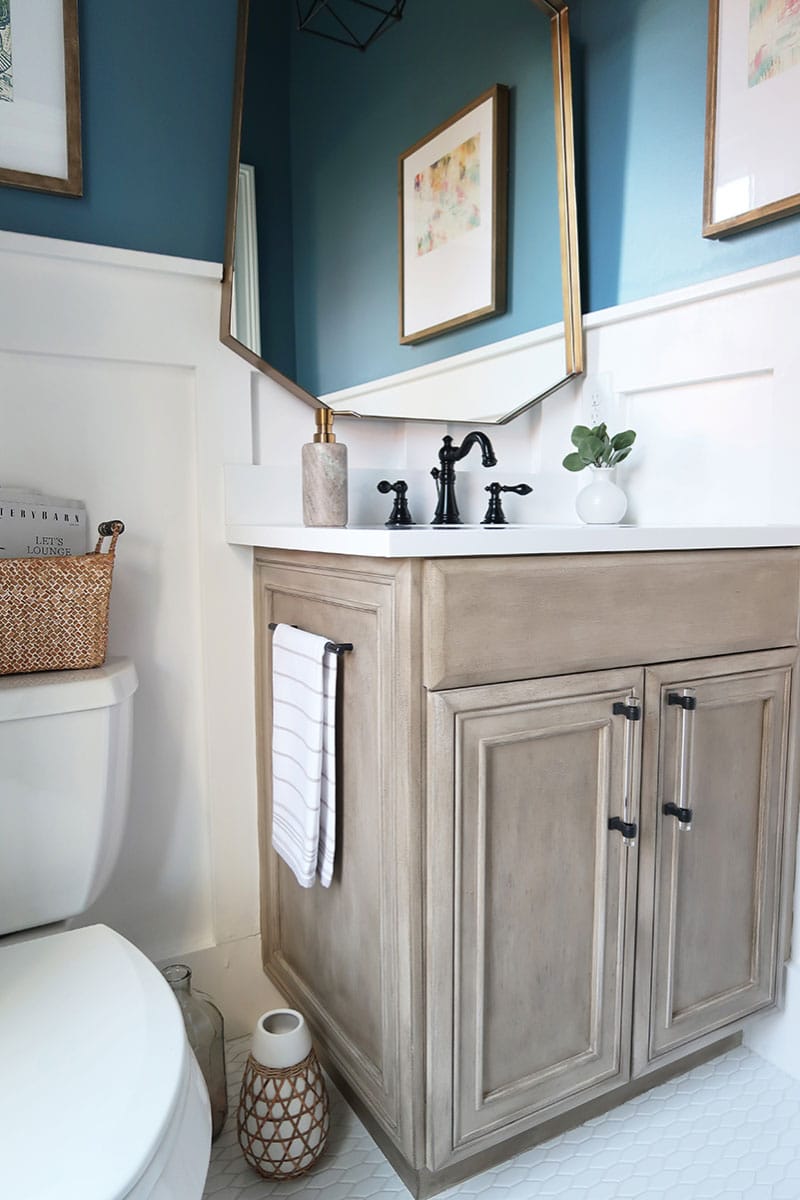
This fall I made over my powder room to a Modern Coastal style.
As the inspiration for my vanity, which looked like this before:
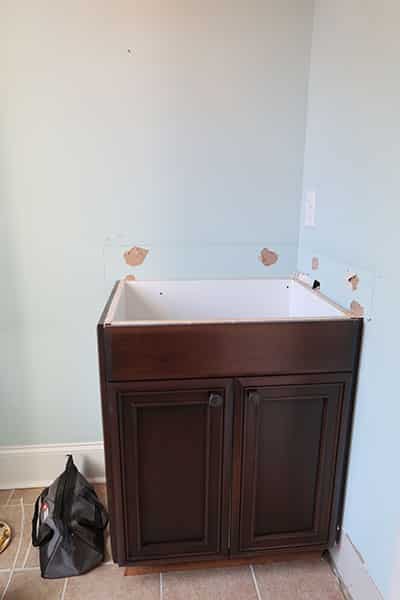
I found a gorgeous, but EXPENSIVE Pottery Barn vanity that I quickly decided I needed to knock-off the Seadrift finish and makeover my dark brown vanity.
Does that sound impossible?
Well, I love a challenge especially when it comes to paint finishes! There isn’t much I won’t paint to make it look like I want.
Want to paint your stained cabinets a solid color? READ NO-SAND Method to Painting Kitchen Cabinets
How-to Paint the Pottery Barn Seadrift Finish
It almost doesn’t make logical sense that you can create a wood grain effect with just some strokes of a paint brush, but you can!
No surface is completely smooth, so that leaves thin crevices for glazes to settle into.
I’ll show you how amazingly well it works.
Please be warned this is definitely more ART than science.
I’d recommend getting sample foam core boards to PRACTICE on, before you tackle anything of value in your home.
This Seadrift finish can be painted on:
- Furniture (here is my Seadrift Furniture Tutorial)
- Cabinetry
To see how the faux Seadrift finish turned out on my cabinet, here is the final powder room completed: Modern Coastal Powder Room: REVEAL
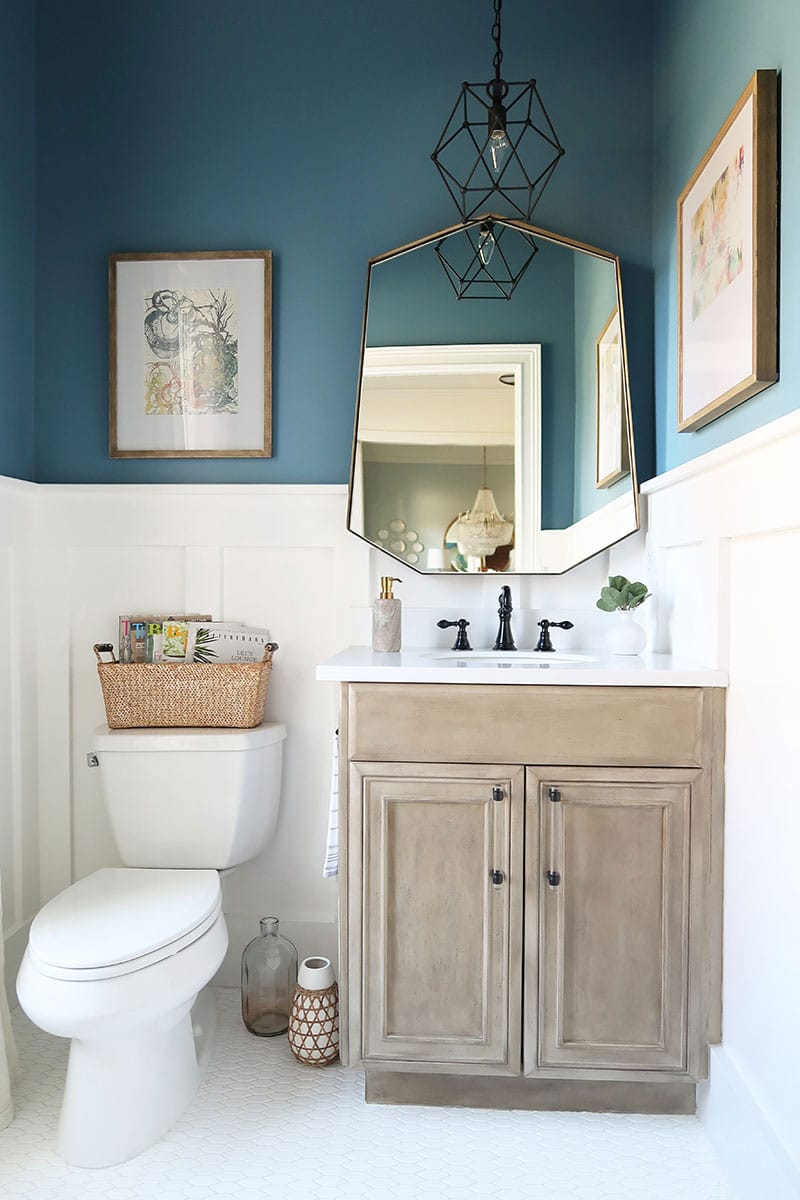
Yes, that is the SAME vanity! Just a new top, fixtures, faucet, and paint job.
My contractor had to pull it away from the wall to make the top work, but that’s a whole other story 🙂
Paint project Supplies
There are only a few supplies needed and little bit of time to create this look.
The base coat of paint is really the longest part of the process.
The SeaDrift faux finish over the base color took only 2 HOURS for me to complete the look!
- 1 Quart Valspar Bonding Primer
- 1 quart Open Canyon (Behr Ultra Premium Plus Semi-Gloss)
- Clear Glaze
- Aged Glaze
- Valspar Sample in Notre Dame, 5006-1B
- 2 ea. Wooster Premium Plus Brush
- Foam Roller Multi-Pack
READ: Are You Using the WRONG Paint Roller Cover?
Behr brand is available at The Home Depot and Valspar Brand at Lowe’s Home Improvement stores.
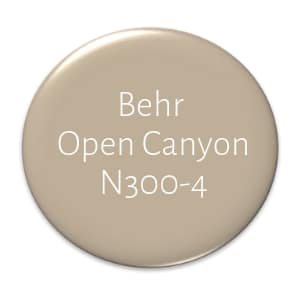
Here is a color swatch of the base color, for perspective.
How-to Layer Paint for the Seadrift Finish
Most likely you are painting over another finish either a stain or a painted finish.
I HIGHLY recommending priming first with a stain blocking/de-glossing primer like the one I recommended above.
This will ensure that the paint has a long term durable finish.
The layers you will be applying:
- Primer
- Base Color
- Clear and Antiquing glaze mixed
- Clear and Gray paint mixed
- Antiquing glaze alone
Paint Project Supplies
- Bonding Primer
- Behr
Step 1: Clean the surface and prime
Pre-clean the surface. Wipe down with soap and water. Dry thoroughly!
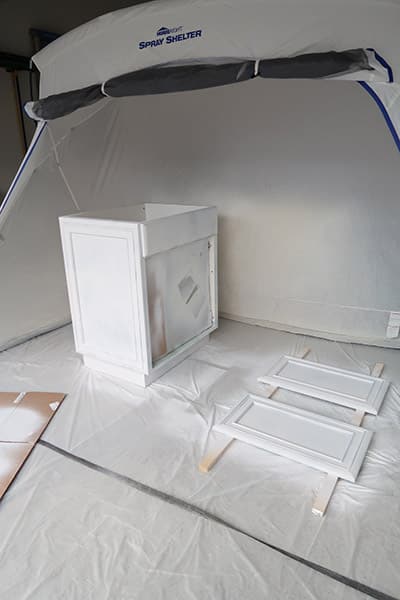
I applied my primer and paint with an airless sprayer, but you can apply just as easily with a FOAM roller and brush.
Please use foam rollers for the smoothest finish on cabinets and furniture.
Apply two thin coats of primer (dry primer about an hour in between) and dry overnight.
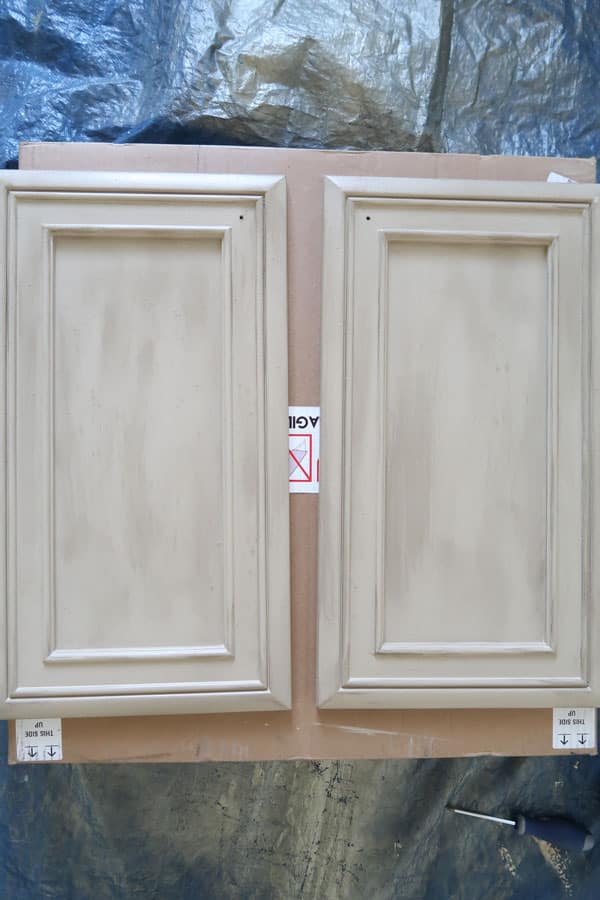
Step 2: apply the base paint color
Apply 2 coats of Behr Open Canyon Semi-Gloss paint following the manufacture’s between coat dry time recommendations.
Let the 2nd coat dry overnight!
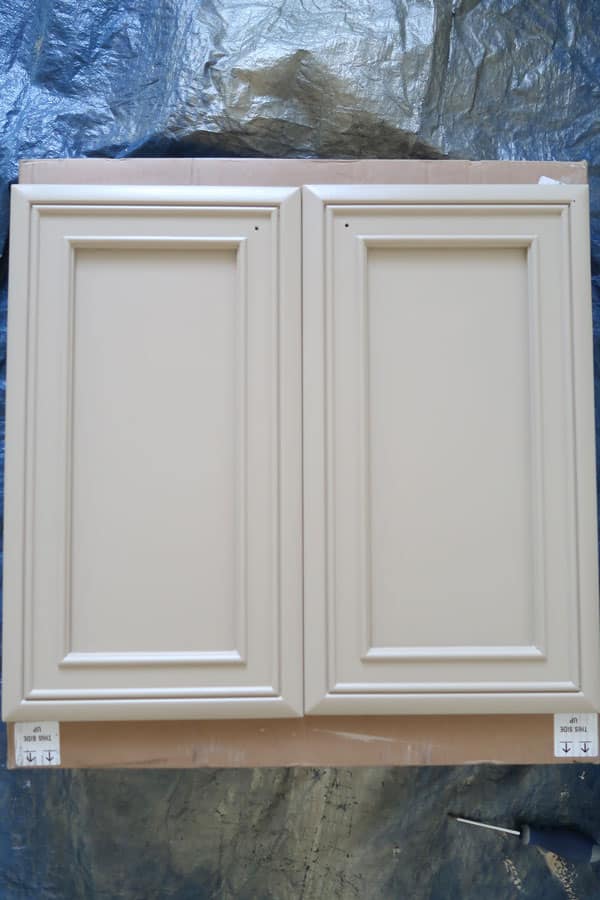
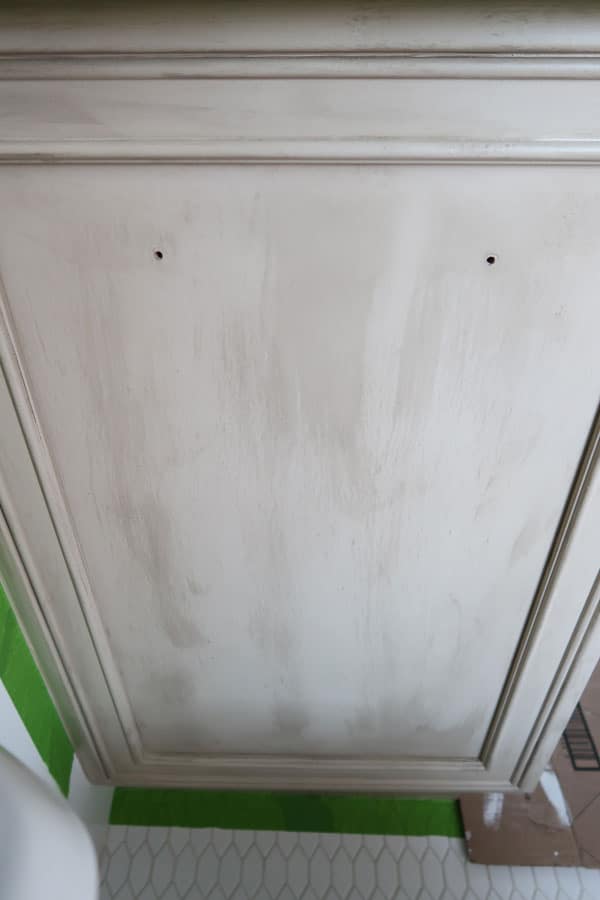
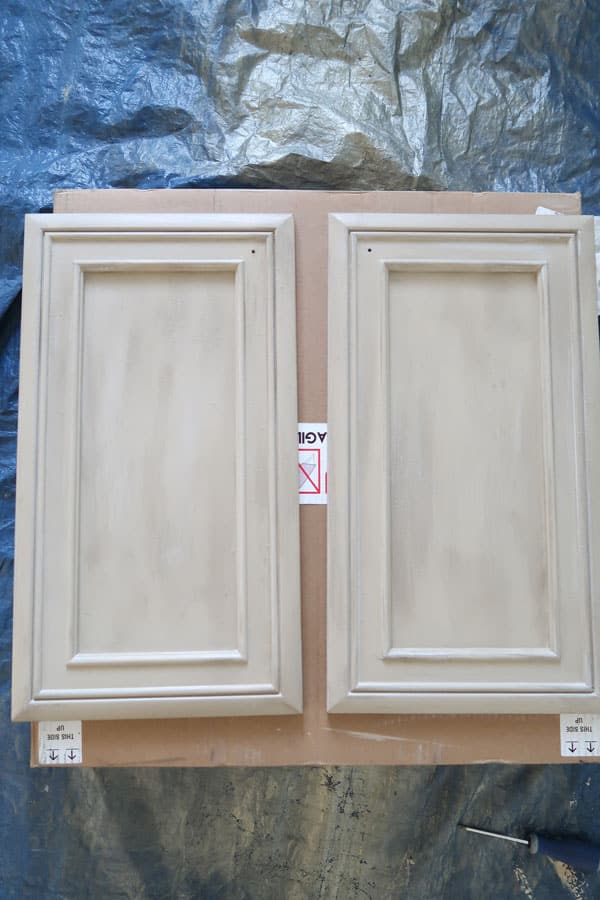
Here are the cabinet doors, before the faux finish.
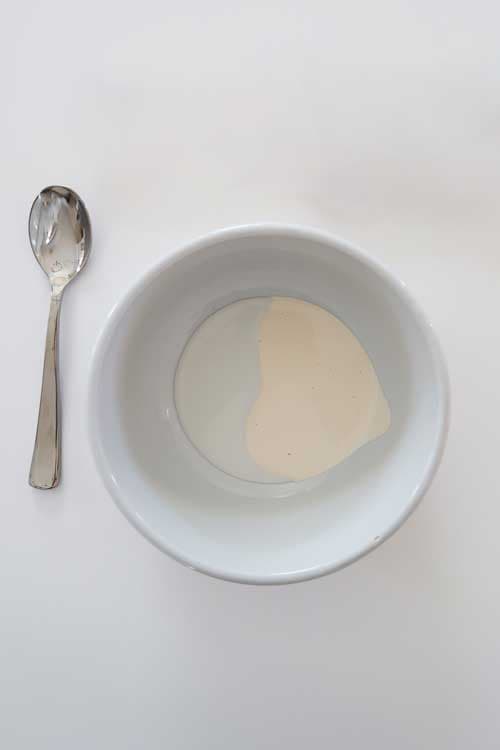
Step 3: mix antiquing glaze
In a bowl, add about 2 tablespoons of clear mixing glaze with 2 tablespoons of antiquing glaze. Stir thoroughly.
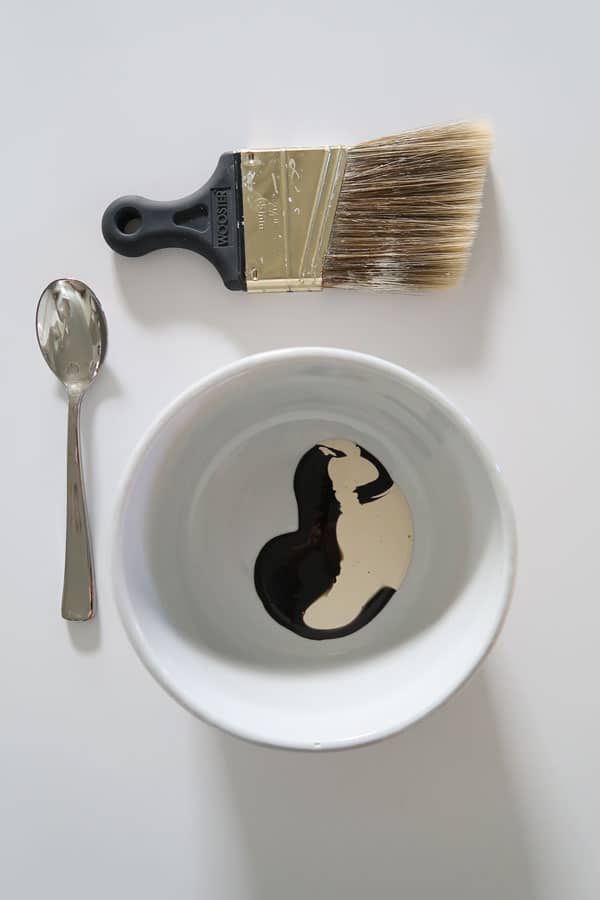
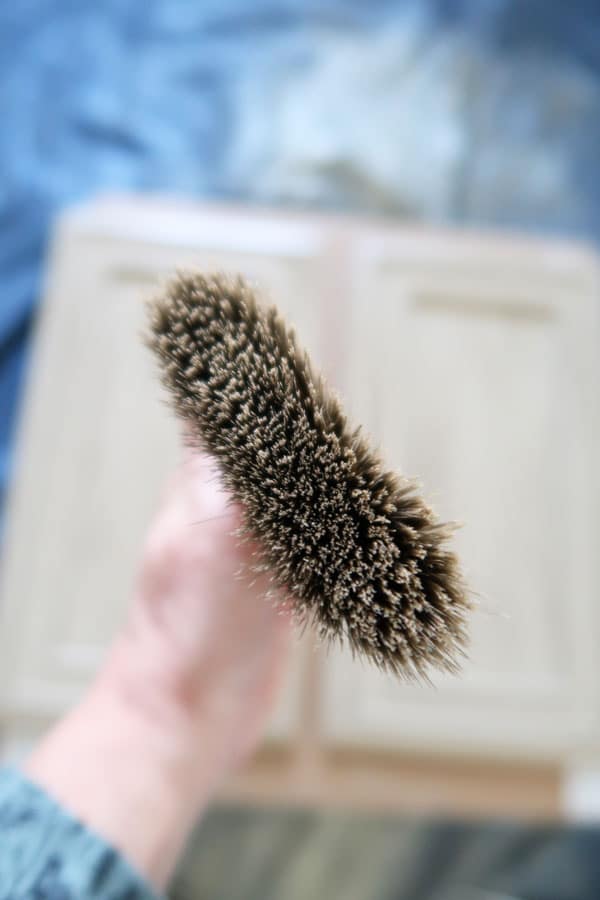
Place a SMALL amount on your brush just LIGHTLY tapping the tips of the brush into the glaze.
If you get too much, BLOT on a paper towel.
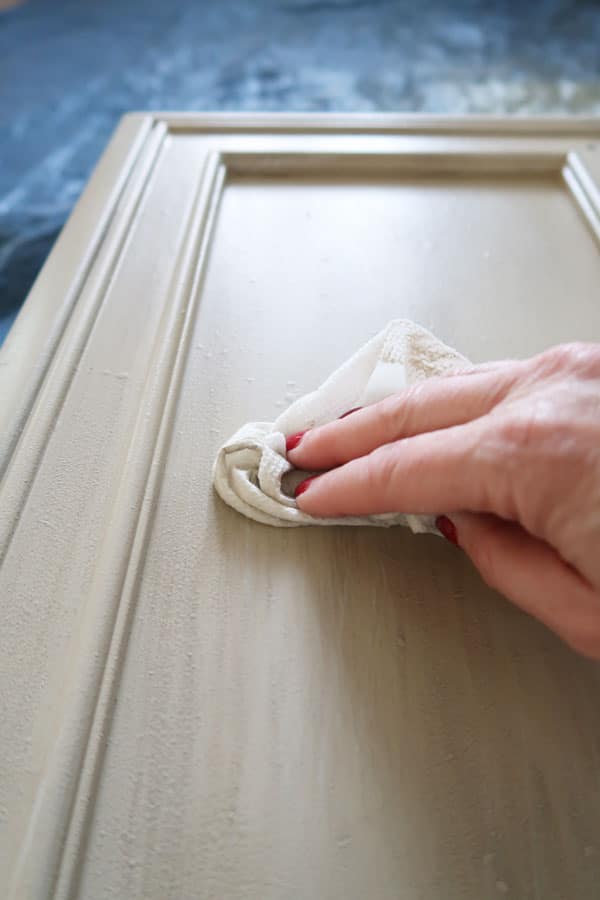
Step 4: dry brush antiquing glaze
Very lightly, with just the tips of your brush apply small amounts in a vertical pattern.
Pretend you are making wood grain pattern.
I thought about planks of a hard wood floor and used about a 5 inch spacing.
Some areas will look heavier than others. That’s OK!
You can see I brushed vertically on the place the boards would normally have the wood grain and horizontally on the top and bottom of the doors
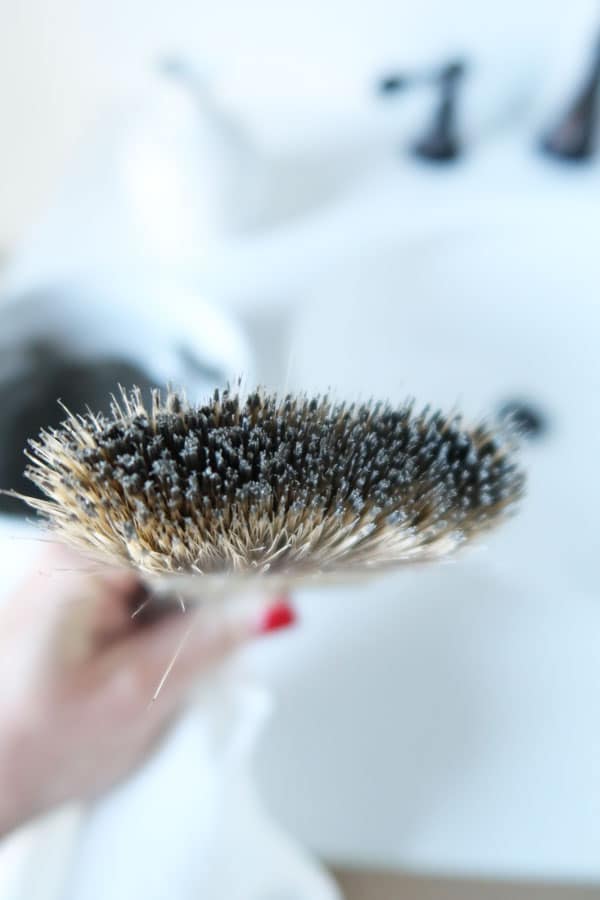
Glaze is EXTREMELY forgiving. If you don’t like a section, wipe it off within a few minutes and start again.
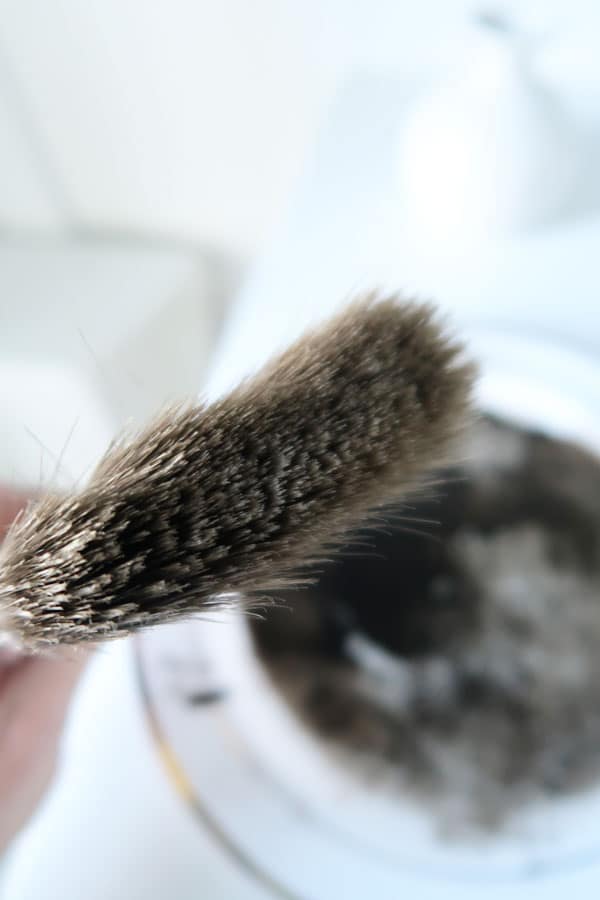
DO NOT dip your brush back into the glaze mixture until you have worked all of it off of your brush.
This is what your brush should look like, before you reapply.
LET DRY ONE HOUR
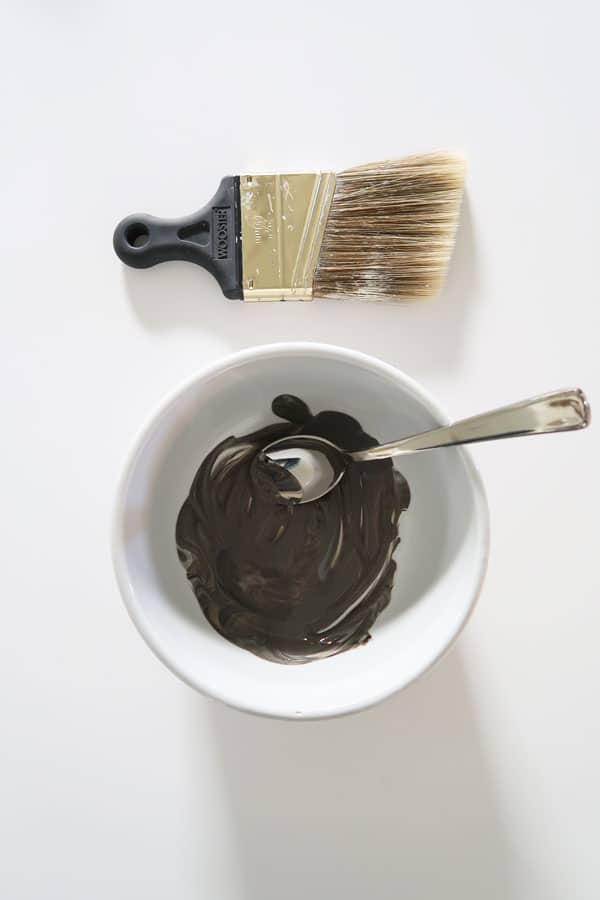
Step 5: mix and apply silver glaze
Mix 2 tablespoons of clear mixing glaze and 2 tablespoons of Notre Dame gray paint. Mix thoroughly.
Remember I mentioned glaze can be wiped off?
Yes, I ended up wiping off the little bit of glaze I applied with this brush.
Using the same brush dipping technique as above, lightly apply the gray glaze mix in the same vertical pattern as before.
RUB in with a slightly damp paper towel.
This is giving that little weathered silvery finish underneath.
You can see how that little bit of gray softened the finish a bit and blended in the other glaze.
If I thought an area was too solid brown, I’d add a little more gray to these spots.
Step 6: apply antiquing glaze
Place 2 tablespoons of JUST antiquing glaze on a plastic or ceramic plate – this is important!
Don’t use a bowl or paper plate.
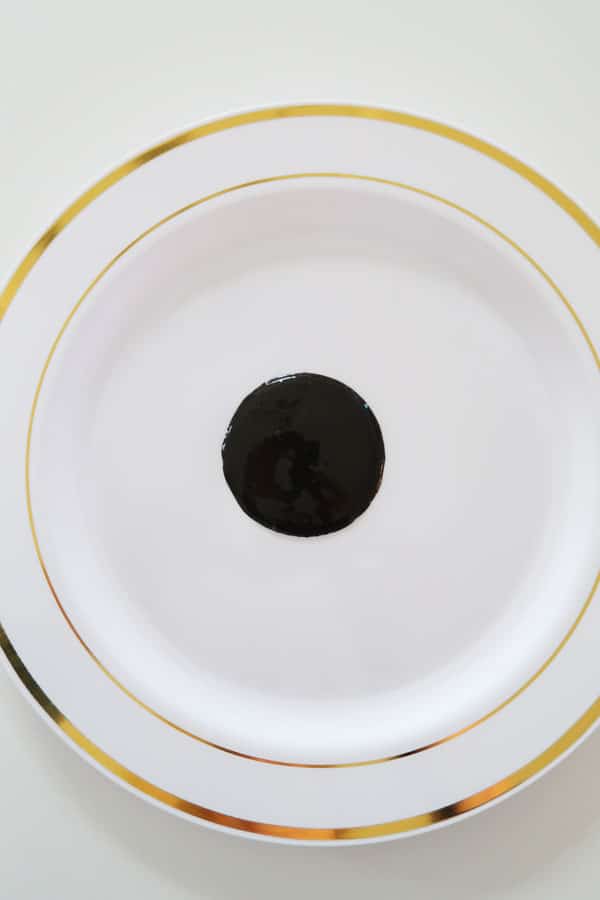
Next, pick up a SMALL amount of glaze and blot as I have on the plate itself, until very little is left on the brush.
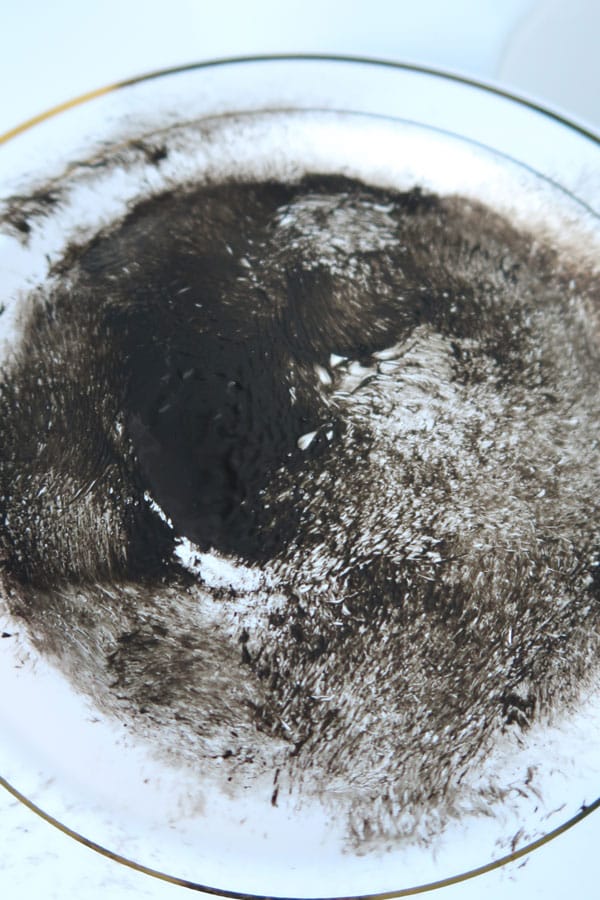
This is what my plate looked like mid process.
Step 7: Dry Brushing Technique
This is the HARDEST thing to explain! Work back and forth very quickly.
Work with where the grain of the wood would naturally fall – horizontally or vertically.
With almost NO glaze on your brush, in the same pattern as you applied the other glazes, work the glaze INTO the surface.
Literally I was sweating from working hard and moving fast across the piece!
After each section, there literally wasn’t any glaze left on the brush.
Move left to right and try not to overlap areas or they will get too heavy looking.
When I say WORK it IN I MEAN WORK IT IN! You will see how that effort starts creating that grain effect.
It’s literally like magic!
You can’t push the glaze in too much – just keep spreading in over and over.
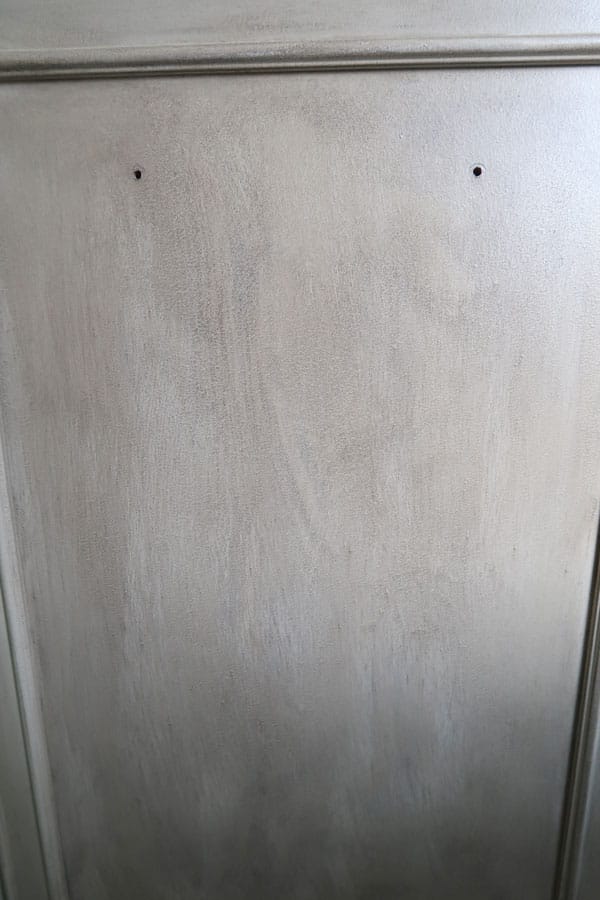
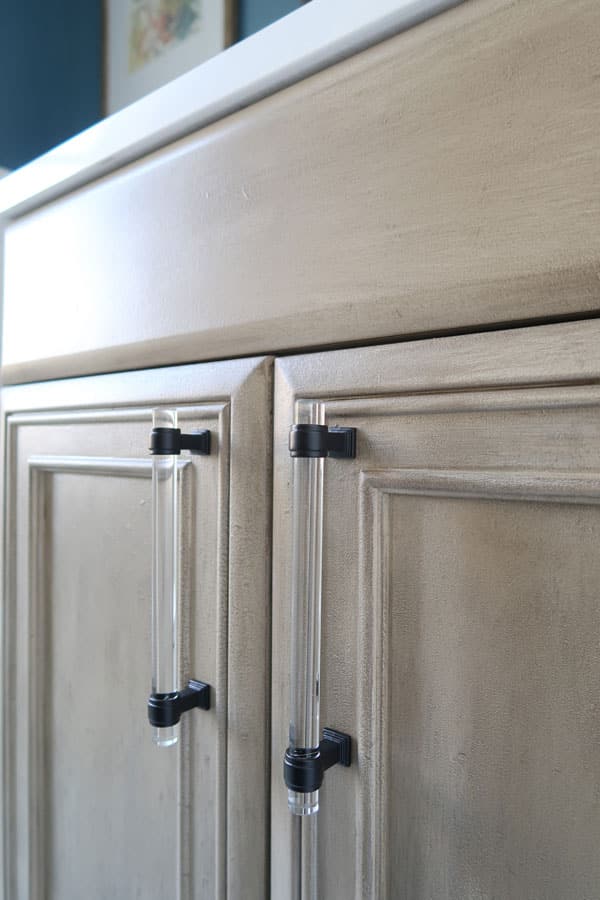
Here is a close up of the side of the vanity completed!
See how the layers come through and how that gray glaze adds a little weathered / silvery wood effect?
Pretty cool that you can create a wood grain pattern on a solid paint.
Here is the completed look. There are darker and lighter spots.
My airless sprayer was dying and spit out clumps of primer I couldn’t sand out, so I also had “pimples” of paint and that is what you see.
The side panel is more how it will be on properly painted surface.
The variation is what makes it look like the wood has a grain or texture.
It’s hard to believe it used to be a dark espresso brown finish!
If you you like Seadrift this finish or want to explore others I’ve created:
- Pottery Barn Furniture Seadrift and Fog Finish
- Pottery Barn Driftwood Finish (Indoor)
- Outdoor Driftwood Finish
Which ever technique feels the easiest for you, USE! They all will give you the same driftwood feel.
Or if you are a fan of Pottery Barn Products here are some of my honest reviews:
Happy Painting!
Good luck to you and I will remind you that every finish will be unique!
Glaze is forgiving, can be wiped off, and re-applied so don’t be scared to try any of the faux finishes I’ve created.
The more layers you apply of the antiquing glaze the darker it will be.
So you be the judge and make your own beautiful creation!
Sign-Up for my Weekly Emails!
Straight to your inbox sharing can’t miss decorating and painting tips for your home.
Please consider following me on Pinterest and Instagram for daily inspiration.
Until next time…
Porch Daydreamer
Tracey
Love this look so much!! I’m excited to try it on my dresser. Do I need to sand off the finish or do anything before painting the primer?
Hi, Jenna! Not sure if you have stained or painted cabinets. If they are in good condition, you won’t have to sand. You may want to read this tutorial for the basics on painting cabinets using my no sand method.
Hi Tracy! I am doing my bathroom cabinet now and its beautiful! I need to do the last step and I am afraid I will ruin it. Should I leave it without the dry brushing step or what can I do if I don’t like how it comes out with the last step?
Thanks!
If you are happy with the look, you don’t have to add that last step 🙂
hi there. I am working on matching my dining room table to my pottery barn sea drift barstools. I have just finished first layer of antiquing and I feel like the color is too light. my barstools have a more of a golden undertone and your directions have a creamier undertone. should I try the other tutorial on painting Ikea furniture as a seadrift? I notice a golder paint color in that one.. I do not have ikea furniture. I am painting a solid honey pine. thanks.
Sure! Adding a top glaze can make the overall tone what you want it to be…that’s the beauty of a glaze! My IKEA tutorial definitely results in a warmer finish and may be better for you to get that golden undertone. The more layers you apply the more depth of color and character you’ll see too.
Hi! I have completed this in my bathroom and love the outcome. I am actually considering doing my kitchen cabinets. Do you recommend a good top coat for an area with high traffic and likelihood of needing to be wiped down?
Also- when I came to step three I noticed the picture shows 3 things being mixed together- the step only lists the clear mixing glaze and the antiquing glaze. Is there another color mixed in with this step? It looks like there may be a tan or grey also in the bowl.
Thank you! Absolutely love your tutorial.
Hi, Megan! Glad you love it. I only mixed clear with the antiquing glaze, so it’s only 2 things. Yes, for high traffic definitely polyurethane over the top. Here’s a post about when I recommend polyurethane and why.
Hi! I’m definitely motivated to try this, but am obsessed with your gorgeous mirror-would you mind sharing where you got it from?
Great! It was from West Elm, but they no longer sell it. Here’s a couple of similar mirrors: West Elm and CB2.
Thank you for this excellent post. You salvaged my failed dining table staining project. So happy with how it came out. I did modify a few steps ( used valspar cabinet paint as my primer. I had Lowe’s match the Behr canyon. Once I got to the step of adding the silver paint, I felt the table was too white and decided to add a tablespoon of brown (rugged tan) in order to get the sea drift finish. Someone else had a similar comment. The table matches my pottery barn sea drift chairs and bench very well!
Hi most of these products were discontinued when I clicked on them. Do you have a replacement list of products? Thank you!
I’ve updated the links for you!
Tracey, You totally inspired me to do this with my very old bathroom cabinets. I figured if it doesn’t work, I’ll be forced to buy new for my bathroom (we’ve been saying for several years that it needs to be done). I’m ready to begin Step 3. I have one question about the final product after it’s been used for a while. Does the paint chip off since the original stain and varnish are not sanded before priming? Thank you for this excellent tutorial!
Hi, Janet! Every project where I’ve primed first with bonding primer I’ve had no chipping!
An attractive Coastal finish, I really like the effect the silvery glaze had on the total look. Very creative to translate the “expensive furniture finish” so it can be used on a piece you already own (or make). It certainly put a new, up-to-date look on the vanity cabinet and the whole bath. Thank you so much for sharing the colors and techniques you used to achieve the look.
Back in 1967, Martin Senour Paint Co. issued a series of “antiquing kits” (way before Faux finishes became hot), they included several Colonial type colors and several wood grain colors. The base paints were water based and dried to a soft sheen (they were very durable and like milk paint – VERY hard to strip off if you had ever wanted to do that in the future). I used the red and also the sage green on two chests – there was also a blue and a yellow as I remember. I used the Fruitwood “wood grain” color on a dresser that I still own and use today.
The “colors” used a single color glaze (oil based) over the base coat and a combo of wipe off and dry brush (similar to your dry brushing). The “wood grain” finishes used 2 glazes (oil based), one light and one darker. These colors depended on the particular “wood” look you wanted.
The “wood grain” glazes went over the base coat (various shades from yellow ochre to a dark reddish brown, depending on species). The “secret to the realistic wood grain” as the Martin Senour booklet in the kit put it, was in the use of coarse steel wool to remove the glazes (changing out frequently as it filled with glaze) and always wiping in a straight line in the direction that wood grain goes in quality case goods (horizontal on tops and it’s edges, drawer fronts, horizontal stiles and base apron and vertical in the sides of the piece, vertical drawer edges, stiles/dividers). Glaze was put on sparingly (as in your instructions) and the first glaze dried 24 – 36 hours before the second one was applied. Little details like “fly-specking” (using either a tooth brush or lightly dabbing with one of the glaze filled steel wool pieces and it was strongly suggested to not over do this) were done with the final glaze coat. Again the same drying time.
The glazes were very thick and gel-like and when they dried, they made a durable finish and I do not remember ever using a top coat (though the “wood grain” chest has certainly had applications of Pledge over the years and has been washed down with both spray cleaners and soap and water). I stripped the paint of the green chest years later and it was a beast to get off, as I said earlier the base coat was tough. It has been over 50 years since I did the “wood grain” dresser and except for having to touch a few nicks here and there, it still looks great. You have to look closely to see that it is not real wood. It is an extremely versatile piece of furniture, 55″ wide, but only about 16 ” deep, with a number of small and medium size drawers. I have used it in just about every room in my house to store just about anything and it current resides in my entryway.
Again, thanks for sharing your painting tips. I look forward to your future posts.
Looks great. Where did you get the handles from. They are perfect for this piece.
Thank you! They are in the Shop the look slider too. Here is my affiliate link: https://rstyle.me/+2-HGxRsVe85tij7mwWxTNg
I just finished up a dresser turned cabinet! I love it! Turned out darker than yours, but still looks amazing! Rereading, I Probably should have added more of the gray glaze. Also looking back, your first layer of glaze in the picture, the clear looks more cream colored & mine was white. So next time I may experiment with adding the open canyon paint to the antiquing glaze. Also, a tip to anyone trying this, if your doing this outdoors & it’s humid, wait a bit before doing the second glaze (that needs wiped off). I ended up wiping some of the first glaze off with it………
Or was I just wiping to hard? Lol
Thanks for amazing instructions! This was no Pinterest fail 🙌🏻
Yay! I’m SO happy to hear that and great advise on humidity. It DOES slow down the dry time, so it’s important to make sure that the first layer is completely dry!
I just wanted to say thank you for this amazing tutorial!! My husband and I refinished a dresser and some nightstands and they turned out AMAZING!! I used satin instead of semi gloss since it was for furniture and it was great! Wish I could share a pic on here, but honestly, will be sharing this tutorial with everyone!
Michelle, THANK YOU! I’m so happy you are happy 🙂
Hi, is there a reason you used a semi gloss finish for the open canyon paint? Thanks!
Yes, and great question. For two reasons, semi-gloss is more durable and wipeable so ideal for a cabinets and also it has a smoother finish making it easier to manipulate the glazes. Hope that helps!
Would love to do this in a barnwood look. Can you recommend colors to use?
Sorry, that would be an entirely new tutorial that I haven’t attempted. All I can say is darker grays. Find a piece of barnwood and match the colors with paint.
Although my results were slightly different from yours, I love my “new” table. Your instructions were excellent and everyone that sees the table top is impressed. Thank you for sharing your technique.
That makes me so happy! I’m glad you were able to transform your table 🙂
Did anyone else have a hard time with the second glaze? The grayish silver one? When I tried to apply it, it was like it ate the first one! Just completely dissolved it. 😫
Sorry you had trouble! You can always go back over with the darker glaze. More layers will give it more dimension. Sounds like you over applied, so use less and blot more 🙂
I am going to have to try this!
I love the paint colors on the wall as well!! What color is the wall and white base please?
Great! Sorry, can’t remember but my 10 year before/after home tour will have that color listed. Good luck 😉
Behr: Blueprint S470-5
Thank you!
Your directions are straight forward and seemed easy enough, so I decided to give it a go on my dining room table. I love the results! I wish I could upload a photo so you can see my redo! Thanks for the inspiration.
I’m so happy to hear that! You can email me a picture using my contact information. I’d love to see it!
Tracey,
These were the best instructions I have seen for this wood look. My cabinets turned out beautiful. I am going to do the final glazing once the bathroom is put back together. I’m not sure if I need to go lighter or darker because they look so good after the gray glaze.
Thank you so much for sharing
~Cass
Cass, so nice to hear that! I’m glad you are happy with the way they turned out. Live with them a bit before deciding or try it on the back of the door to see what you think first.
Beautiful finish! Do you recommend a top coat and if so, which one?
Julie, I didn’t top coat mine and so far it has been fine. If you have a high traffic area and are concerned, I’d recommend a matte water based polyurethane. Both Minwax and Rustoleum make one. That will keep the color as close as possible to the original finish, but it will darken it slightly. Hope that helps!
Thank you!!