Ultimate DIY Guide to Painting the Pottery Barn Finish


Have you ever drooled over the beautiful finishes on Pottery Barn furniture but cringed at the price tags? Well, you’re in luck! I’m going to share my favorite tips and tricks for creating a copy cat faux paint Pottery Barn finishes right at home.
Whether you’re aiming for that dreamy Seadrift (Sausalito finish) or a rustic Driftwood finish (Sandwash finish), I’ve got you covered with easy-to-follow steps.
So grab your paintbrush, put on your favorite playlist, and let’s makeover a piece of furniture or cabinets to your favorite Pottery Barn finish 🙂
Contains hand selected products, with affiliate marketing links where I may earn a small commission if a purchase is made. {full disclosure here}


Getting Started with a DIY Pottery Barn Finish
What is the Pottery Barn Seadrift finish or Driftwood finish?
The Pottery Barn Seadrift finish is a weathered, silvery-gray finish that mimics the look of driftwood.
It’s popular for its coastal, rustic appeal and is commonly found on furniture pieces from Pottery Barn.
Here are the common finishes found on their furniture, with links to examples:
- Seadrift (Sausalito) Finish
- Bone White (Linwood) Finish
- Sandwash Finish
- Fog Wood Finish
- Gray Wash Finish

This finish is achieved through a combination of base paint, antiquing glaze, and dry brushing techniques to create a layered, textured effect.
I haven’t created the gray wash finish on my furniture or cabinets, but you could create it using these tutorials. Just use a gray versus a tan paint color for the top glaze.
Can I apply a Pottery Barn finish on any type of furniture?
Yes, you can apply Pottery Barn finishes to a variety of furniture types, including wood, MDF, and even laminate (IKEA).
The key is proper surface preparation, which includes cleaning, sanding, and priming the piece to ensure the paint adheres properly.
Can I use this same Pottery Barn finish technique on kitchen or bathroom cabinets?
Yes, these paint finishes can be applied to cabinets to give them a rustic, weathered look.
Just ensure you use apply a brush on water-based polyurethane protective topcoat, especially in areas prone to moisture and regular cleaning.
What kind of paint should I use to achieve the Pottery Barn finish?
For a Pottery Barn finish, you’ll need high-quality furniture or cabinet enamel paint for the base coat, and a specialized glaze for the top layers.
For outdoor projects, make sure to use exterior-grade paint.
What is the paint application process for Pottery Barn finishes?
When I tell you I make this an EASY DIY paint project to follow I mean it!
Each one of my tutorials follow the same basic formula to achieve the Pottery Barn finishes:
Step 1: Base Coat Application
The first step in the actual painting process is applying a solid base coat. This sets the stage for the layers that follow.
Whether it’s a Seadrift or Driftwood finish, the base coat paint color is essential as the starting point for achieving the depth and richness of Pottery Barn finishes.
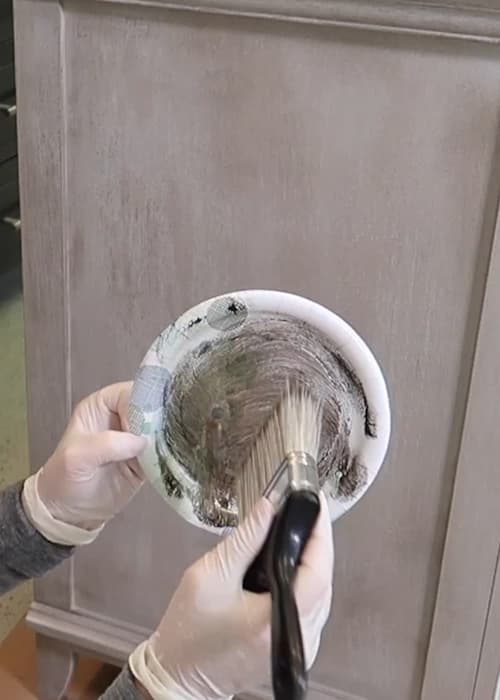
Step 2: Layering with Glaze
Applying colored glaze layers is where the magic happens. The glaze adds texture and dimension, creating that weathered, aged look.
You often use dry brushing or blending techniques to enhance the wood grain effect, which is a signature aspect of these finishes.
Do I need to use a protective topcoat on my finished furniture?
Sometimes! Applying a protective topcoat is essential to preserving the finish on high use furniture.
For indoor furniture water-based polyurethane to protect against scratches and spills. For outdoor furniture, a spray on clear coat will protect the finish.
On my cabinet and outdoor furniture Pottery Barn finish, I DIDN’T use any type of clear coat. For the dresser that I use CONSTANTLY, I applied 3 coats of water-based polyurethane.
Read this post on how-to decide if you need to apply a clear top coat of polyurethane.
Essential Pottery Barn Finish Tools and Materials
Before we jump into the nitty-gritty, let’s chat about what you’ll need to get started.
Trust me, having the right tools and materials will make your project so much easier (and more fun!).
I’m a big fan of avoiding a trip mid-paint project to grab something you forgot at the home improvement store.
I always say, “Invest in good tools—they’ll make all the difference!” Here’s what you’ll need to have on hand for all of the paint finishes I’m sharing.
Paint Supplies
- Pre-Paint Cleaner
- Bonding Primer
- Cabinet and Furniture Enamel Paint (base coat)
- Antiquing glaze
- Clear mixing glaze (Valspar has been discontinued)
- Water-based polyurethane (matte or satin)
- Angled Brush
- Paint Brush Set for Details
- Sandpaper (medium and fine grit)
- Drop cloths or cardboard
- Protective gloves
- Paper plates
With these supplies in hand, you’ll be well on your way to creating a gorgeous finish that looks like it came straight from a Pottery Barn catalog.
Surface Preparation
Now, I know prep work isn’t the most glamorous part of a DIY project, but trust me, it’s essential.
Skipping this step is like baking a cake without greasing the pan—things just won’t turn out right!
Make sure to clean, sand failing areas smooth, and prime your piece before you start painting. This will help the paint adhere properly and give you that smooth, professional finish.
How to Create the Pottery Barn Seadrift Finish
Ah, the Seadrift finish—one of my absolute favorites! It’s that perfect blend of coastal and rustic, with a weathered, silvery-gray vibe that works in just about any space.
Let me walk you through the process step by step. Don’t let the word “finish” scare you off—this technique is easier than you think!
We’ll start with a base coat, then layer on some antiquing glaze to create that gorgeous depth and dimension.
By the time we’re done, your furniture will have that Pottery Barn Seadrift or Fog Finish look we all love (without the Pottery Barn price tag).
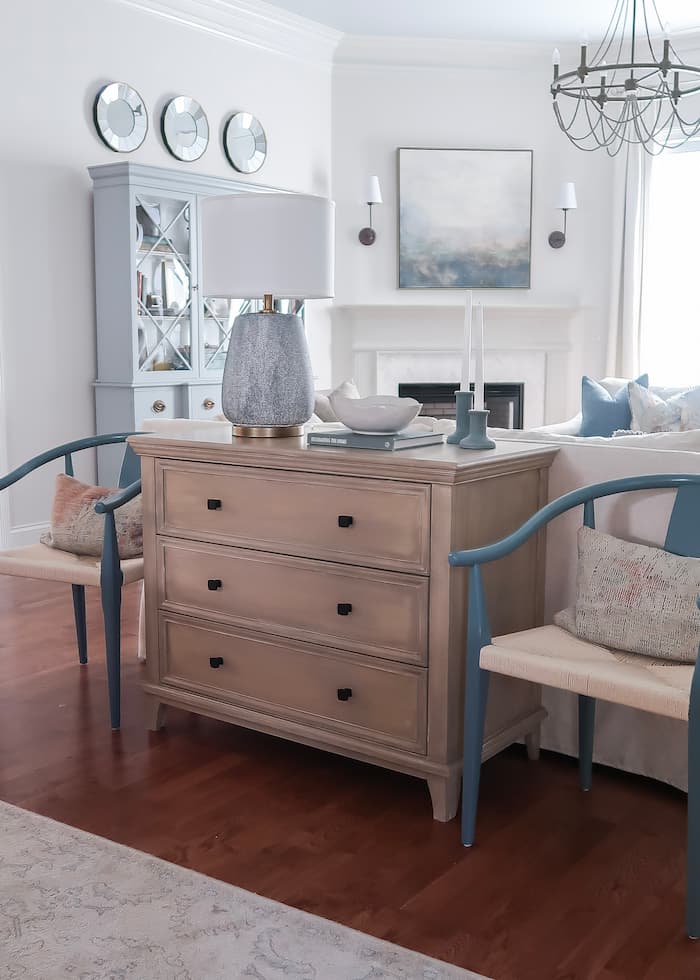
Furniture Seadrift or Fog Finish
Use this finish to makeover any type of furniture. Paint over stained wood, IKEA or laminate surfaces.
For a complete walkthrough, head over to my post on How-to Paint IKEA Furniture the Pottery Barn Seadrift Finish (aka driftwood)!
Cabinet Seadrift Finish
Use this finish to paint kitchen or bathroom cabinets. Paint over stained wood, painted or laminate surfaces.
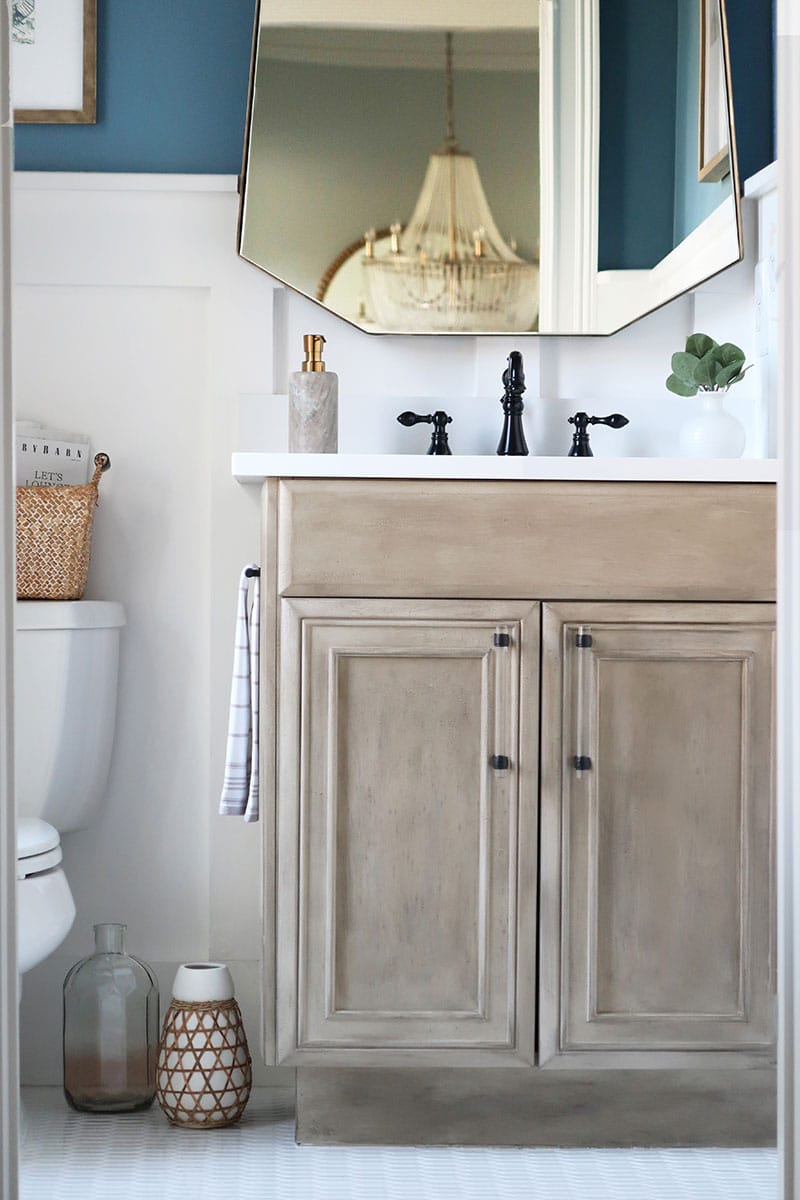
For a complete walkthrough, head over to my post on How-to Paint the Pottery Barn Seadrift Finish
Tips for a Professional Finish
Here’s where the magic happens! Blending the glaze just right, using a dry brush technique, and knowing when to step back and admire your work are all key to nailing this finish.
I’ve learned a few tricks along the way that make the process smoother and the results even better.
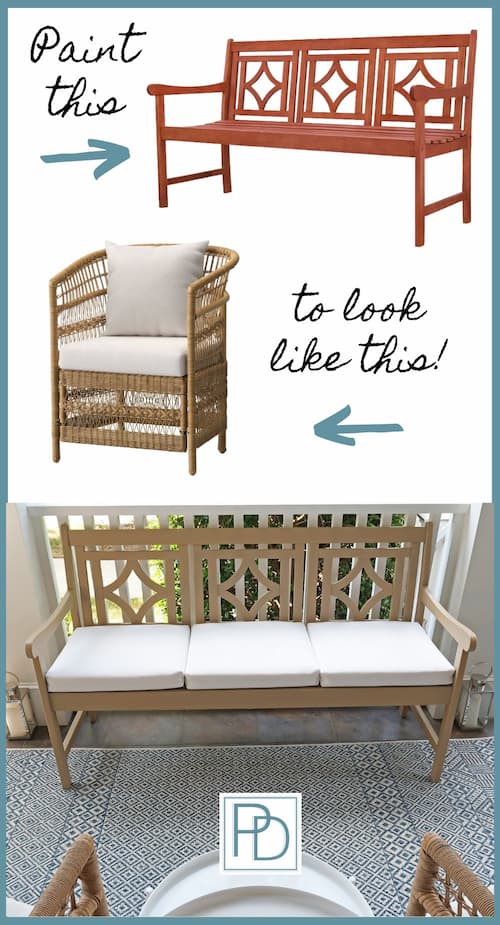
Pottery Barn Driftwood or Sandwash Furniture Finish
Let’s talk driftwood or the new name for it “Sandwash”. Another classic Pottery Barn finish that’s perfect for adding that beachy, laid-back vibe to your home.
Whether you’re updating a piece for your living room or giving your patio furniture a facelift, this finish is versatile indoors or outdoors.

Driftwood, Sandwash, Bone white Finish
Use this finish to makeover any type of furniture. Paint over stained wood, IKEA or laminate surfaces.
For a complete walkthrough, head over to my post on How-To Create the Pottery Barn Driftwood Finish
Outdoor Driftwood Finish Techniques
I’ll show you how to create that driftwood finish that’s perfect for a porch or patio.
For outdoor furniture, durability is key. We’ll use exterior-grade paints to ensure your pieces look beautiful season after season.
Outdoor Driftwood or seadrift Finish
Paint over stained or painted outdoor wood furniture or even your swing!

For a complete walkthrough, head over to my post on Easy Driftwood Paint Finish for Outdoor Furniture.
outdoor fog finish
Paint over stained or painted outdoor wood furniture or even your swing!
For a complete walkthrough, head over to my post on Create a Tan Wicker Finish with Paint!
Antiquing for Your Furniture
Another idea to get a rustic or aged or weathered wood appearance is to use an antiquing wax.
Not only will the wax add depth and dimension to your furniture, but it will also protect the finish underneath!
It’s like adding a little history to your piece, making it look like it’s been passed down through generations.

How-to Use Antiquing Wax
Add an aged look over any stained, polyurethane or painted finish.
I’ll show you how to use dark waxes, glazes, and distressing techniques to achieve that perfectly imperfect look.
For more on protecting and antiquing, don’t miss my guide on Easiest Way to Protect and Antique Furniture.
All about Antiquing Glaze
Your easy guide to all of the ways you can create glazes to add depth to cabinets and furniture.
If you want general information about how to antique furniture, I teach you all about it!
For more on antiquing glazes, don’t miss my guide on All About Antiquing Glaze for Cabinets and Furniture
Real-Life Applications and Inspiration
Sometimes, seeing is believing! I’ve put these techniques to the test in my own home, and I’m excited to share a couple of my favorite projects with you.
From a modern coastal powder room to a cozy front porch, these makeovers show just how transformative a Pottery Barn finish can be.
Modern Coastal Powder Room Makeover
This project was all about turning a basic powder room into a coastal retreat.
The Seadrift finish on the vanity set the tone, bringing in that relaxed, beachy vibe I love. It’s amazing what a little paint and creativity can do!
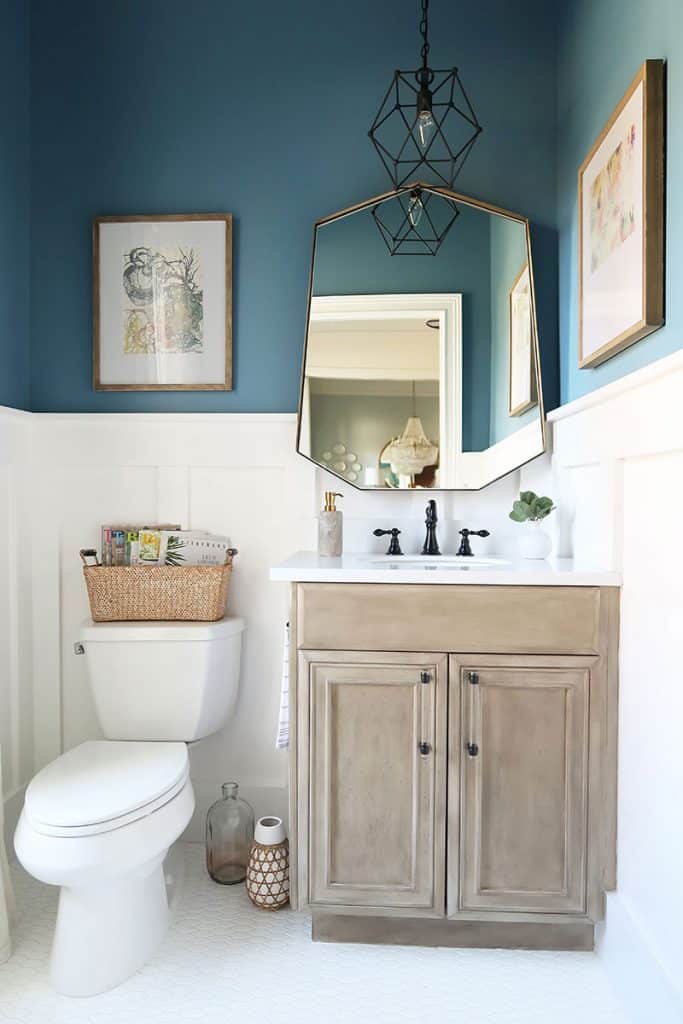
For more inspiration, check out my post on Modern Coastal Powder Room: REVEAL
Front Porch Furniture Update
My front porch is one of my favorite spots, and giving the furniture a driftwood makeover made it even more inviting.
The transformation was simple, but the results were stunning—a perfect blend of rustic and coastal charm.
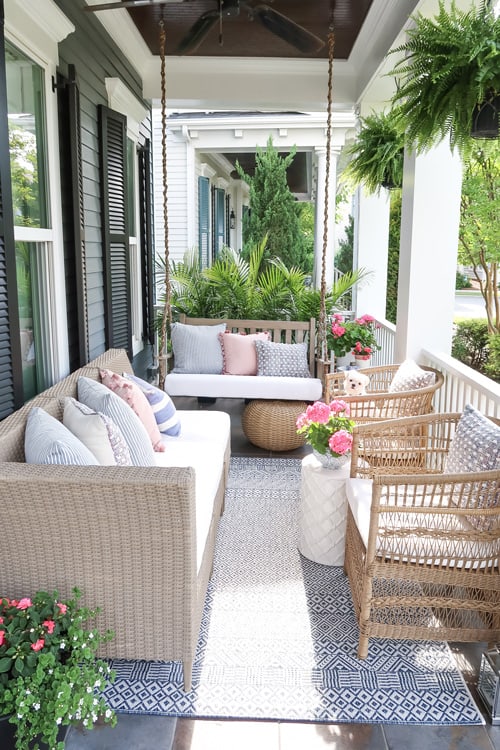
For more inspiration, check out my post on How-to Spray Paint Outdoor Resin Wicker Furniture (Driftwood Finish)

FAQs Creating a Pottery Barn Finish
How durable is the Pottery Barn finish for outdoor furniture?
The Pottery Barn driftwood finish for outdoor furniture is designed to be durable when properly sealed.
Using exterior-grade paint and a protective topcoat like polyurethane or a UV-resistant sealant will help the finish withstand the elements and maintain its appearance over time.
Can I use different colors to achieve a custom Pottery Barn finish?
Absolutely! While the classic Pottery Barn Seadrift and Driftwood finishes use specific color palettes, you can customize the colors to match your decor.
Experiment with different base colors and glazes to create a unique finish that suits your personal style.
How can I clean and maintain furniture with a Pottery Barn finish?
To clean furniture with a Pottery Barn finish, use a soft, damp cloth to wipe away dust and spills.
Avoid using harsh chemicals or abrasive cleaners, as they can damage the finish. My favorite cleaning method is a damp micro-fiber rag to remove dust and spills or dirt.
For outdoor furniture, an occasional reapplication of a protective topcoat may be necessary to maintain its durability.
What should I do if I make a mistake while applying the finish?
If you make a mistake, don’t worry! The glaze used in Pottery Barn finishes is forgiving and can be wiped off with a damp cloth before it dries.
You can also reapply layers as needed to correct any issues or achieve your desired look.
Then there is always sandpaper to sand off the finish and start again. If you follow my guidance on creating a sample before applying, you likely won’t run into any issues 🙂
How long does it take to complete a Pottery Barn finish project?
The time required to complete a Pottery Barn finish project depends on the size and complexity of the piece.
Generally, you should allow at least a weekend for the project, including drying times between coats and any final touch-ups.
Bringing Pottery Barn Style Into Your Home
So there you have it! With these DIY Pottery Barn finish techniques, you can transform any piece of furniture into a stylish and timeless addition to your home.
Whether you’re working on a large piece or a small accent, these finishes offer endless possibilities for customization.
So grab your paintbrush, get creative, and enjoy the satisfaction of crafting something beautiful with your own two hands.
Love All Things Pottery Barn? Check out these posts:
Sign-Up for my Weekly Emails!
Straight to your inbox sharing can’t miss decorating and painting tips for your home.
I just painted a piece black and it’s too heavy. Can I do this over my black matte paint? I love this! TIA.
You sure can! To be safe, you may want to apply 1 coat of bonding primer over the black first. Glad you love it like I do…this piece of furniture sits in the middle of my house and it looks like wood 🙂