Master Bathroom Remodel: WK 4
Sharing the mosaic tile on the floor plus how to map out a shower wall niche! The bathroom remodel is now in full swing and getting prettier by the day.
Here we are at week 4 of the master bathroom renovation and remodel. Turning the corner from demolition to the tile installation phase.
Sharing my best tips for mapping out a shower wall niche and laying out the tile to get the look you want.
Plus the details around the cabinet hardware and pretty plumbing fixtures.
Master Bathroom Remodel Details
Last week was the hard week with all items being demolished to make room for the pretty new tile!
This week I’ve hit a wall of annoyance “When will this darn bathroom be done?”, “Why didn’t the contractor show up today?” and “Please install my toilet for the weekend!
It’s all part of the remodel emotional journey they say. I’m hanging in there because the design vision is turning into reality!
Here are the final selections in all of their glory…
Post contains hand selected products, with affiliate marketing links throughout {full disclosure here}
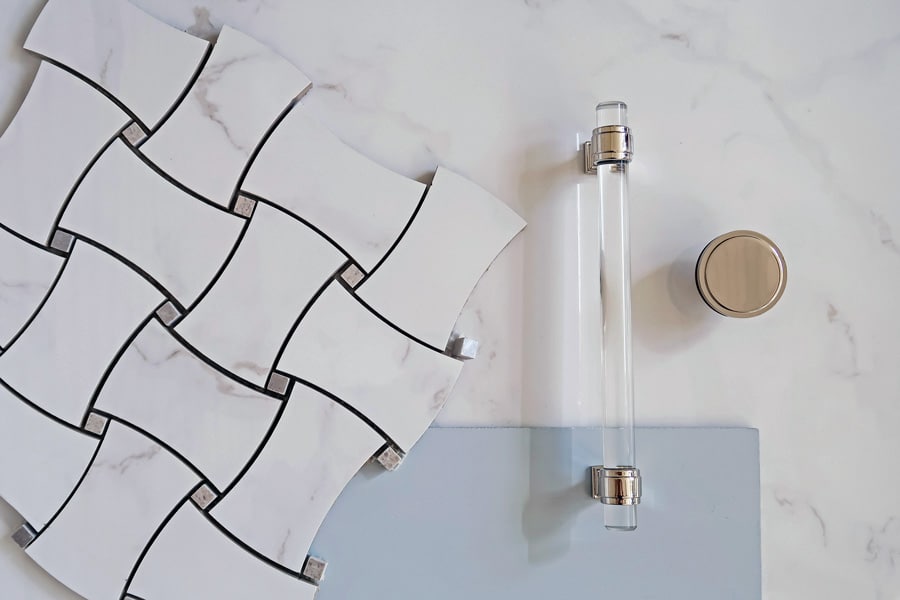
I’m so excited about the Amerock cabinet hardware and I love the look with the tiles and Wales Gray paint color.
It’s clean and sophisticated using a polished nickel finish to reflect the colors and light in the room.
Chrome is the more common finish, but tends to have a blue cast and with polished nickel it brings more warmth against the other cool tones of the paint and tile.

The polished nickel finish complements the drapery hardware and wall sconces perfectly, which were both amazingly affordable finds considering the glass and acrylic structure.
I love the modern clear accents in between the more traditional elements to create a unique look!
How-to Design a Shower Wall Niche
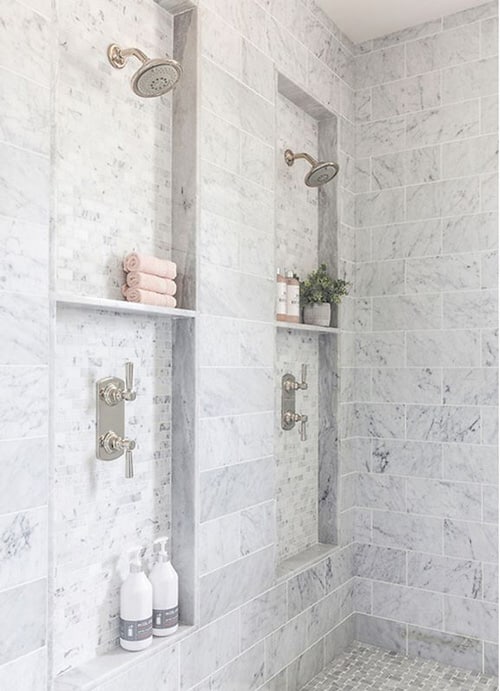
This is the fun part where craftsmanship meets creativity! Here is a reminder of the shower niche inspiration.
Unfortunately, due to both budget and structure confinement this option just wasn’t possible in my shower.
My initial thought was to do a basic niche on the large wall. You can buy a pre-defined niche that is inserted and tiled.
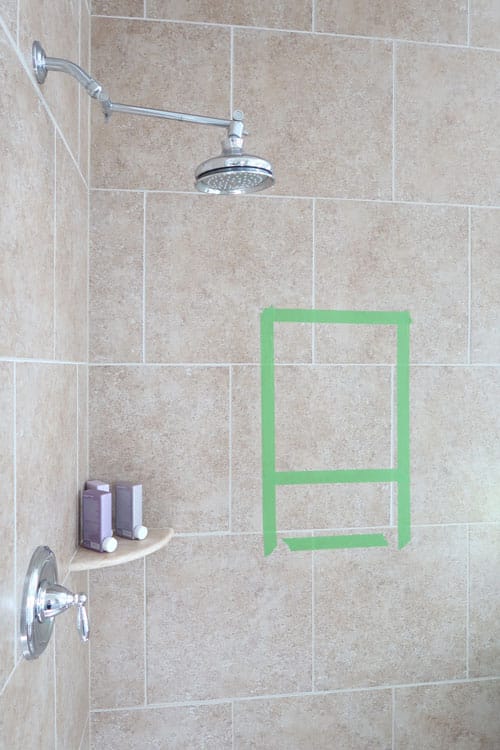
An easy method to test out the size and shape is to map out the niche on the wall with painter’s tape!
After going through this process, I realized having a niche on the main shower wall was going to take away from the the clean porcelain slab look I so desired.
Off my mind went to think of a new option and discuss it with my contractor.
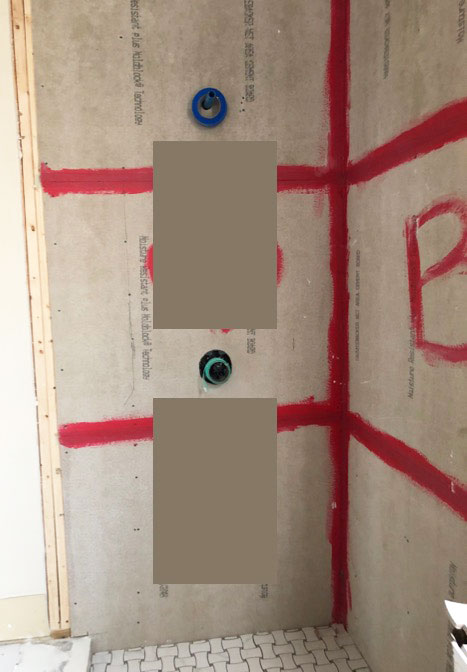
My hope was we could relocate the niche to the wall with the plumbing fixtures and mimic the same look as the inspiration bathroom.
Luckily, with a little ingenuity my contractor was able to reroute the plumbing lines and the two new niche options got a green light!
The floor tile went in without issue and now it was time to work on the shower tile.
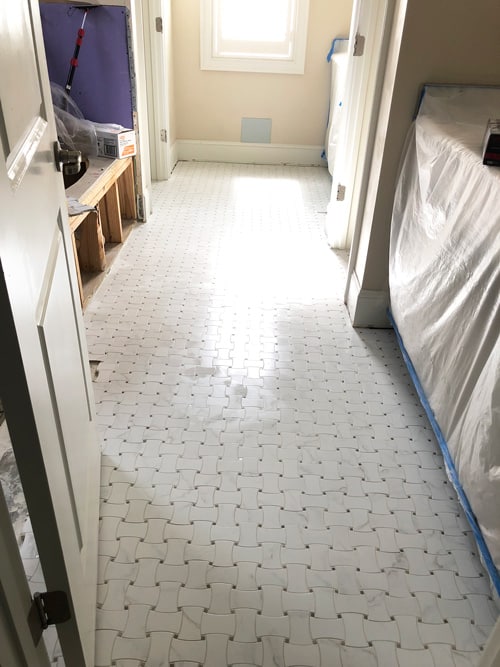
Here is a little sneak peek, before the tiles were wiped clean. Pretty spectacular and a HUGE change from that big beige tile.
Laying Out Shower Tile
To make sure you get exactly the look you want with the tile, it’s critically important to layout the tile with your contractor.
When you have a large format tile that only has a few patterns, it’s SO important to turn the individual tiles and create a pattern that flows.
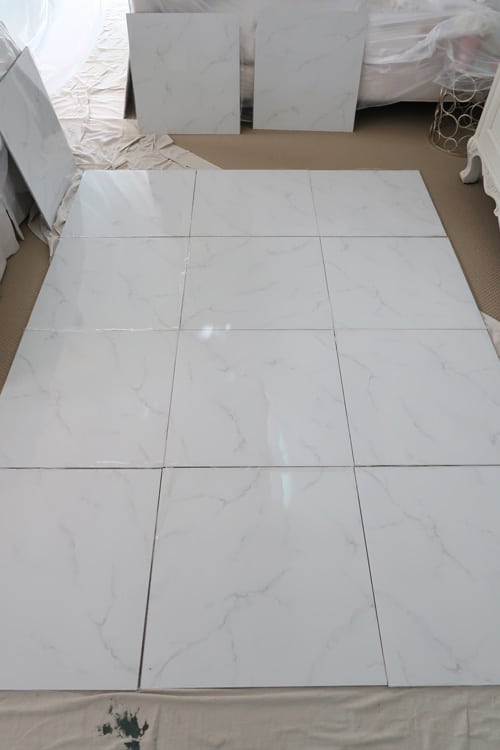
With a little muscle from my contractor, we laid the main wall tile on the floor.
Then we made sure each piece flowed into the next like a natural marble would.
The tile from The Tile Shop was so well designed that it was a matter of preference on how we connected the “marble” lines.
Now Leo and Blanca had the look I envisioned out of my head and onto the floor of my bedroom.
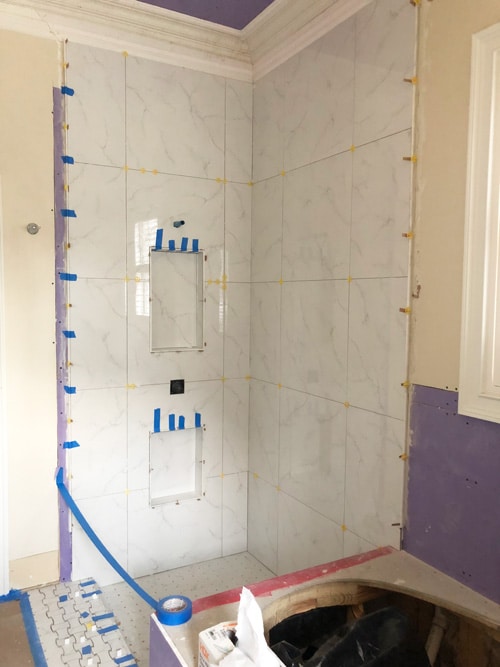
By using the smallest 1/16″ grout lines, the vision had become a reality! They even found a way to make the back of the niche flow with the wall tile – such great work.
Now the shower was going to have the look of a porcelain slab, but by doing it very inexpensively with 24 inch x 24 inch marble look tiles.
Moving the niches to the plumbing fixture wall created a clean uninterrupted look on the main shower wall. Perfect!
Gotta love when a vision comes together, with a skilled tile installer.
One last but a VERY important detail are the fashion plumbing fixtures.
I found the prettiest collection from Kohler that carries the same details as the lighting and cabinet hardware, in polished nickel.
By they way, finding polished nickel items proved to be more difficult than you would think!
One Room Challenge Progress to Date
Want to see the remodel before pictures and the progress each week?
Follow this page created just for The Luxury Hotel Bathroom One Room Challenge Remodel.

We had a little delay with the marble tub deck, so come back next week to see that feature and how to design picture frame moulding for the walls!
To keep you entertained in between, please visit all of the other featured and guest designer’s progress during their own One Room Challenge craziness!
So you don’t miss an update, please consider signing up for my weekly email newsletter.
Until next time…
Porch Daydreamer
Tracey
Hi Tracey, i LOVE your blog! i feel abandoned by all my other bloggers who have moved to Instagram! I chose the wrong time to give up social media???? You are a bright spot in my email! I love your ORC! it will be beautiful!
June, you made my day! Thank you so much. I love Instagram, but it doesn’t give me enough room to write and teach 🙂