Master Bathroom Remodel Luxury Hotel: REVEAL
See the master bathroom remodel that was once boring builder beige and now is luxury hotel. The bathroom reveal is here!
The master bathroom remodel from the boring beige tile to something special has been a dream of mine.
It always felt out of reach, but after saving for a few years I turned that dream into a reality!
Fast forward to a spilled glass of wine on a rug and poof it was time to makeover the bathroom!
What I love out this master bathroom remodel for my readers is that I spent my own money and made a point of being budget conscious.
I was able to change the look dramatically, without making any structural changes which makes this bathroom a great starting point for your own remodel. Product sources and paint colors at bottom of post
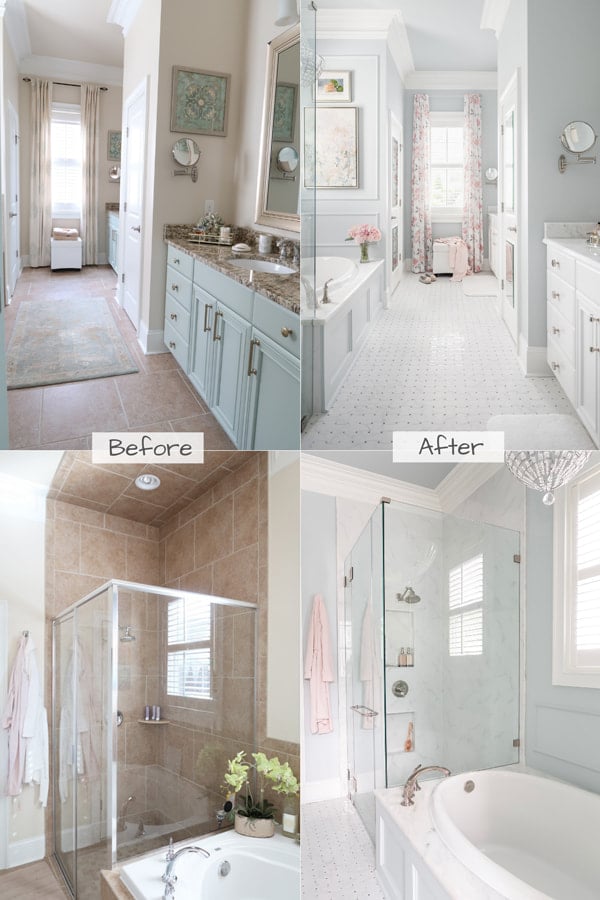
Master Bathroom Remodel Before and Design Plan
So you understand how far this bathroom has come, we must look back at the before pictures!
At the time I built my home 9 years ago, I went with the builder’s model home beige tile. It looked beautiful (at the time) and felt really new – now not so much!
If you would like see the progress each week, where I dive deeper into the details of each area, please visit this page Luxury Hotel Bathroom Remodel.
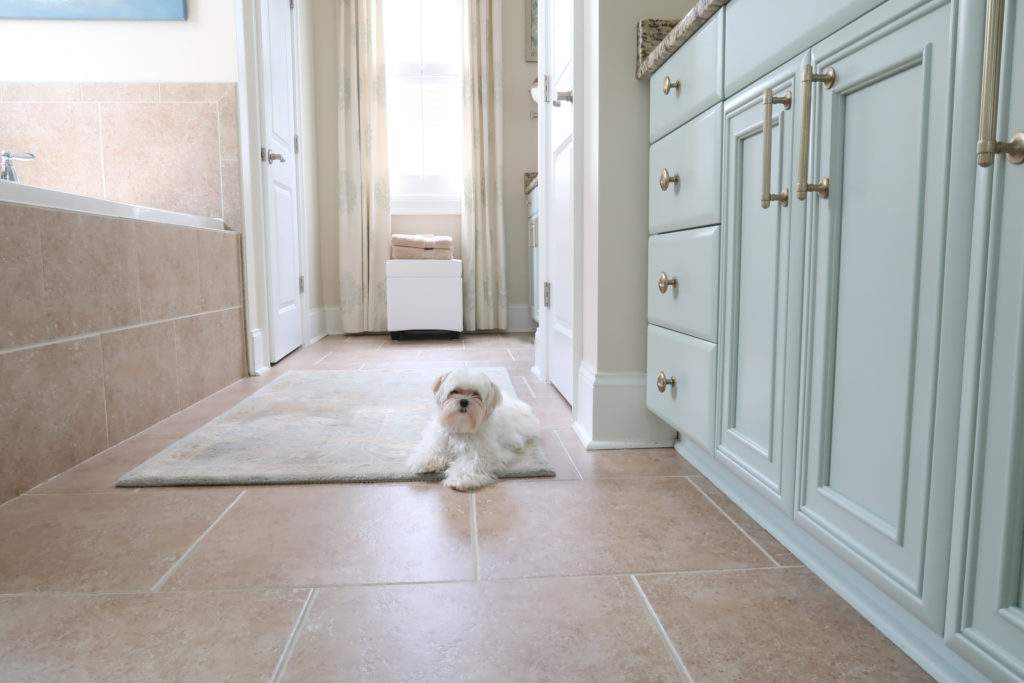
It seemed easier to remodel the bathroom than to find a new rug!
See that lovely rug? Well, after a dumb decision to bring red wine into the bath it was ruined.
This ruined rug was at the core of my color scheme, couldn’t be replaced, so the kick off to this remodel commenced!
Design Plan Goals
Having a clear design plan, before ever getting labor quotes, helped me save time and money. That’s my best advice for you!
Know what are must haves and what are nice to have that can be dropped if it gets too expensive.
- Update all tile on floors and in shower, with a marble look porcelain.
- Maintain bathroom vanities, repaint and update cabinet hardware.
- Purchase a new streamlined oval drop-in bathtub.
- Remove granite and replace with marble and add a marble tub deck.
- Replace all bathroom fashion plumbing fixtures.
- Relocate vanity lights from a single bar above the mirror to two sconces on either side.
- Install 4″ LED overhead lights over vanity and in shower for brighter lighting.
- Upgrade to a frameless glass shower surround.
- Create shower niches for toiletries and a foot rest for shaving.
- Add a crystal chandelier above the bathtub.
A nice to have was to update the linen closet space and create something prettier. Unfortunately, all plans ended up outside of my budget!
Luckily, you’ll see I found a clever and affordable way to “dress-up” both doors in the bathroom.
Are your ready to see the pictures?
With the help of Tiffany Ringwald my professional photography friend, we’ve been busy getting the pictures ready for the reveal.
SOURCES can be found at the bottom of the post.
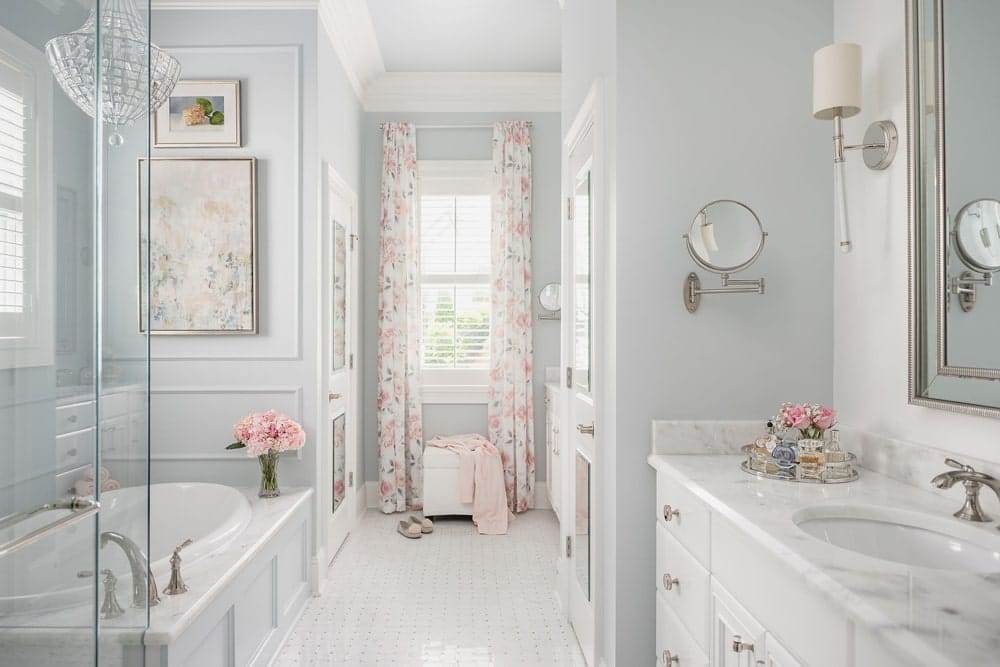
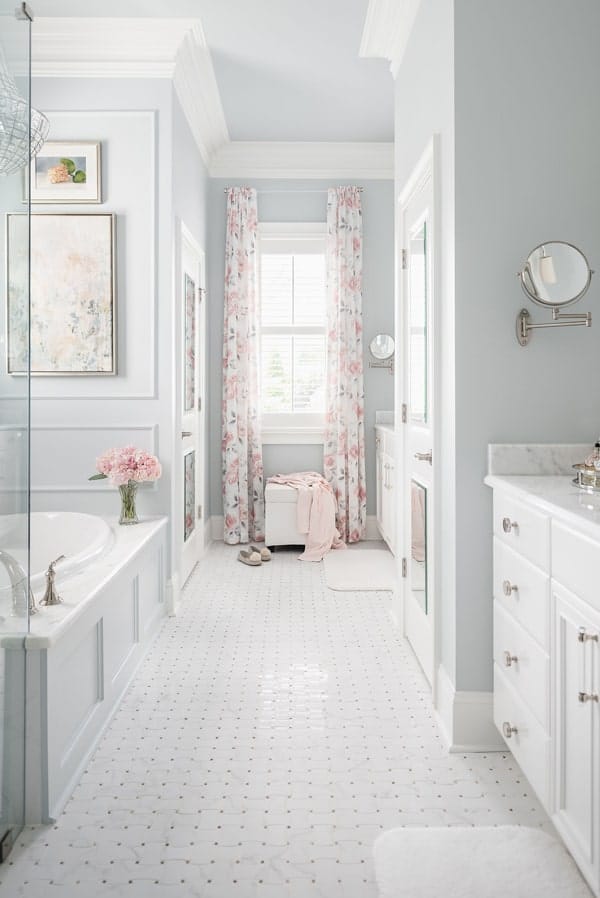
Master Bathroom Remodel Reveal
It’s so exciting to share with you how the bathroom has been transformed! If you’ve been following me on Instagram, you know my style is a bit French or European.
Of course I brought that style into the bathroom! Since I’m a single mom, I’ve been able to decorate my home with a more feminine flair and this bathroom is no exception.
It now feels like a luxury hotel bathroom was dropped into my home – wow!
Post contains hand selected products, with affiliate marketing links throughout {full disclosure here}
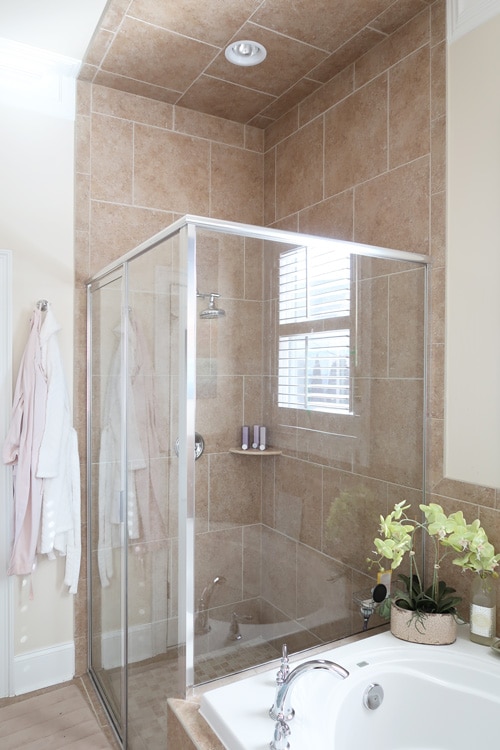
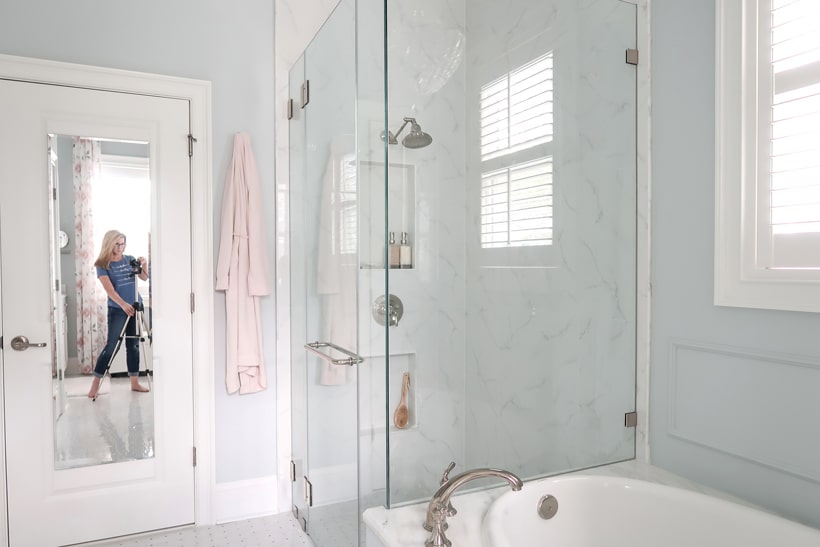
Master Bathroom Tile Details: Floor and Shower
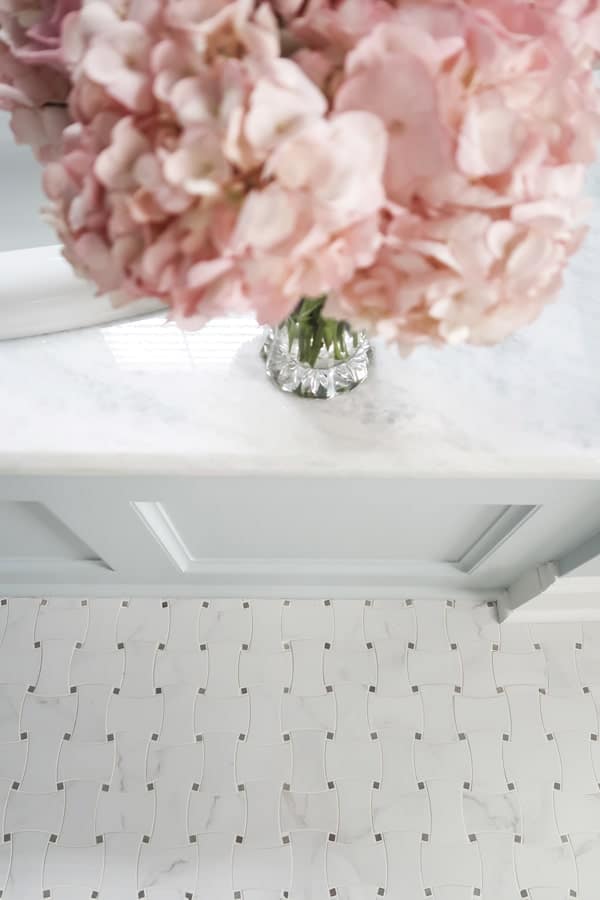
The beautiful mosaic marble-look tile, in a basket weave pattern is a stunner! It has a charcoal gray accent versus the typical black, which softened the look of the floors and worked perfectly with the Shadow Storm marble.
Not going with a honed surface and instead polished surface tile added more dimension and light reflecting quality.
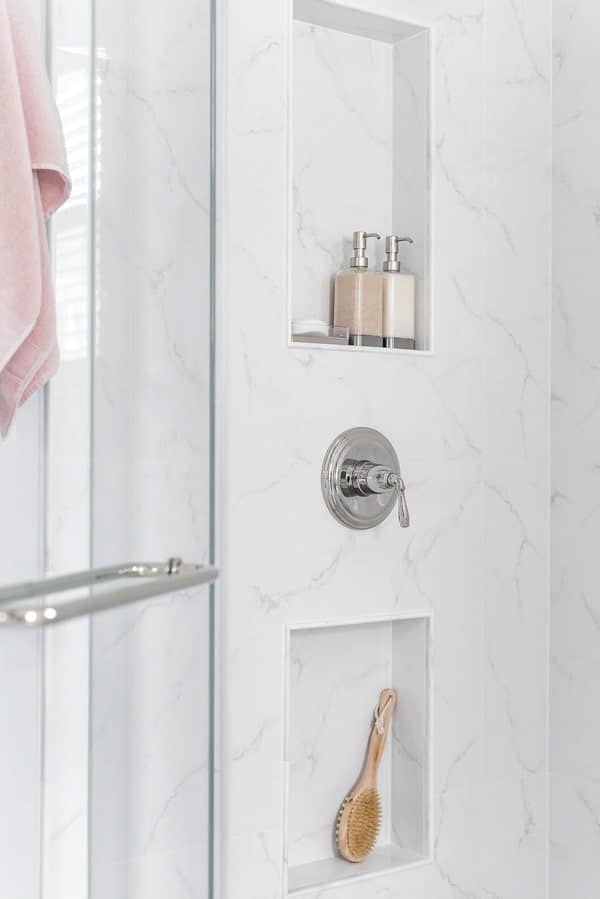
The tile was carried into the shower, where we created a zero entry look using pencil marble trim. To not take away from the mosaic tile, I went with a drain that could be tiled for a more upscale look.
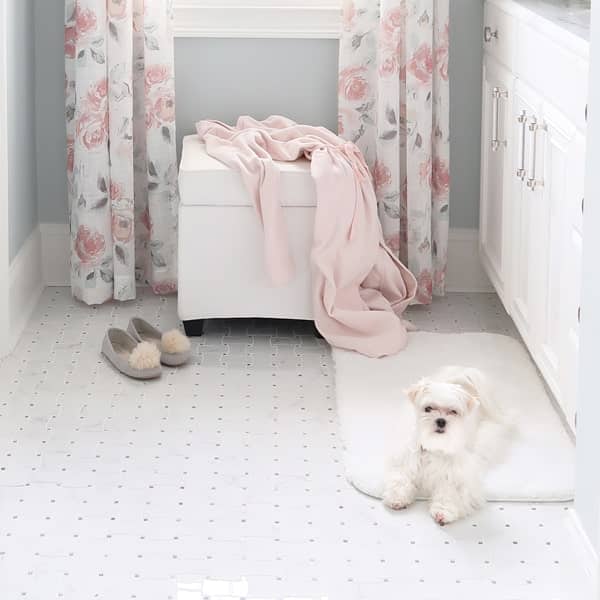
The general contractor laughed that I insisted I needed at least a toe rest, when shaving my legs.
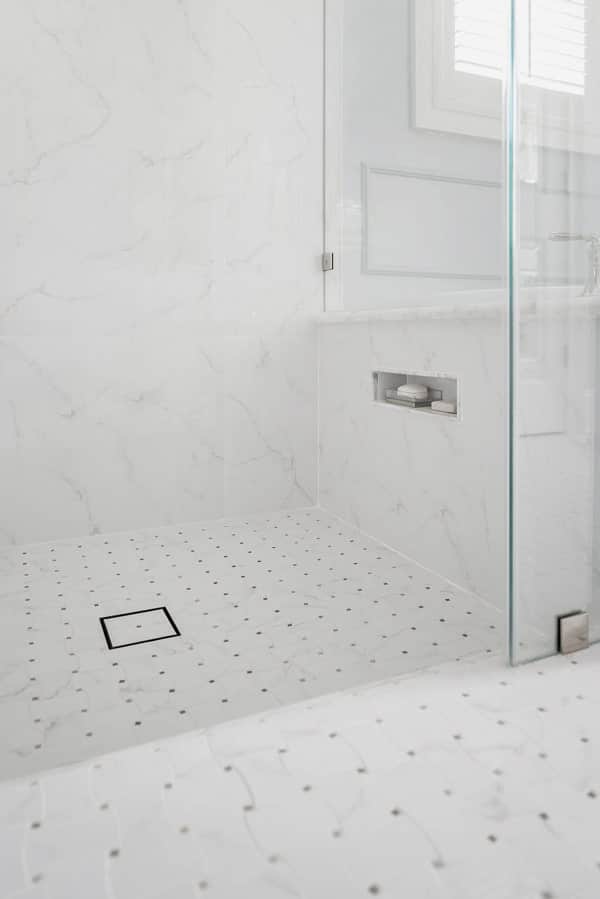
Adding a small niche on the short wall of the shower has been just the thing I needed to store my razor and prop my foot.
Not wanting to do a corner shelf it was fun to instead design niches to not only add interest to the shower, but store my stuff!
To preserve the clean look I desired on the main shower wall, I loved that we were able to create two niches inset on the same wall as the faucet and shower head.
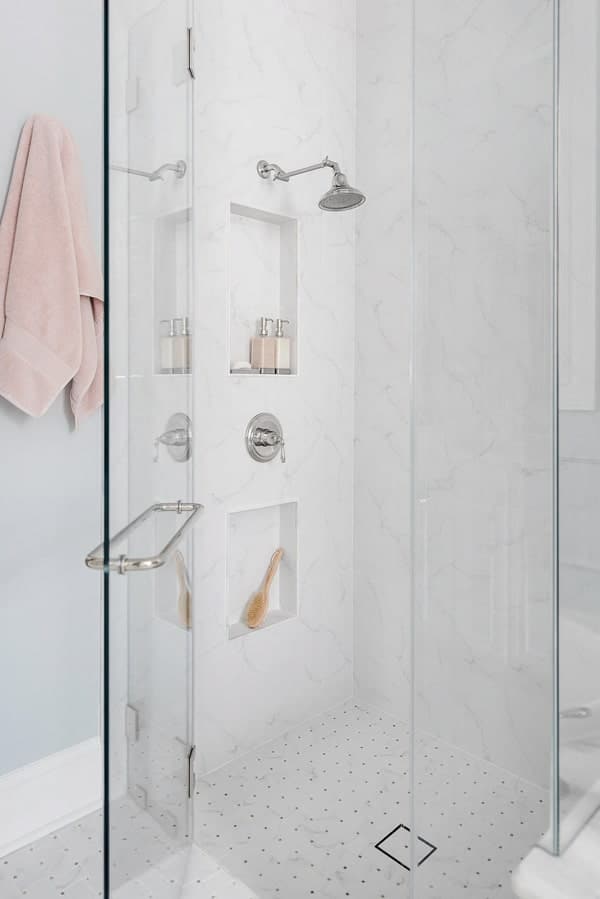
It creates so much depth and an interesting focal point. The pump bottles and soap dish were the perfect way to bring in that hotel feel inexpensively.
My initial design for the shower was to incorporate porcelain slab for a seamless look. Unfortunately, porcelain slab was NOT in the budget!
By selecting a large format marble-look tile in 24 in. x 24 in. squares, we were able to create the LOOK of marble slab using a 1/6 in. grout line.
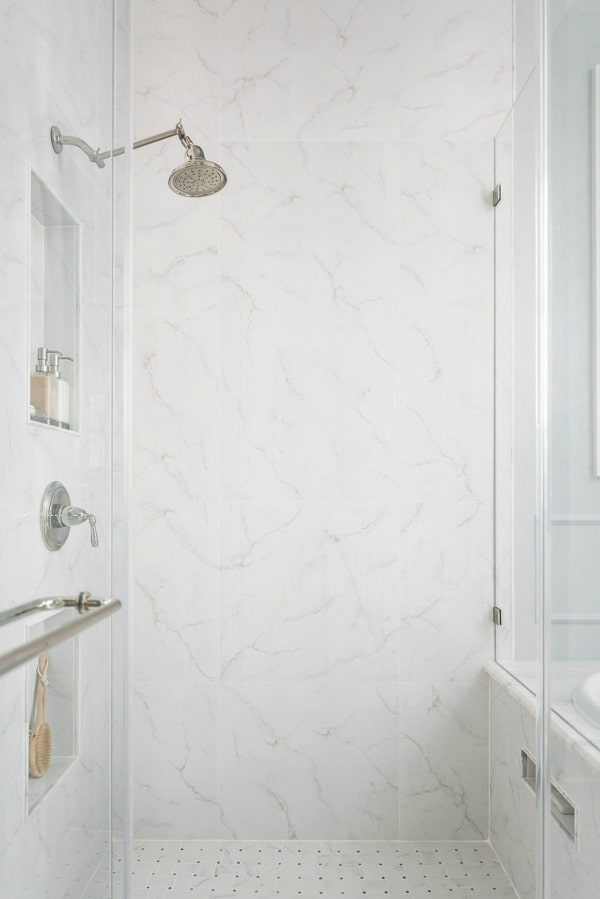
The tiler took the time and painstakingly focused on making sure we had constant movement of the veining from tile to tile.
It is exactly as I hoped for am glad I left the one wall devoid of any other detail for that true slab feel.
The large format tile looks amazing with the mosaic tile on the shower floor.
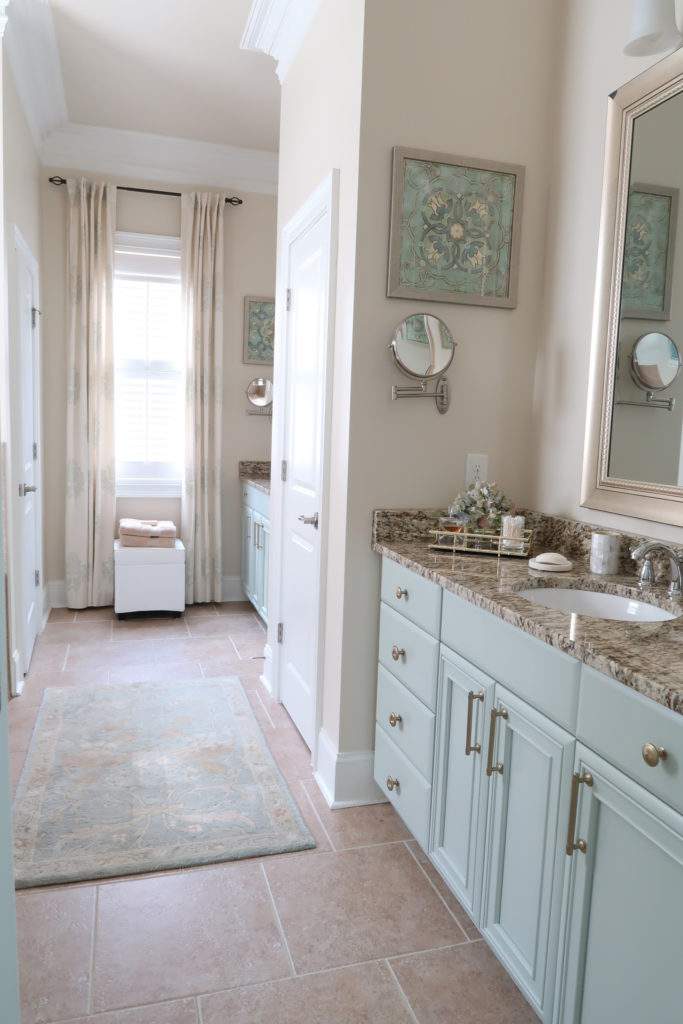
Master Bathroom Double Vanities
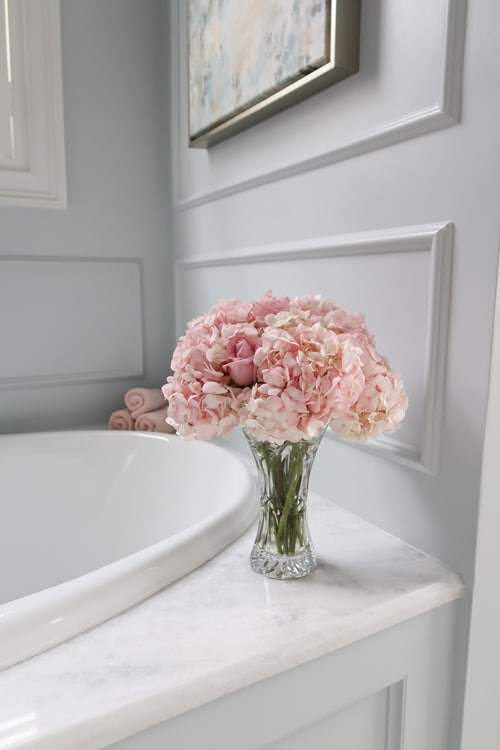
What about those marble counters and tub deck? That says luxury to me. The Shadow Storm marble has a crystalized depth too it and on a sunny morning sparkles in the light.
I went with a non-upgraded beveled edge, which looks more finished adding architectural detail without spending more money.
Painting the walls and ceiling a color helped to break up all of the white and create a cozy feel, without being harsh or too cold.
Ah the sconces! Such an affordable find that were similar to a much more expensive design.
I’ve always wanted sconces on either side of the mirror because symmetrical design soothes my soul!
It’s such a nice upgrade, after having a single bar light over the mirror. We added dimmers to all of the lights too, for more romance.
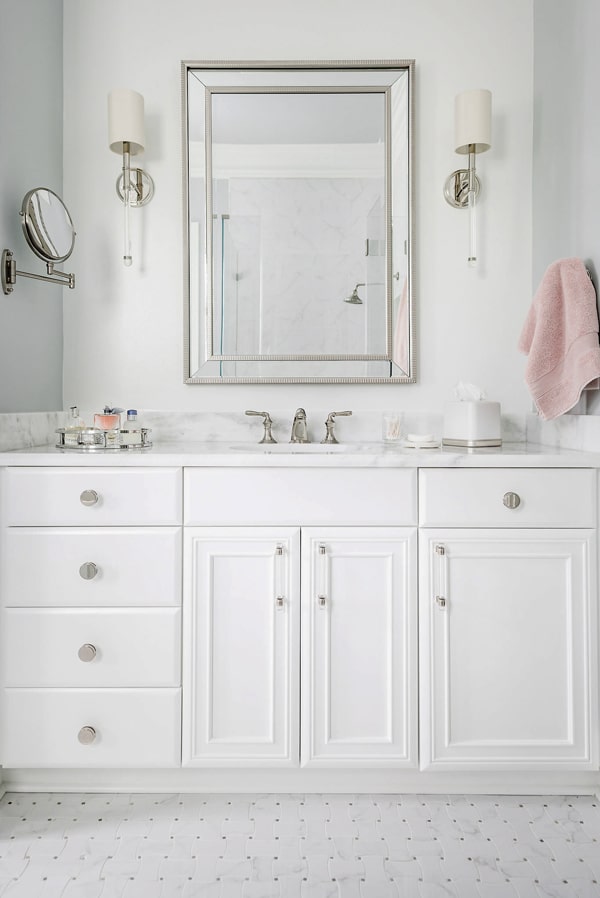
Notice something unique about the wall color? I decided to pull the same color used for the cabinets up onto the wall behind the mirror.
When putting on make up or doing my hair, it’s better to have a white wall to look into versus blue or gray. Much more flattering!
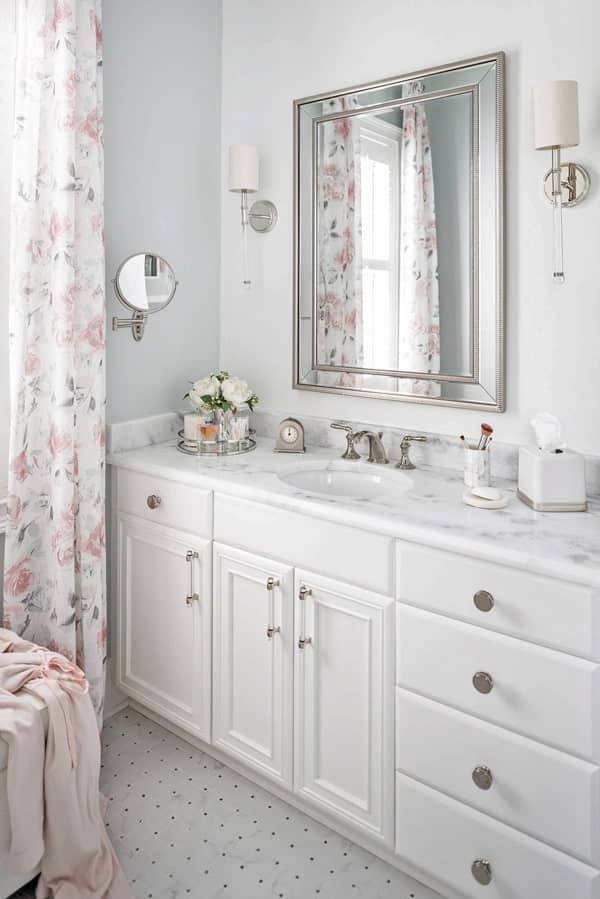
I like the depth the color change creates in each vanity nook and a white back drop is a better contrast to the gorgeous antique silver mirrors.
Taking the cabinet color from a mint green to a clean white gave them an entirely new look! Full cabinet painting tutorial here.
So did the Shadow Storm marble counters and new polished nickel faucets.
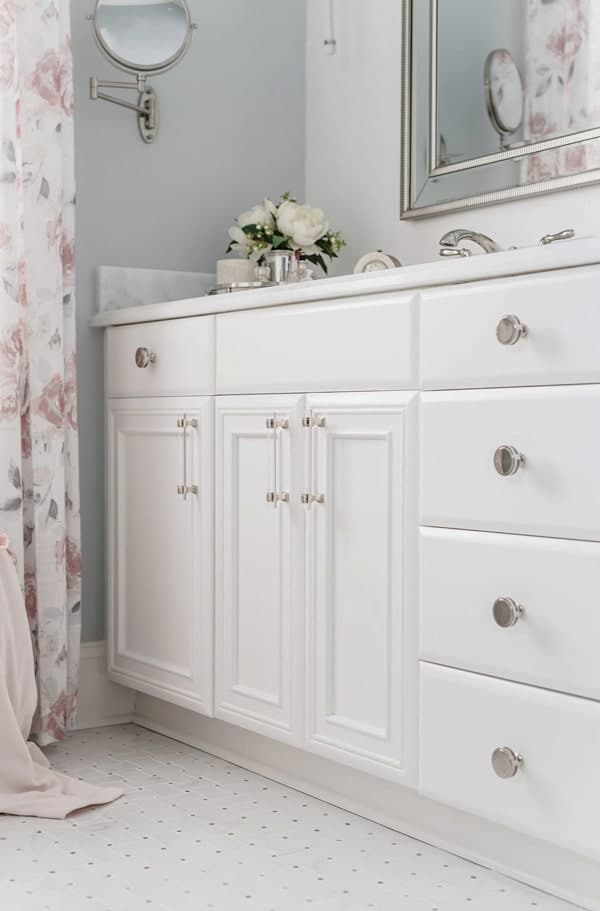
Cabinet hardware is one of my FAVORITE things in life and is the perfect accessory to a perfectly plain white cabinet.
The clear glass pulls with polished nickel accents were the perfect complement to the sconces.
Then I went with oversized almost 2 inch round polished nickel knobs on the drawers for a wow factor.
Surprisingly, they don’t pick up fingerprints – I knew you’d want to know with all of that reflective finish 🙂
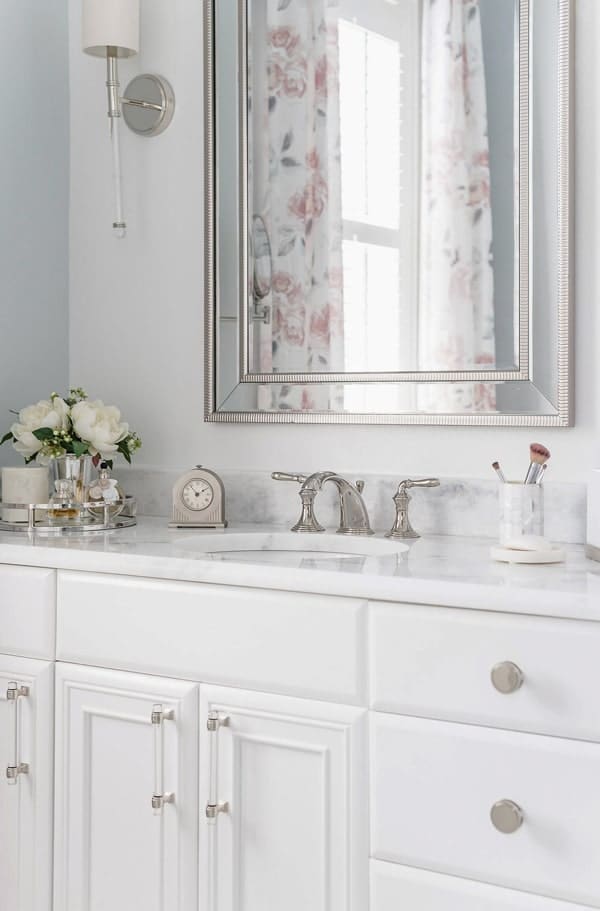
The white tissue holders and round polished silver mirrored trays were the perfect find for the counters.
Since I am someone who likes to keep my vanity clear of clutter, they neatly hold my pretty little things and display perfume beautifully.
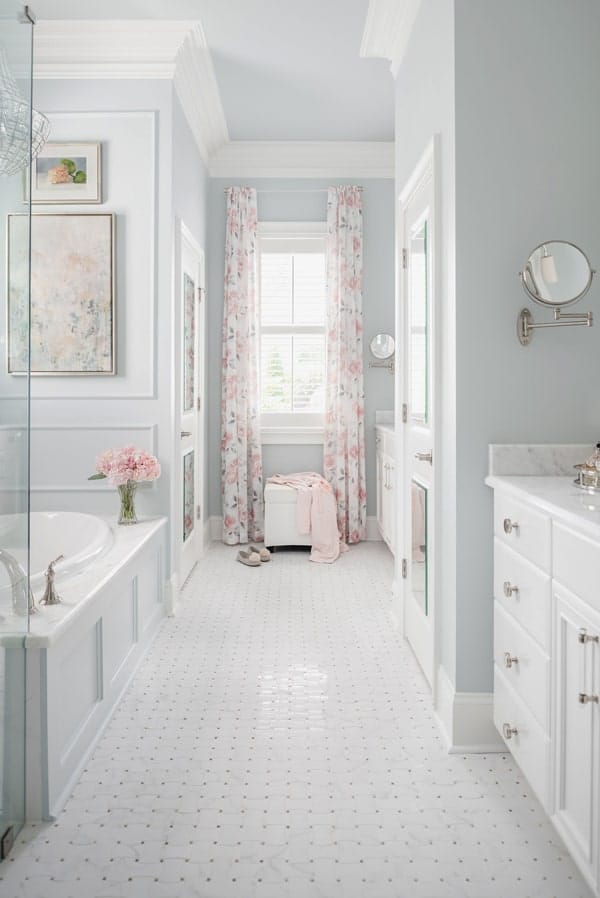
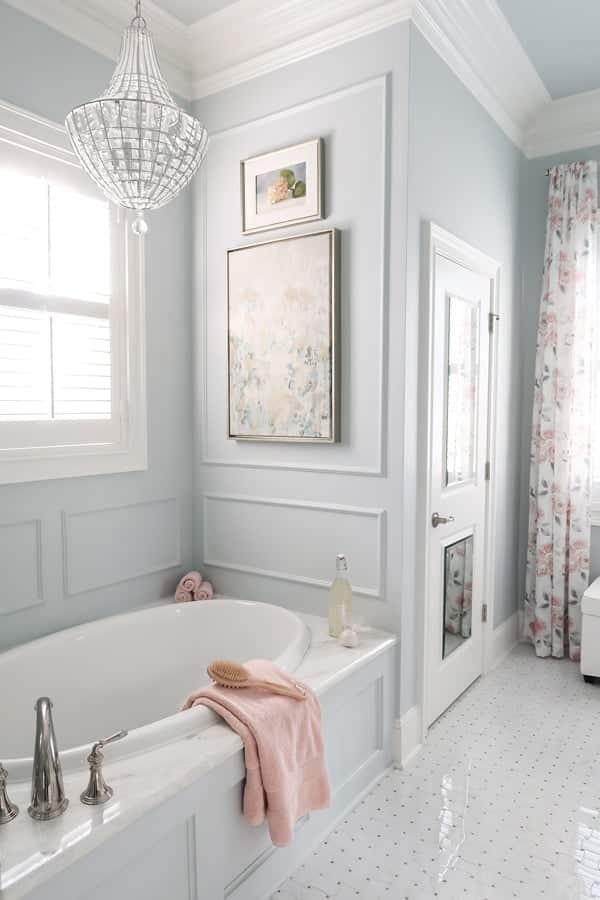
Master Bathroom Bathtub Nook
Then I MUST mention the artwork! The little hydrangea oil painting is an original and one of my mom’s “studies”. Isn’t is perfect!
We traveled to Bellagio, Italy last spring and we wandered into this beautiful artist’s studio.
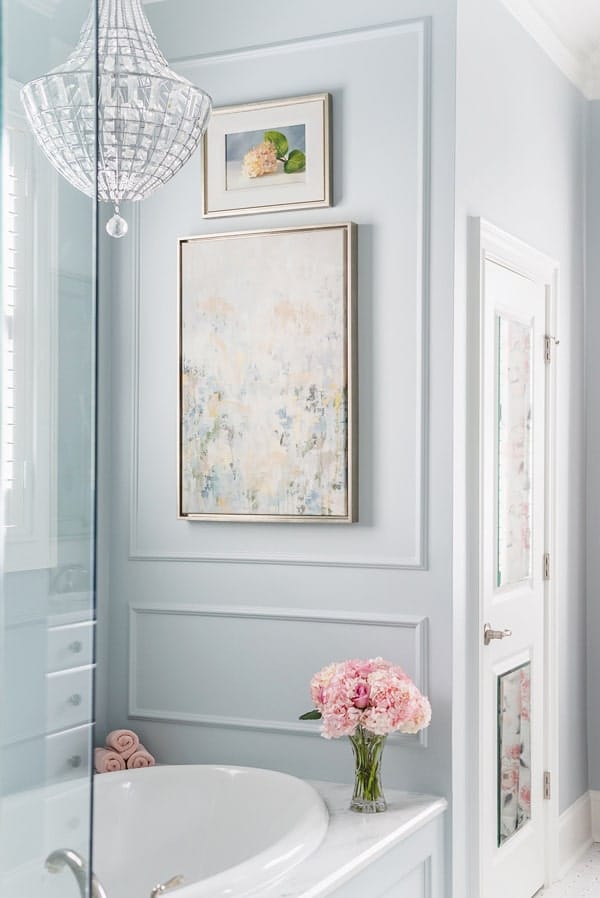
I couldn’t afford his hydrangea painting, so she used a similar technique to paint one for me instead!
Then I wanted to balance the small painting with a larger abstract piece of art to anchor the space and used the same antique silver frame color for a cohesive look.
Adding the picture frame moulding to the walls was an inexpensive option, but ads that little extra special touch to the tub nook.
In order to provide as much visibility to the artwork as possible, I didn’t choose as large of a chandelier (try this collection of sold out)that could have fit in the space.
It’s much nicer when standing in the shower to not stare straight into a light fixture and instead a beautiful art feature wall.
For the tub base, it looks so much better with the framed boxes painted Wales Gray to break up the white of the marble and tile floor.
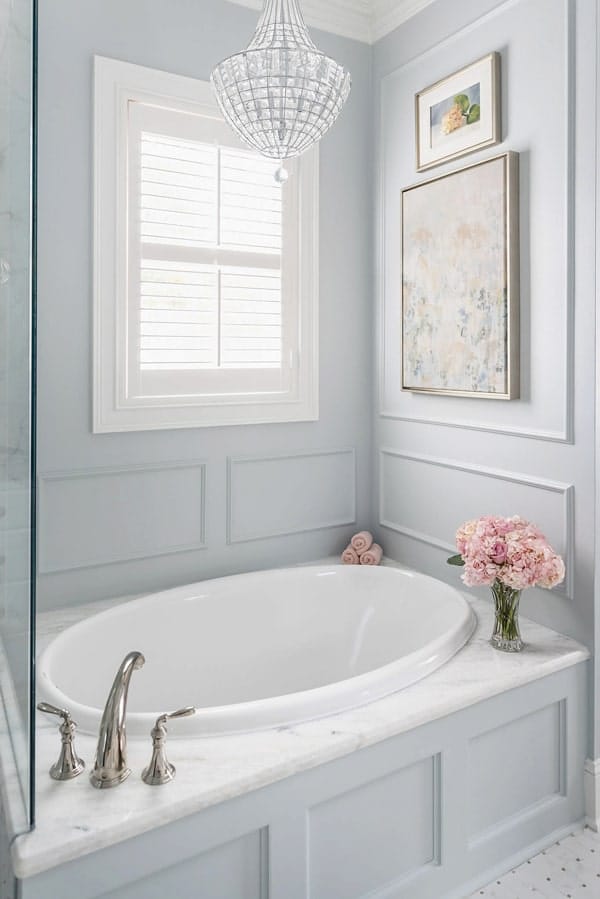
I love how the boxes supporting the tub create dimension and work nicely with the picture frame moulding above the tub.
A nice little side benefit of the chandelier (if sold out try this one) is that little crystal ball reflects the light and throws rainbows around the room on sunny mornings! I couldn’t be happier with it.
Oh and how can I forget the oval drop in tub (try this if sold out)? It is SO deep and I’ve loved taking baths in here sinking in up to my neck.
The tub filler in polished nickel is so pretty too, with the stepped edge detail for a more vintage look.
Frameless Shower Details
Who knew how expensive glass is? Or how wanting polished nickel hardware was not common!
The shower looks so much more sophisticated now that it’s frameless. We took the glass up to a natural break in the grout line to make the look more seamless.

This took the cost up, but I am so glad I went for the extra height.
Another extra was shifting the door to the center, which added an extra panel of glass. Again more money, but so worth it.
I needed to get the shower door away from being lined up with the bathroom door and this was my best option.
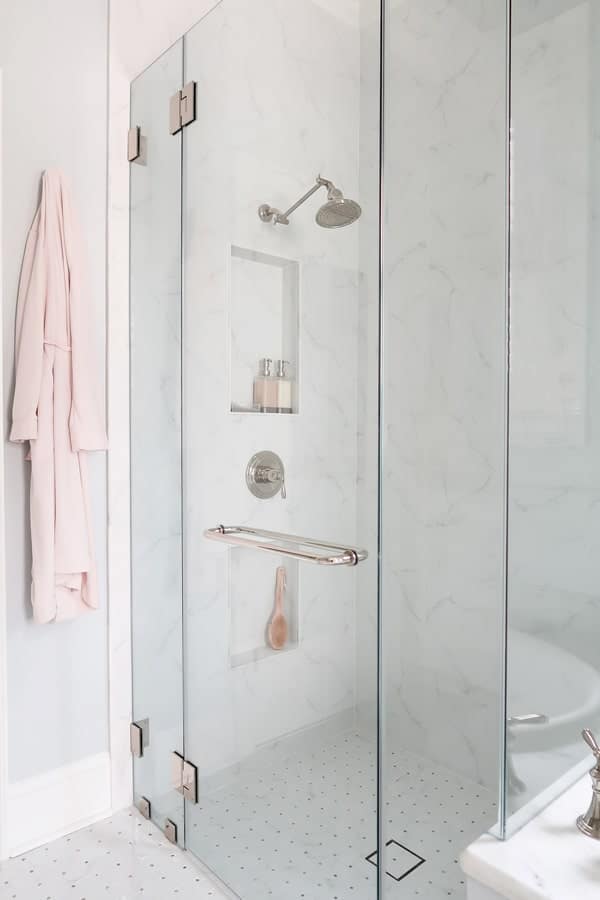
It looks amazing with the beautiful polished nickel hardware and I’ve been really happy with the door handle that acts as a towel bar too.
Luxury Hotel Master Bathroom Details
Finding a watercolor rose floral drapes that complemented the blush towels and the paint color felt like a big win.
The drapes filter the light, without blocking it, draw the eye up to balance the chandelier and artwork, plus add lots of color to the room.
To bring the glass detail to the wall at the end of the room, I used a clear acrylic drapery rod that disappears visually.
Mirrors on Closet Door Panels
Did you notice the mirrors on the panels of the linen closet and toilet room doors?
This was a decision made after the remodel was completed due to how flat and uninteresting the doors felt among all of the other beautiful updates.
I measured the two flat areas of the raised door panels and had custom mirrors made.
It was very budget friendly to add these custom mirrors for the the upper and lower panels of the doors.
Having custom made mirrors is more affordable than you may think!
See how much more interesting the entire room looks with the mirrors?
They reflect the light around the room, add visual interest and pull the colors through the space.
How much did 4 custom mirrors cost? $250!
I chose 3/16 inch thick mirror with a 1/2 inch beveled edge and ordered through One Day Glass.
Their service and delivery was excellent.
My contractor attached the mirrors with double sided foam tape.
Make sure to use the correct version for the weight of your mirrors.
Plus a little side benefit is I can pull the door of the toilet room open a bit, so I can see the back of my hair when I am drying it!
Little Decor Details
Last, but not least, are the most AMAZINGLY soft bath rugs supplied by Mohawk Home.
It’s so cute that Mick loves them so much he literally flattens himself so his bare belly is on the rug.
These bath rugs have such a deep pile and feel amazing on your bare feet!
They add a luxury feel to the room.

Here’s another little detail that I have absolutely LOVED every time I need a towel.
Instead of doing a traditional towel bar, I used three robe hooks that match the toilet paper holder on the main wall in the toilet room.
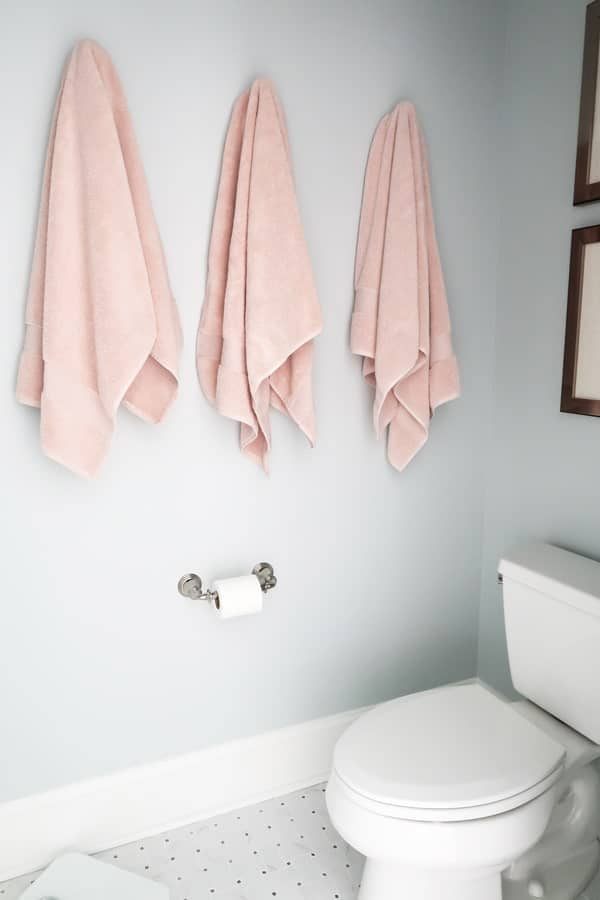
I love the look and pop of color the new blush towels bring.
Plus the towels dry out really well hanging like this (plus it is easier to hang them too!).
After all that work, it is time to take a bath!
Bathroom Remodel Sources
It feels so good to be finished with this project that has been worked on mentally since December and physically since February!
Hopefully, there are some interesting details in the newly remodeled bathroom that will inspire your own creativity.
GUIDE: HOW TO PLAN AND PREP FOR A BATHROOM REMODEL
If you would love know where I found the many things included in the room, I’ll do my best to list them all!
Paint Colors
Primary Walls and Ceiling: Benjamin Moore Wales Gray 1585, Value 50%
Cabinets and Behind Vanity Mirrors: Benjamin Moore Decorator’s White OC 149
Tile
The Tile Shop: PLEASE MENTION PORCH DAYDREAMER SENT YOU!
Mosaic Floor: Calacutta Bianco Delray w/Cinderella Grey Porcelain
If the floor tile is sold out, here are similar mosaic options: Mosaic Floor Tile
Shower Wall: Calacutta Bianco Gloss Porcelain 24 Inch
Marble Pencil Trim: Hampton Carrara Polished Somerset 0.375 x 12 in
Shower Drain and Niche
Shower Drain: 5″ x 5″ Square Tile Insert Shower Drain
Pre-Fab Niches: Double Recessed Shelf (separated lower half for shaving niche)
Door mirrors
Custom Door Mirrors: One Day Glass
Artwork Framing
Frame: Picture Frames
Linen Liner: Franken Frames
Thanks Everyone!
Thank you to the following people and companies that made this dream bathroom a reality! For your reference, I live in Charlotte, North Carolina.
Photographer: Tiffany Ringwald
General Contractor: Finishing Touches Construction
Marble Fabricator: Cutting Edge Stoneworks
Frameless Shower: Dakota Glass
Bath Rugs: Mohawk Home
Want to know the tricks to making a small bathroom look bigger?
Design Tips to Make a Small Bathroom Look Bigger
Sign-Up for my Weekly Emails!
Straight to your inbox sharing can’t miss decorating and painting tips for your home.
Please consider following me on Pinterest and Instagram for daily inspiration.
Until next time…
Porch Daydreamer
Tracey
Love your bathroom!!! Did you add any recessed lights over your vanities for additional task lighting (shaving, putting on makeup)?
Hi, Jennifer! Thank you, I did. Added LED lights over each vanity centered on the sink. The lights aren’t pretty, but when I need to do my makeup in the evenings they are great.
I absolutely love your remodel! I want to to the boxes – wainscotting look around my tub. My concern is it not being waterproof and then having damaged wood. Have you had any issues with this or did you find a material to use that isn’t wood? Thanks for your help!
Hi, Kristi! My contractor used a water resistant backer board on the tub walls and under the tub. Plus I have the marble tub deck overhang to stop water. I’m a big bath taker and haven’t had any issues. Semi-gloss paint adds a little protection as well, so keep that in mind.
I love your update and the style of your tub. I’m now encouraged that I do not need to try to do a freestanding tub in a tight spot. I’m ready to order and noticed that it is 2 1/2 inches narrower front to back. than what I had before. Was yours also narrower and what do you think? I do like that it is 2 inches longer for the legs than my old one.
Hi, Angela! I don’t remember what my last tub was, but this is the BEST bathtub and it is deep too. I can sink in up to my neck and stretch my legs out while sitting. It’s great and big 🙂 I am 5′ 4 ” for reference.
Tracy your bathroom is stunning and serving as an inspiration for our remodel. I have two questions I’m hoping that you can answer. I found the shower wall tile that you have from another vendor. It has more of a cream background with a bit stronger veining. Is the background on your wall tile more white or cream? Your tile has a more ethereal look which I prefer. Also it appears that your floor tile is polished. Do you have any issues with it being slippery? Does it come in a honed finish?
Hi, Andrea! The background is definitely more white than cream. The polished tile hasn’t been slippery at all – yes, I have forgotten a towel and had to walk across barefoot with wet feet 🙂 You’ll will have to check with the tile shop I linked in my sources to see if the floor tile comes in different options. Have fun with your remodel 🙂
Absolute perfection!
Thank you!
I had emailed you earlier about options for the tub surround and like you, we have decided to go with the marble as well. The one piece surround is so beautiful! The tub came yesterday and I wanted to ask if you still have the framing dimensions for the structure under the tub and if you would please be willing to share those figures? I really love the spacing around the top of tub with the marble and would love to have the dimensions. Thank you so much!!
Hi, Patricia! The total dimensions with the deck are 44″ x 63 3/4″. The marble has an overhang of only 1/4 inch because it came with the wrong bevel and to correct it shaved an extra 1/4 inch off – should have been 1/2″. It looks just fine to me 🙂 So the framing is around 43 3/4 x 63 1/2. The space available really dictated the size of the frame and we centered the tub under the window and on the shower – not the wall. I wanted to maximize the marble “show” and create an edge to sit on as well. Hope that makes sense and helps!
Your bathroom is so beautiful. I am curious as to how you glammed up the doors with mirror. Is the mirror just glued to the doors? Were they flat doors to start with?
Hi, Kari and thank you! I’ve just added a section to this post to address where I bought the mirrors and how I attached them plus the cost 🙂 They were custom for the panels of each door and added as part of the remodel. You can see the before of the doors for reference.
I love it! The mirrored door for the bathroom entrance is different than the mirrored door for the toilet and closet since it’s only 1 piece instead of 2. Did you get this mirror from the same place as the 4 mirrors and attach it similar?
I’ve added a header to separate the Door Mirrors, so you can see that section more clearly. There are two mirrors on both doors and they are the same. I had them custom made at the source I have linked. Hope that helps.
Absolutely stunning! I am so happy I found you. After too many paint samples, I have narrowed down Wales Gray for our kitchen cabinets. I was really hoping for a gray with slight aqua undertones. But yours are the first photos I have seen where it really looks like a soft blue and even a slight purple undertone. Do you think that is from reducing the tint and the flash? Even though I love how it looks, my husband does not want blue, but a gray with green/blue undertones. Our last house was Winter in Paris and we loved it but are using it in our bedroom in the new house. I also like Beach Glass which is just a bit greener than the Wales Gray but too green. Can you tell me more about how the Wales Gray looks in real life? I have been looking at my painted sample every which way to Sunday. 😀 Thank you for all the great info you have shared!
Hi, Erica! I’m happy you found me too! Funny enough my kitchen was previously Winter in Paris, so I know that color well! Have you seen my kitchen remodel (click here)? If you go to my Instagram IGTV, I have an actual video tour of the bathroom that will show you the color. NO purple undertone at all. It’s odd because the sample I painted looks a bit green, but once on the walls the green undertone disappears. I’ve had others ask me if it reads green at all, but it doesn’t.
So glad I can help because I KNOW how stressful it can be! I have been known to obsess over 8 x 10 paint samples before pulling the trigger on a color. LOL!
Hi,
I just looked at your link to the Wales Gray paint color, and it says 50% – what does that mean? Also, was this the same paint color from the inspiration photo from New England Home Magazine?
Thanks,
Nancy
Hi, Nancy! That means I had the store tint it at 50% strength to lighten the value of the color. It’s not the same color because I couldn’t find any detail about the inspiration bathroom other than that picture. The paint color is one I found to work with the tile and marble.
Does the 50% tint make the original Wales Gray
Paint color lighter? Because the sample they show online compared to these photos of your bathroom look quite darker than what’s on your walls, I’d love the exact color you have on your walls, if you could help!
Hi, Ashley! Yes, the 50% is half the amount of colorant so it is 50% lighter 🙂
I love your bathroom floor but am having a hard time finding it. I would rather porcelain tile like yours but all I can find is marble. Did you have any other options?
Sorry, but you will have to contact The Tile Shop directly to see if they will be getting the name of the one I used back in stock or have another recommendation.
Your remodel is STUNNING! Our master bath has the same tile as your ‘before’ picture. I’m looking to update but can’t do a complete remodel at this time. Can you tell me the paint color of the vanity when it was the mint? Also what kind of light fixture was above the tub before the remodel? Thank you! One day I hope to redo the entire room as you did!
Hi, Brittany! Thanks so much. The before vanity was Valspar, Garden Flower 5004-3B in semi-gloss Valspar Cabinet & Furniture Enamel. The previous light was a standard can light rated for damp areas. The chandelier is not to code, but in my last house I did a chandelier over the tub and when I sold it the buyers wanted it to stay in place 🙂
We are remodeling our master bath soon and your bathroom is our model. It is beyond gorgeous. I love your drop in tub and the surround. Somewhere I saw you splurged and went with actual carrara for the surround. Did you consider any other alternatives that would give you a carrara look? We are not sure that is in the budget and want to consider other options.
Thank you!
I went with Shadow Storm marble and yes, it was a splurge! Since I wanted the tub deck to match the counters, I didn’t look at any other options. My tile is really affordable and a marble look. That’s an option too.
Can you provide an updated link to small chandalier on Wayfair? Thank you
Sorry…it looks like that size isn’t available or sold out. I’ve added a link to the collection, so you can call customer service.
Your bathroom is absolutely beautiful!! Every aspect of it is perfect for the space. We’re signing the contract tomorrow for our bathroom remodel…and I’m still looking at pictures on Pinterest! However, my husband and I designed it in our heads and changed our mind about some things as we read more. We’re going with a frameless shower door as you did and have a curb-less shower. The thing I was concerned about was that the lack of a curb doesn’t allow us to put a rug right outside the shower. We can put one by the stationery part of the glass wall, but I wondered if you’ve found that to be a problem. We’re older already and I was afraid that as we grow older, it might be more risky stepping out directly onto tile rather than a rug. Thanks for sharing your cost information, too. That makes me feel better about what we’ll be spending. Lovely, lovely bathroom!
Hi, Sue! I’m so glad you found my information helpful in your own remodel. What I did about the rug outside of the shower is had the glass shower installer remove the sweep on the bottom of the door. It gave me just enough clearance for a rug underneath. Hope that helps and just know you will get frustrated along the way, but it will be SO worth it!
Every corner of your bathroom remodel is truly beautiful, Tracey! Love the soft and feminine colors, the transition from beige to white – all of it. Congrats on a job well done!
Thank you!
I just love your bathroom! I am remodeling next week and still have to choose paint color. I remembered your bathroom when I was searching marble bathrooms and went back to look at the wall colors – it is just truly a masterpiece, so many details that make your bathroom such a classic!
Thank you for all the inspiration!
PS. We have the same floor tile, in fact I kept coming back to the main picture of your bathroom while choosing my floor tile. I will also have a marble counter top, but went with a 3×12 Marlow Watercolor tile in white for the shower walls only due to budget. You did the right thing, that tiler is fabulous and it takes a craftsman like Leo to pull off that look with 12×12 tiles!! 🙂
Oh, thank you! I’m glad you found some inspiration in my makeover and yes, Leo is a master at his craft 🙂
I love your renovation. I would love to get an idea of costs, though I realize the contractor costs would differ. Thank you.
Thank you! I detail all of the costs in this post: https://porchdaydreamer.com/master-bathroom-remodel-costs-luxury-hotel-orc-wk2/
Perfect bathroom!! I’m showing pictures of this to my contractor for my bathroom remodel. One question: how is the wood paneling/moulding on the tub holding up? I’m concerned about moisture…..
Lulu, thank you and that makes me so happy you are using my bathroom as inspiration! I used semi-gloss paint on the walls around the bathtub and on the base of the tub. No issues and I’ve taken baths!
I love your renovation, it is beautiful, such timeless and classic style!
One question, how did you do the niches? Are the sides and bottom of the box covered in cut pieces of your wall tile? Also, are the edges trimmed? I love how they look rounded.
Thanks, Erin! The inside of the boxes were tiled with the same wall tile as the shower and then trimmed with the same marble “pencil” trim as around the shower walls. I’ve linked both products at the very bottom of the post, if you want to see what they look like before installation 🙂
Thank you!
My bathroom remodel begins tomorrow! I do have a couple questions for you – hopefully, you’ll see them!
1. Was your shower floor recessed to begin with OR did you just add the pencil tile only for water containment? I love the look of a curbless shower but am concerned about water. My shower will be 46” wide vs. 36” as your shower is. I’m just not sure what to do – my “default position” is to just add a curb.
2. How high are your ceilings? The ceiling over my shower is slanted. The ceiling begins at 8’ 7” along side wall and then vaults up to 11’ by the wall that currently divides the tub and shower areas. I am going to remove that wall. I’ve never felt cold inside my current shower (it’s narrow – 30”). My contractor asked if I wanted to drop the ceiling down over the shower in order to add an overhead waterfall nozzle (I don’t want one of those – my husband would). He also said that will trap heat (it will also trap moisture!) I like the high ceiling – makes room look larger. Plus, I’m using marble tile on shower walls/shower pan – don’t want to trap moisture. Do you feel cold in your shower?
Love how your bathroom turned out! Thanks!!
Hi, Dani! I think this was meant for me not Erin…sorry just saw it.
1. My show floor was recessed with a lip to begin with…if you go back to the before picture and construction pictures you can see it. I love the lip and look of “zero transition” by carrying the floor tile to the edge with the pencil moulding and on the shower floor. My tile guy came up with that and was talented. My shower backs up from time to time due to all of my hair, so I’ve been happy to have the curb.
2. My ceilings are 10 ft. My preference would be to keep the ceiling height for sure! My mom has 11 ft ceilings in her bathroom and it will look amazing. I feel warm in my shower for sure. My glass is taller than normal because I wanted that look, so you can consider a taller wall of glass.
Have fun and grab a bag of patience 🙂 It’s SO worth it in the end!
Tracey,
Once again you turned another room into the spectacular. The brighter colors of the tile and paint totally make this makeover one to be envied. You should be very proud of what you have accomplished.
Bill
Thanks, Bill! I really appreciate it and am very proud of how it evolved.
Tracey, beautiful job. The bath room is so you! You picked out wonderful finishes for every surface. Don’t you love your frameless shower? We love ours too. Marble in a master bathroom is so luxurious. I love your mom’s art. How talented she is! Enjoy your labors by soaking in the new tub.
Thank you, Carol! I’ll pass your compliment to my mom – she still is not sure she’s good LOL. The new tub is AMAZING and deep for soaking. I’ve been enjoying the new tub and view for sure 🙂
This is beautiful! I wanna move in and just live in your bathroom!
Thank you so much!
There’s nothing in this luxurious room that I would change! I especially love the curtains, I wouldn’t have thought to hang drapes in a bathroom but they are perfect!
Leen, thank you so much! I appreciate it and those curtains were the best find and deal!
Your tiler is worth his weight in gold.
Love what was accomplished in the shower without the expenditure of a slab.
It is just gorgeous and the detail and thought into the design make the rest of us envious. Sometimes we rush into a project but our end results don’t equal the vision and we have spent the same amount of money or more because we didn’t take the time to think it through. I am sure there is not one thing you would change. Fantastic job!
Deb, that is SO sweet and yes Leo is amazing at his artistry. I’m so glad he was just as proud of the final results as I was. Honestly, there isn’t anything I would change 🙂 Thank you!
I’ve got a bathroom remodel in my future and I love how light and airy this bathroom feels! Great job on all of the personal touches.
Loralee, thank you so much! Read through each week, so you know how to be prepared 🙂
This is truly gorgeous! Oh my goodness. So much inspiration. Well done!!!
Courtney, thank you! I just stopped by your bedroom reveal and WOW! Can I move in? It’s the perfect mix of texture, color, and interesting detail. Eclectic, but cohesive. Oh and that blue dresser with the gold hardware is a show stopper. We’re finished – woo hoo!
Absolutely gorgeous! Every detail is just perfect. One of the best remodels I have ever seen. I would stay in this bathroom all day and never leave!
Jane, that is SO sweet! I really appreciate it. The little ottoman is the best because I can sit and brush my teeth or put on my lotion and take in the room 🙂
Tracey, this is perfection. Every detail perfectly considered, everything in perfect harmony. No flashiness, just pure taste and elegance. I definitely pinned for a couple of your tile ideas! Love the marble pencil liner for a zero entry — that’s a keeper.
Thank you! The tiler and I had a vision that he made a reality 🙂 It was so cute because Leo, who did the work, was so proud and snapping pictures to share. That’s the real win!
Lovely transformation. So soft and feminine.
Thanks so much!
Tracey!!!!! I don’t even know where to begin! I mean….WOW!!!! It’s so glamorous! The colors are gorgeous and the hardware, the finishes, the sconces…every detail is perfection! Beautiful job, my friend! I’m so impressed! Standing ovation right here!!! Hugs too!!! 🤗 💕💕💕
Oh, Summer you are the sweetest and I REALLY appreciate your compliments because I love your style so much! Thank you sweetie!
It’s absolutely beautiful and I love it all. What a gorgeous space to relax, especially for someone who loves bathes! I think the white paint in each of the vanity alcoves is really nice, and I am particularly interested in the mirrors on the door panels and how you did it. They really do add to the room!
Thanks so much! I smile when I walk in this room and love soaking in the tub. The mirror source I linked in my sources as a reference. I just measured the panels and had them made with a beveled edge. My contractor attached them with heavy duty foam tape – easy!
Wow wow wow!! I’m in love! The shower is total goals! I love the idea of having a place to rest your foot AND storage. You really outdid yourself!
I am really loving the towel hangers in place of racks. So modern and less fuss with folding.
It’s beautiful! Congrats!
Oh one of my originals 🙂 So GOOD to hear from you and thank you so much! I’m pretty proud of the outcome and glad you love the little details too!