How-to Convert Old Under Cabinet Lights to LED
Looking to update your halogen, fluorescent, or xeon under cabinet lights to LED? Here’s how to install LED light bar fixtures using your current under cabinet wiring!
It’s time to update our kitchen under cabinet lights to LED and I’m here to share with you a step by step guide to installation! Why are we updating you ask?
Halogen and xeon under cabinet lights get hot! Plus they use a lot of energy. Fluorescent lights hum and flicker.
All of them have light bulbs that are a pain to change. Let’s save time and money by moving to LED!
Hot Under Cabinet Lights
Two things motivated me to change my kitchen under cabinet lighting:
- Xeon bulbs were hard to find, expensive, and a pain to change.
- My food and vitamins were being heated by the lights and that wasn’t good for freshness. Like when you find your peanut butter partially melted!
Plus, after getting new quartz counters it was time for an upgrade to the lighting in the kitchen. I didn’t need to hide from my dark granite counters any longer.
Boy was I SHOCKED, when I removed the current under cabinet lighting and found the cabinets scorched from the heat!
They have been in place for close to 9 years, but still it really felt unsafe once I saw the damage.
Here is a picture of how the bulb was scorching the inside of the fixture:
Here is what the cabinets looked like once I pulled the fixture down.
Post contains hand selected products, with affiliate marketing links throughout {full disclosure here}
Doesn’t it seem like these were becoming a fire hazard? I’m glad I made the move to switch out my under cabinet lights to LED now more than ever!
Benefits of LED Under Cabinet Lighting
There are a lot of benefits to moving to LED lights in general. Specifically, I’ll address under cabinet LED.
- The light is bright and true, so you can see better while working in the kitchen.
- It’s going to be a LONG time before you have to change them with 50,000 hours of work time.
- No changing bulbs – ever!
- They are cool to the touch, won’t scorch cabinets, and won’t heat what is inside your cabinet.
- LED lighting will save you money! The largest light I have is 36 inches and the estimated cost to run a year is $2.20. NICE.
I’ll link exactly what I used, but want you to make sure what you buy is DIMMABLE. You will see why later.

The sizes I used to replace my existing fixtures (make sure you measure the amount of space under the cabinet to know exactly what to buy):
In general, in my hunt for the LED fixtures I had a hard time finding the 12 inch size. Luckily, the line I ended up using had a wide range of options from 12 inches to 48 inches. They are DIRECT WIRE.
Also, the reviews were good and helped me make my final decision!
Before Installing LED Under Cabinet Lighting
First and foremost, this is NOT and I repeat NOT for a novice DIYer. This is for someone who has tackled at least a couple of the following and done it more than once:
- Installed outlets
- Added dimmer switches
- Hung ceiling light fixtures or fans
You should be familiar with a few other things:
- Circuit breakers
- Wire stripers
- Electrical tape
- Wire nuts
Also, if you aren’t able to work in small spaces, upside down, and with little parts – this isn’t for you! Here is a picture during the installation to give you an idea of what is involved:
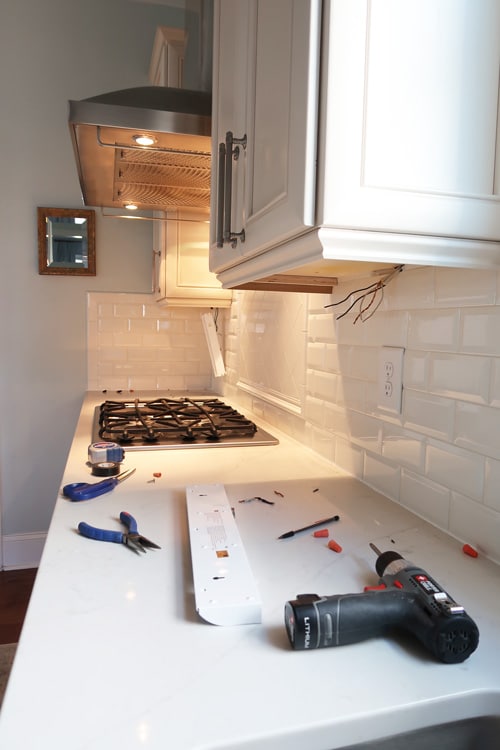
Last but not least, this became a TWO PERSON job. I highly recommend recruiting a helper to help hold the fixture while you attach.
After I spent 15 frustrating minutes trying to hold a tiny screw and attach it to the fixture while looking up, I realized it was going to take a miracle to do both of those things at once.
About in tears, I called and asked my friend/neighbor George “What are you doing right now and can you come over immediately?” Luckily he was free and heard the panic in my voice, so he came over quickly. In hindsight, I should have asked for help ahead of time!
You need one skilled person and the other person literally just needs to hold things in place 🙂 Luckily, my helper has some skill too and tackled pieces of the project plus helped me trouble shoot.
How-to Replace Current Under Cabinet Lights with LED
If I haven’t deterred you and you are ready to tackle this project or show it to someone who can tackle for you, here are the installation instructions!
Of course always follow the manufacturer’s instructions first. I found the ones that came with the light to be LACKING. So hopefully my pictures will help provide additional details.
Supplies
- Power Drill
- Philips and Flat head screw driver
- Long Nose Pliers
- Wire stripers
- Electrical tape
- Wire nuts
TURN OFF CIRCUIT BREAKER TO UNDER CABINET LIGHTS.
My range hood was on a different circuit and why they were able to remain on for extra lighting during installation.
Step 1
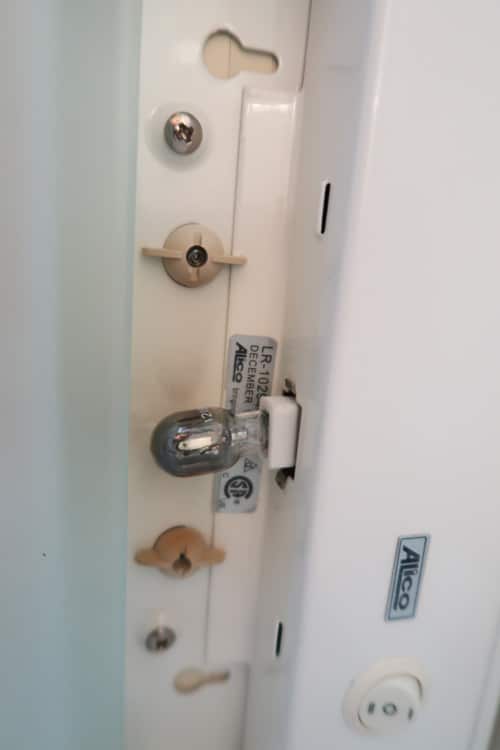
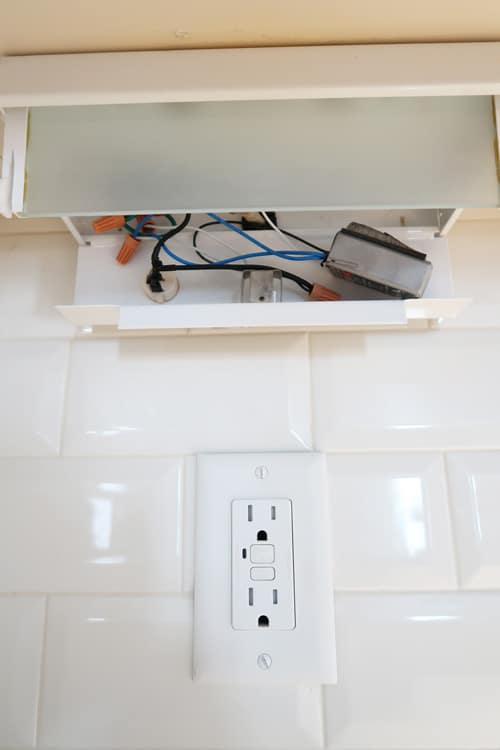
Remove your old under cabinet lights. This was simpler than I thought it was going to be. These lights came with the house so I really didn’t know what I was going to encounter.
The diffuser dropped down to expose the screws that needed to be removed. I was accustomed to dropping the diffuser to change the bulbs.
All that needed to be removed were 2 screws and two wing connectors (tan in the picture).
First remove the wing connectors to drop down the panel with the wiring. Just the act of turning mine horizontally let the panel drop.
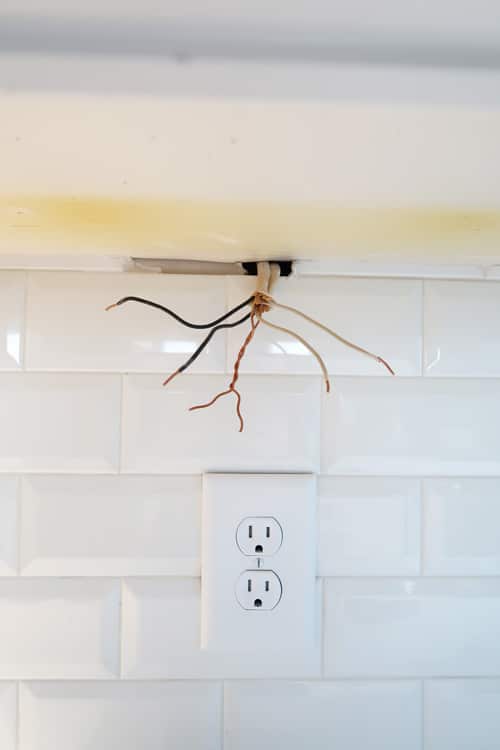
Step 2
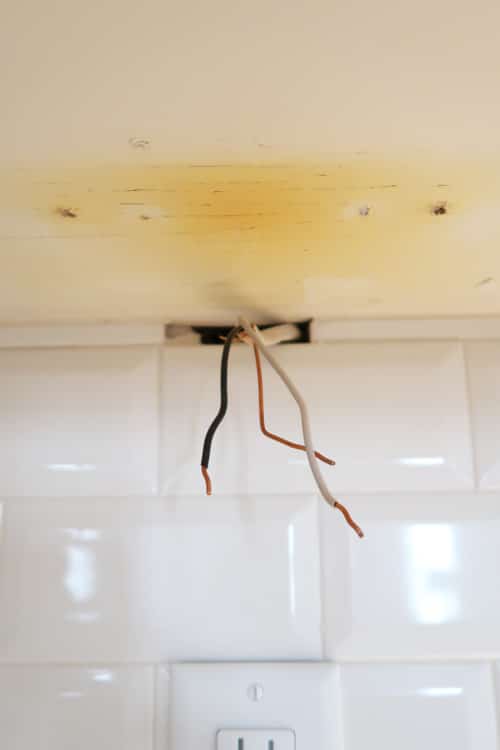
Remove all wire nuts to release the connections. Those are the orange caps on the wires.
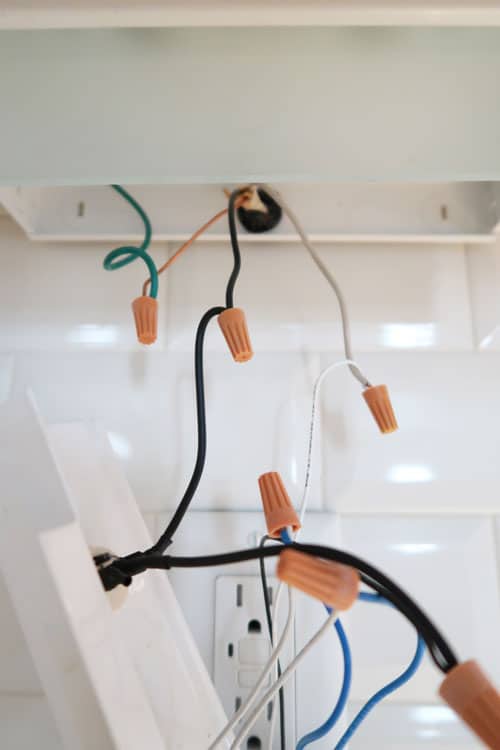
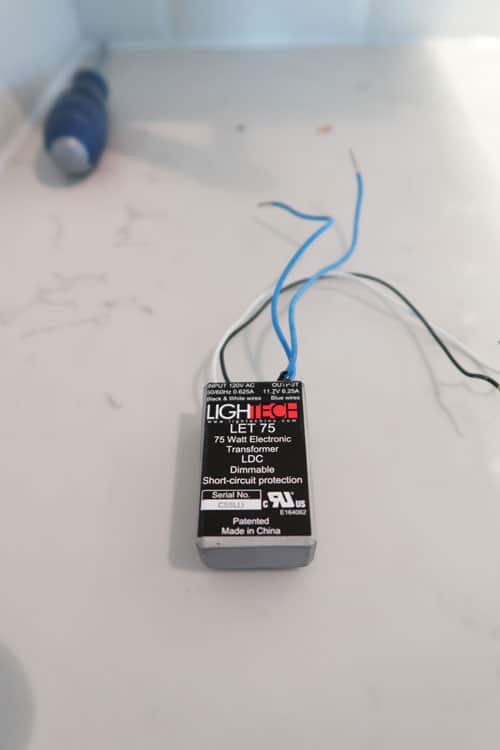
My previous lights had a transformer, which I removed as well. It wasn’t needed with the new LED lights and my existing wiring.
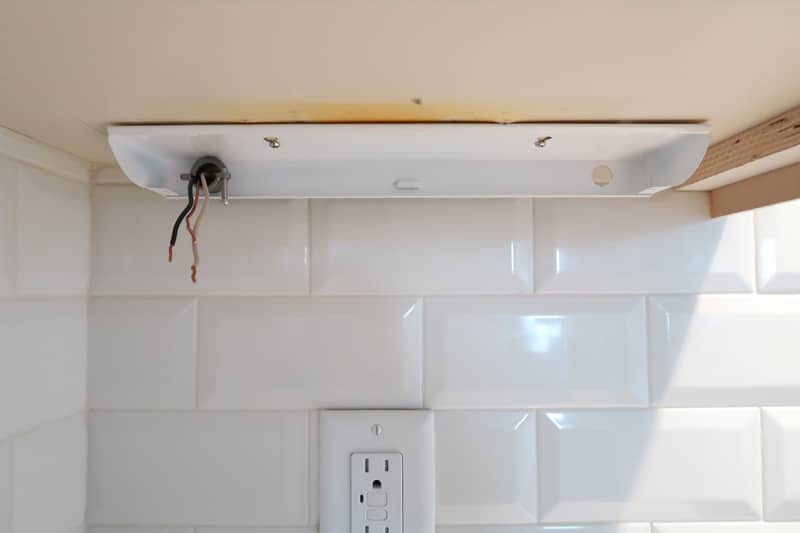
With a power drill, remove the last two screws that mount the fixture to the cabinet and remove the final piece. All that will be left is exposed wires.
Since I have moulding at the base of my cabinets, I didn’t need to touch up the paint or fill the holes. I left it as you see it and installed the new lights.
Step 3
Follow the manufacturer’s instructions to pull parts out from inside of fixture. Basically that involved removing the diffuser and 2 screws. Easy!
Hold fixture up underneath the cabinet and decide where the wires will be pulled through and where you want to hang the fixture. Sorry I couldn’t photograph this part at the same time!
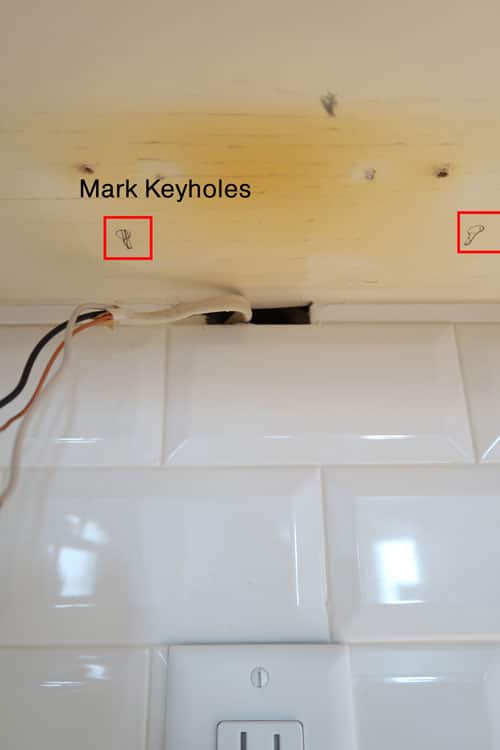
Using a pencil, mark through the key holes. The smallest area is where the screw will be placed.
This will help you decide which hole to punch out for the wires. Punch out wire hole with a flat head screw driver.
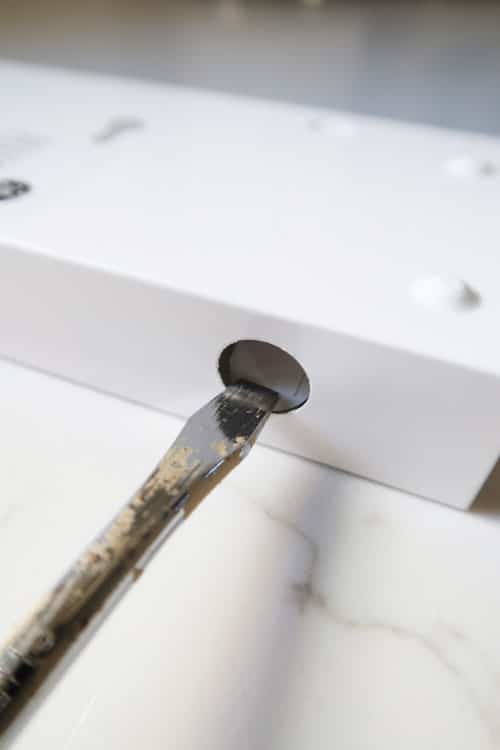
Step 4
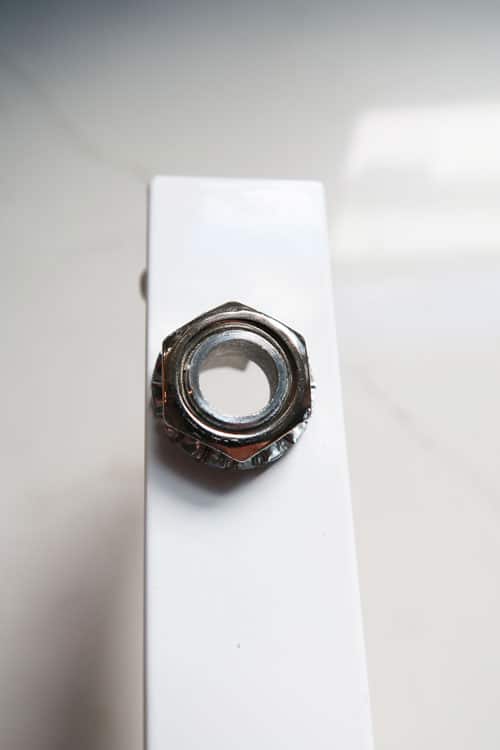
This part is REALLY important and don’t skip it! You MUST install the strain relief so the wires are protected.
Just feed it through the hole. Remember the nut is on the backside of the fixture or the wall side. Tighten with long nose pliers.
Hold base fixture up to the underside of the cabinet and pull through wires. Your long nose pliers will come in handy to straighten wires and pull on them.
Make sure to grab the actual wire when pulling and if you damage the wire insulation repair it with electrical tape.
With your power drill and Philips head attachment, screw in screws where marked on the underside of the cabinet to hold base fixture. Leave about 2 to 3 turns, so it’s not completely flush with the cabinet.
If you have a little trouble getting the wood screws to grip, drill a small pilot hole with a 1/16″ drill bit. Some of mine went in easily and others didn’t.
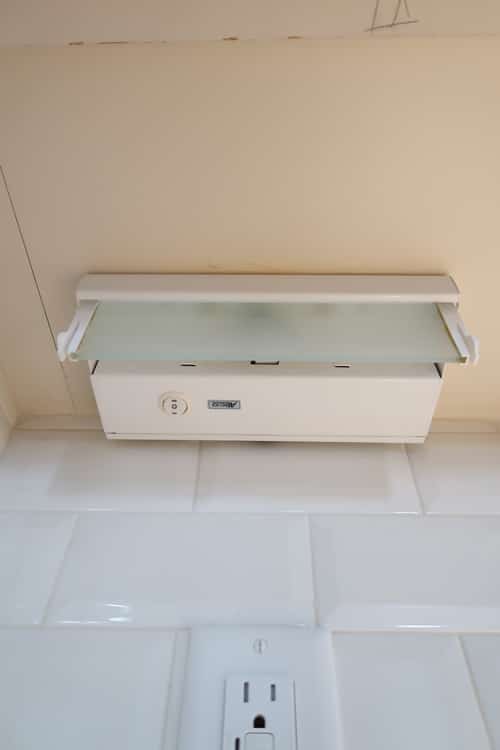
Attach base fixture by pulling the fixture forward to lock into the smallest part of the keyhole. Then tighten down the screws to the base of the cabinet.
When you finish it will look like this!
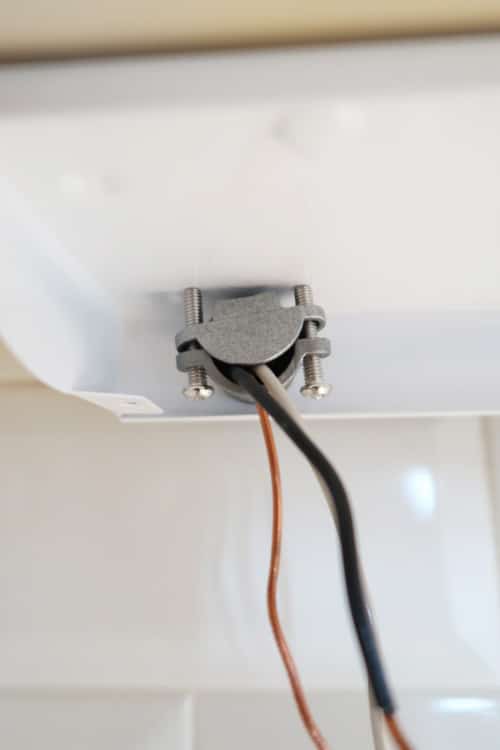
Then using the two screws that come with the fixture, tighten the strain relief connector to secure the wires.
Step 5
Firmly push wires into the quick connect nut on the fixture: white to white, black to black, and ground/copper to green.
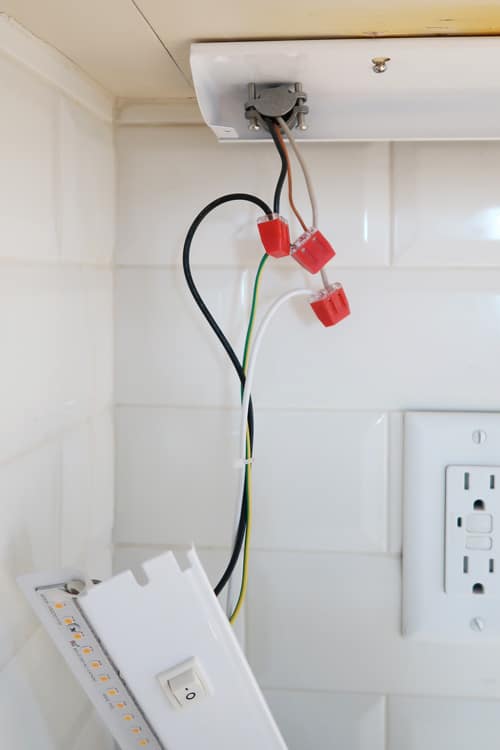
IF you pull down one of your fixtures and see 2 white, 2 black, and 2 copper ground wires it’s OK. Two of my fixtures had this to create the connections between the light fixtures.
The red quick connectors have TWO spots for wires, so you just follow the same process matching each wire type.
On the 2nd fixture with the sets of 2 wires, I ended up using my wire cutter/striper because these wires were so long. Cut and strip the wires to work with the space you have.
Step 6
Flip circuit breaker and test to make sure the light turns on. If not, flip the breaker off again and check connections are secure.
Next, get your partner! This is where you need another set of hands.
Using the provided screws and washers, using a power drill or Philips head screw driver screw LED light panel to the base that is attached to the cabinet.
An issue I ran into with the 12 inch fixture is it was very hard to get the light bar attached.
The quick connector nuts take up a lot of space and you can see the fixture bows slightly. There wasn’t anything I could do about this!
On the longer fixtures, this wasn’t an issue so I’m showing you worst case scenario.
Step 7
Attach the diffuser over the light panel.
YOU’VE DONE IT! Your neck and back are sore, fingers raw, but you did it! Now onto the other 3 LED under cabinet light fixtures that need to be installed!
TIP: Every time you finish a fixture, flip on the circuit breaker to make sure each fixture you’ve installed is still working!
I ran into an issue where ONE white wire didn’t clip into the connector properly, so the first light suddenly didn’t work. So check those connections, before attaching the LED bar to the base.
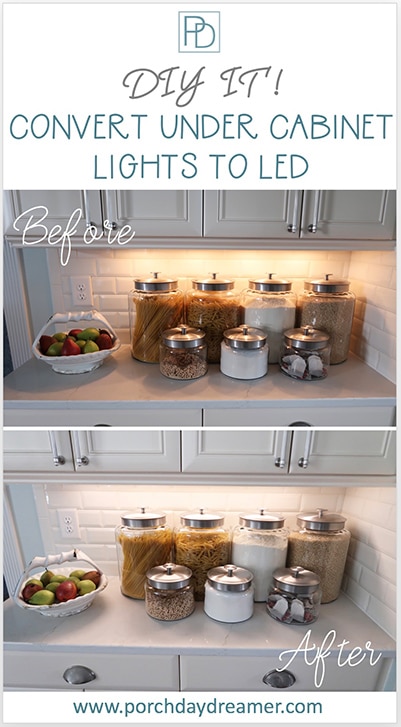
Before and After LED Under Cabinet Lights
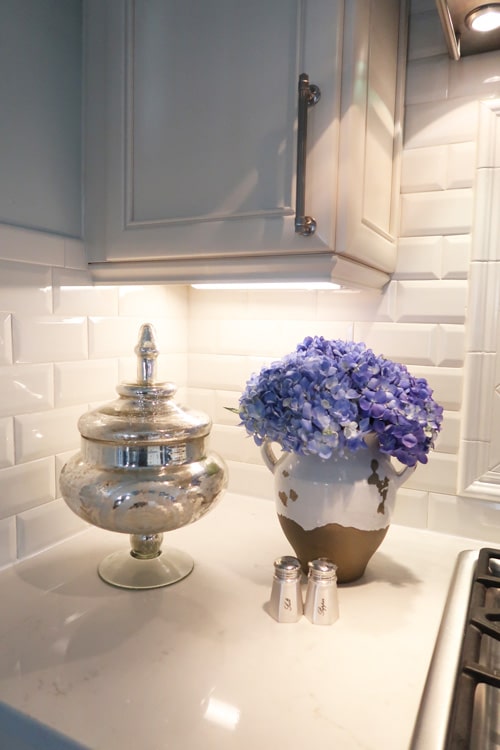
Now for the full reveal! If you missed it, I just recently added a glass jar pantry to my kitchen and LOVE it. It’s the perfect before and after LED spot to show you how much more light is available.
Before with halogen (Xeon) Under Cabinet Lighting
Something that completely annoyed me is the builder didn’t center the fixture under the cabinets.
See how it’s off to the right? You bet I corrected this! Notice how yellow and warm the light is.
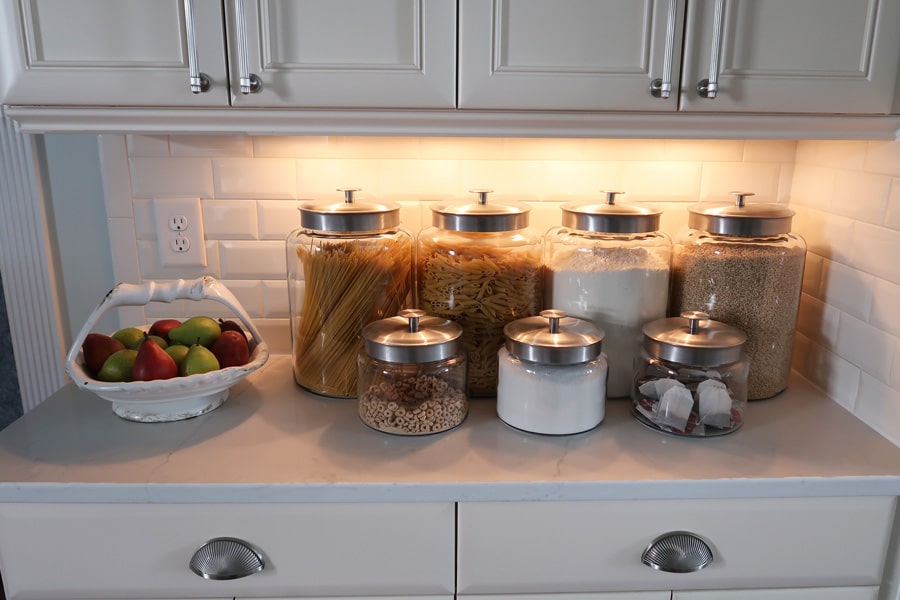
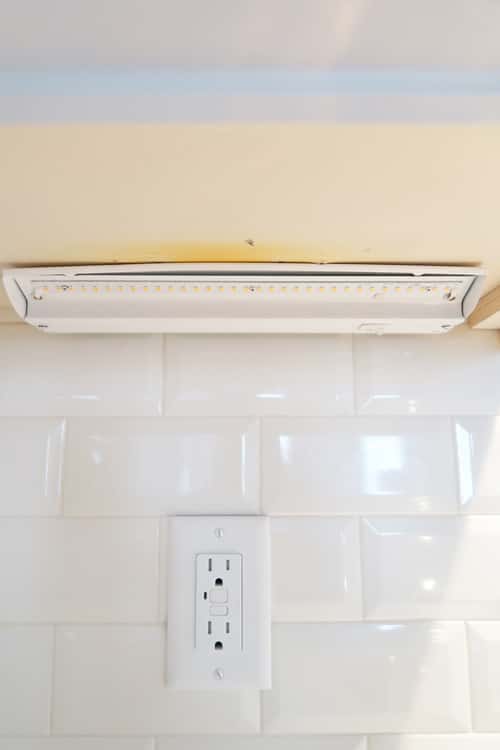
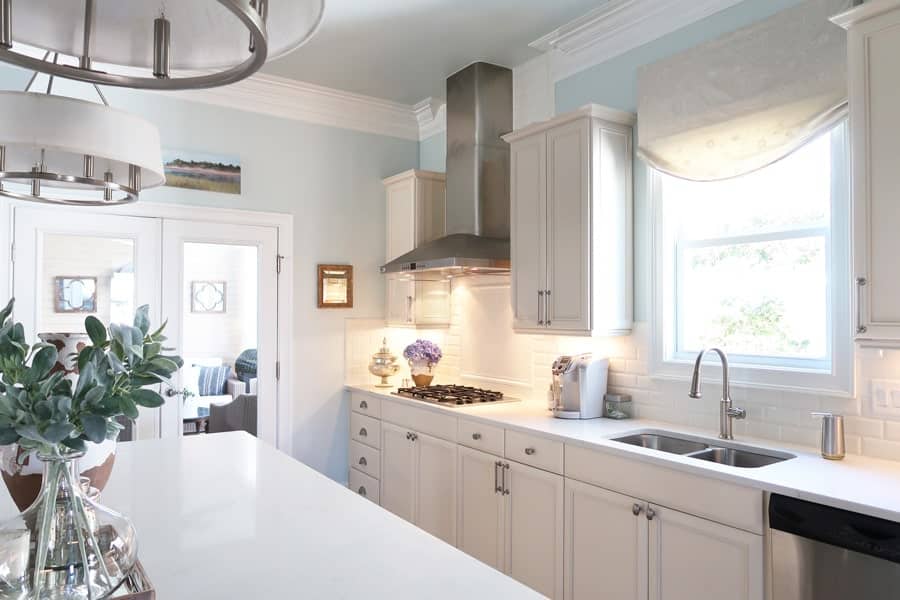
After with LED Under Cabinet Lighting
Now the light is centered and I have a nice bright light that is crisp and true to color. I’d eaten a few pears along the way, but notice the color difference of the pears and the pasta!
You can even see more of the detail of the quartz counters.
Guess what? I ended up not liking HOW BRIGHT the LED lights appeared.
Luckily, it’s very easy to install a dimmer switch to dim the light. Here is a tutorial for how to install a dimmer switch and it only take 5 minutes!
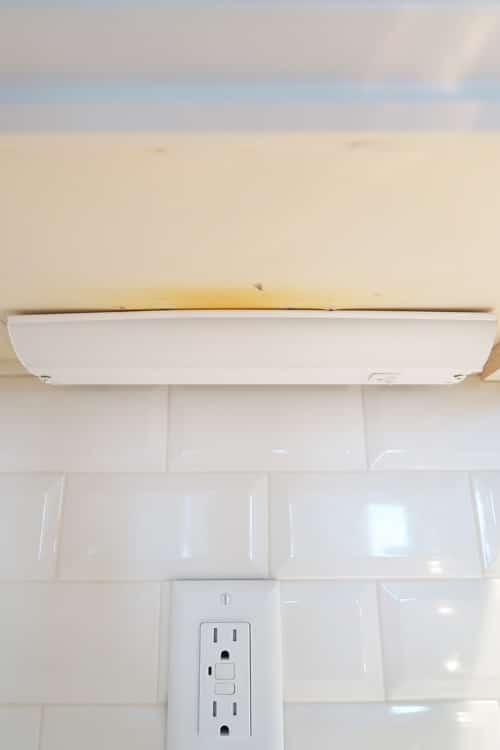
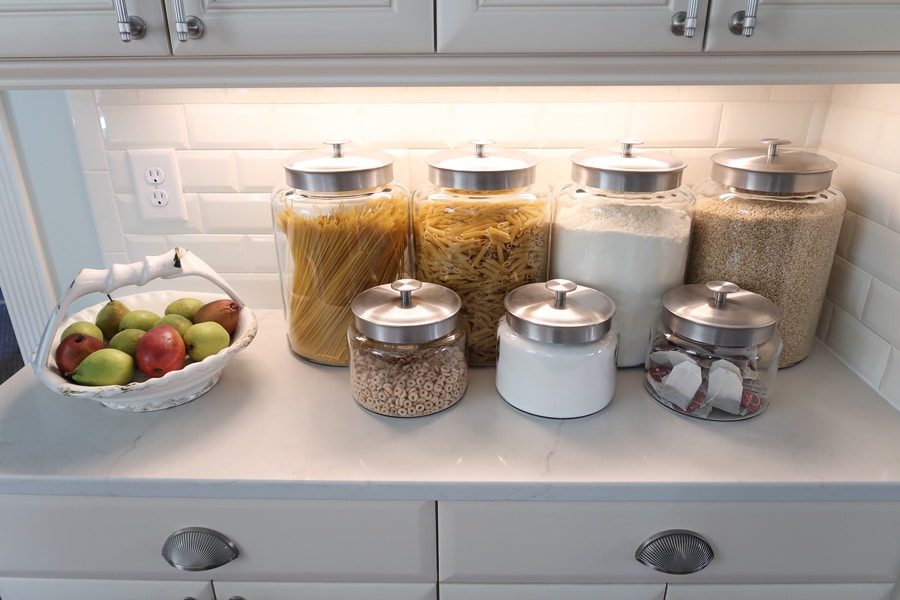
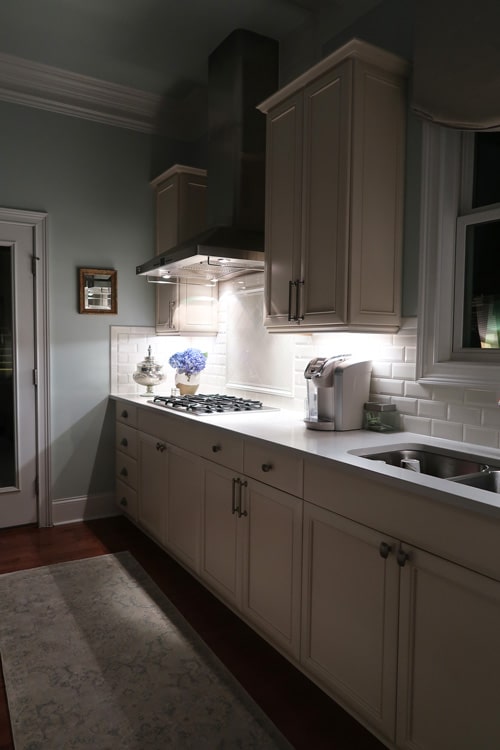
After with LED Under Cabinet Lighting Dimmed
This feels more natural especially at night. Undimmed and the lights were WAY too bright.
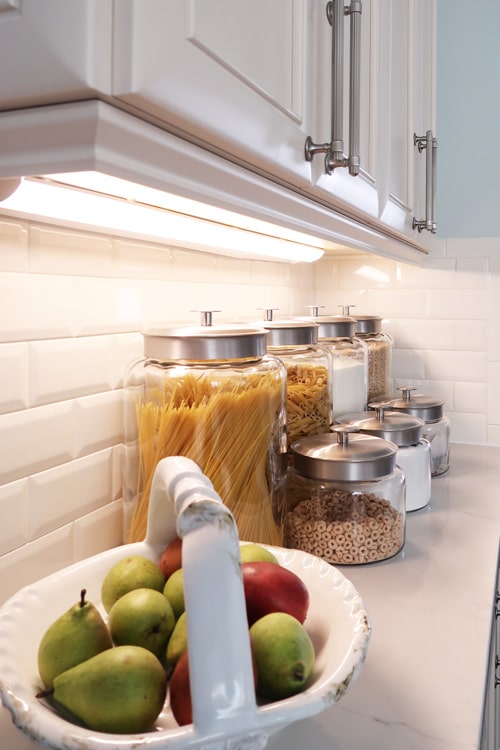
Here is a side view, so you can see the fixture itself when dimmed.
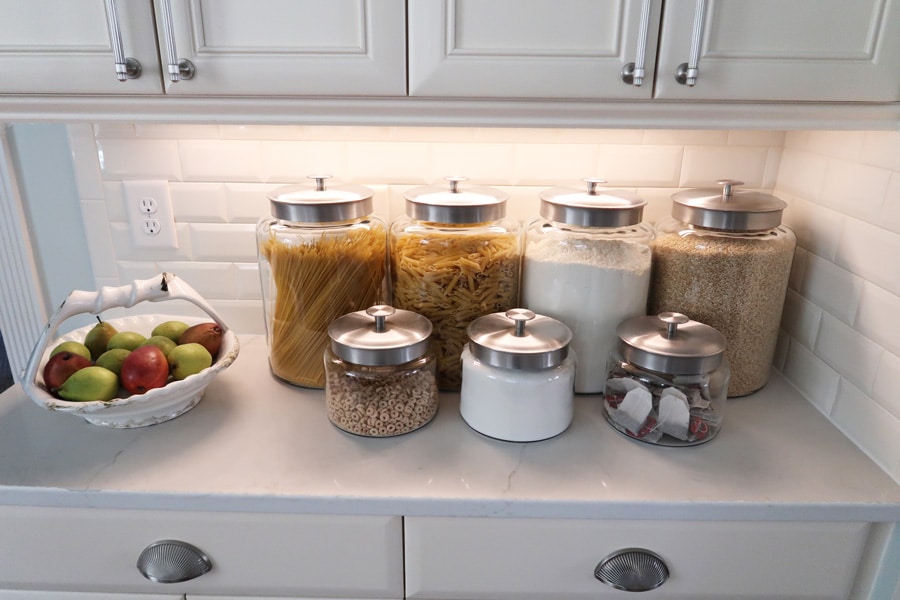
It’s a LOT better and so much brighter compared to the original lights. Plus they are COOL to the touch. No more worries about a fire hazard.
Here is the smaller light and I wanted to show you that the lights do reflect on the counter, but there are NO spots. Some cheaper LED lights will show pin marks of the LED bulbs.
Here are what the lights look like at night and dimmed all the way!
There is a LOT more light than there used to be, which is nice for my aging eyes.
My next adventure is to find LED replacement bulbs for the halogen lights in the range hood, so everything matches.
You can see during the day the camera captures how yellow the halogen is compared to the LED lights.
All-in-all I’m so happy with the outcome, but now I need a massage! Seriously…
Good luck to you with your under cabinet lighting adventures. Total cost of the lights was well under $200, so it really is an affordable update when you have free labor!
Check out: Ultimate Guide to Updating an Outdated Kitchen
Pin It for Later!
Please consider following me on Pinterest and Instagram for daily inspiration.
Until next time…
Porch Daydreamer
Tracey
can you please estimate how long a job this is?
(per light fixture, maybe?)
thanks!!!
Hi, Michelle!
It took me half of a Saturday to complete. Maybe 4 hours total for my entire kitchen? 1 hour per light to remove and install a new one. Hope that helps!
I was taking notes and photographing too, so that slowed me down a bit.
I do not have to do exactly what you did as the one that came with my unit was a plug-in to the wall socket type, your article did inspire me to take a closer look at it, pull off the diffusion screen and even take out the tube. I can see the screws holding the unit under the cabinets. Aside from stapes holding the cord to the outlet, which should be no problem, I can do this.
The question would be what I would replace the unit with but I know I have options. I just hadn’t gotten to first base to get started. Thanks.
Glad I inspired the “taking a closer look”! Sometimes it just takes seeing something you didn’t know was possible. Good luck! I love my new brighter lights!
Thank you for your explanation. Very helpful.
What brand lights did you use?
Right before the tutorial I’ve linked the exact products in a list or you can click through the pictures of the lights to read all about them. Thanks!
Tracey you made a boo boo. You put the cable connector on the inside of the fixture. That metal two screw connector belongs on the backside of the fixture and you tighten the lock ring on the inside.
My point is that you made a simple mistake but you also just misled any other newbie to do it incorrectly. The most dangerous wanna be electricians are those that make an assembly work even though it is installed incorrectly, use non compatible parts together or violate basic code requirements.
You need to edit your post to show the connector installed correctly
Thanks for letting us all know. I recommend always following the manufacturer’s instructions. Since I don’t plan to pull down the fixtures and photograph the project again. I’ll just leave your comment for others to read. Thanks.
Tracey, you are a brave girl to tackle all this electrical work. When we did our remodel before we moved in our house almost six years, we replaced every single light in our home with new LED lights. The kitchen had been totally gutted so the under and over cabinet lights are all LED and every light in the house is on dimmers too. You will love the new lighting – doesn’t get hot and you’ll never have to change a light bulb.
Thanks, Carol! It seemed so simple, but I was glad I had enough experience to handle some of the wiring challenges. Loving the brighter light for sure 🙂 The stuff in my cabinets is staying at the temperature they should too!