
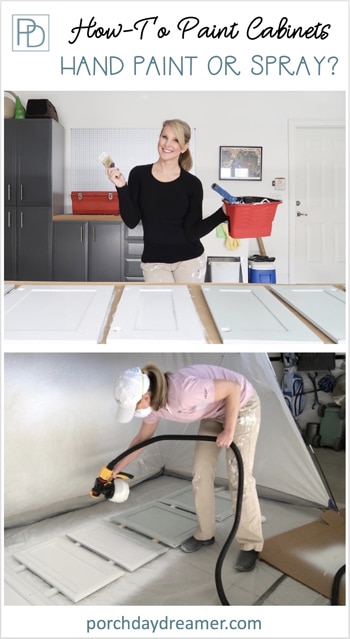
Hand Painting or Spraying Cabinets: What is Better?
Looking for how-to paint your kitchen or bathroom cabinets and the best paint to use? Here is a full tutorial plus the pros and cons of hand painting versus spraying cabinets!
This post started out with me teaching you how to re-paint kitchen or bathroom cabinets by hand and it turned into something different.
What it turned into is a debate of which is better: hand painting or spraying cabinets?
You will learn all about painting cabinets both by hand and by spraying, along with the best cabinet paint to use.
Find out why I will never hand paint cabinets again!
INCLUDED is a full video tutorial showing both hand painting and spraying cabinets to get the best results.
Decision Time: Hand Paint or Spray Cabinets
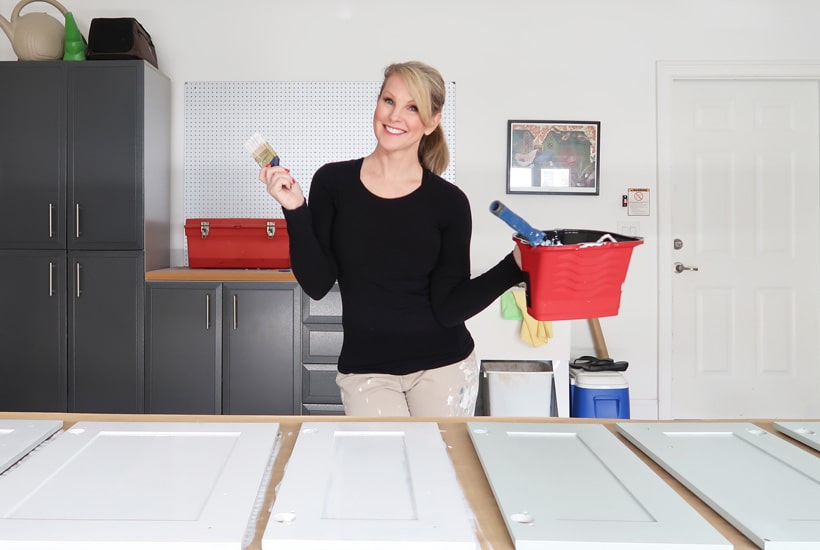
After a long love affair with my Wagner Studio Sprayer, it finally died after overuse (which means I used it like a pro).
In order to be the best teacher and guide on paint projects that I can be, I decided that I would show you how to hand paint cabinets instead of spray them.
NO-SAND METHOD TO PAINTING KITCHEN CABINETS!
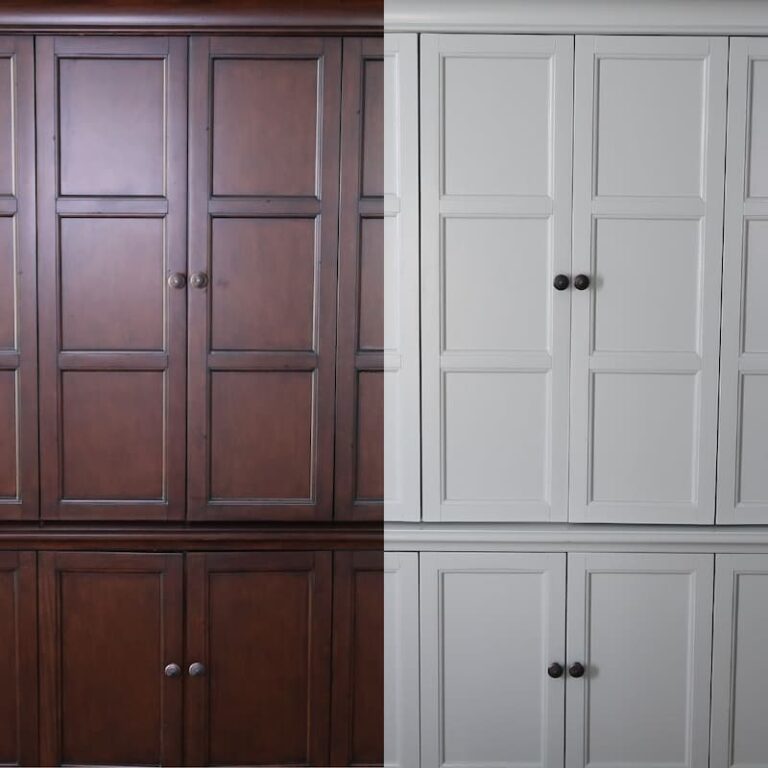
In this particular project, I am RE-PAINTING my master bathroom cabinets, which is very different than painting over stain and polyurethane.
Re-painting cabinets means that I am re-applying the SAME PAINT in a new color. That means there is no need for priming first.
If you want to learn about painting cabinets that are currently stained, read this post first!
Come on the journey with me as I start with hand painting and end with spray painting the cabinets.
It’s an interesting story, with a lot to learn along the way!
Post contains hand selected products, with affiliate marketing links throughout {full disclosure here}
How-To Hand Paint Cabinets
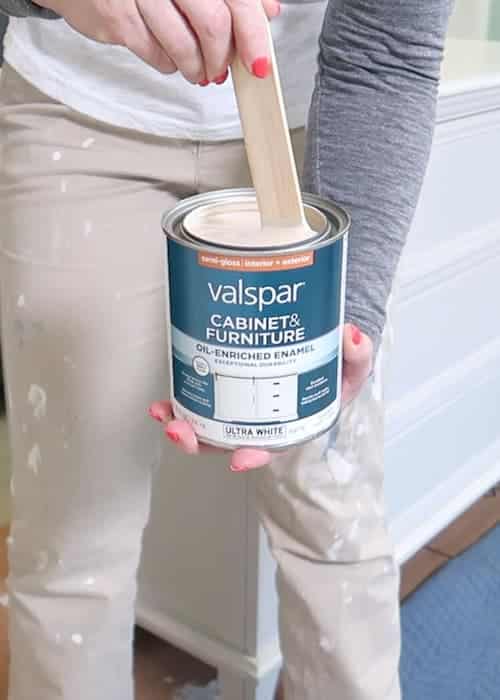
First, let’s talk about my favorite and the best paint for cabinets. After using Valspar Cabinet Enamel paint on over 8 items in my home, I speak from actual experience and real life use!
I also recommend Valspar Cabinet Enamel it for furniture too!
Valspar Cabinet Paint is TRULY the BEST cabinet paint hands down:
- Dries to a hard finish
- Flows and levels to hide brush and roller marks
- Easily hand applied or sprayed
- No need for a topcoat
- Water based for soap and water clean up
READ: Valspar Cabinet & Furniture Enamel: What You Need to Know
YES, you can apply this right over a regular paint.
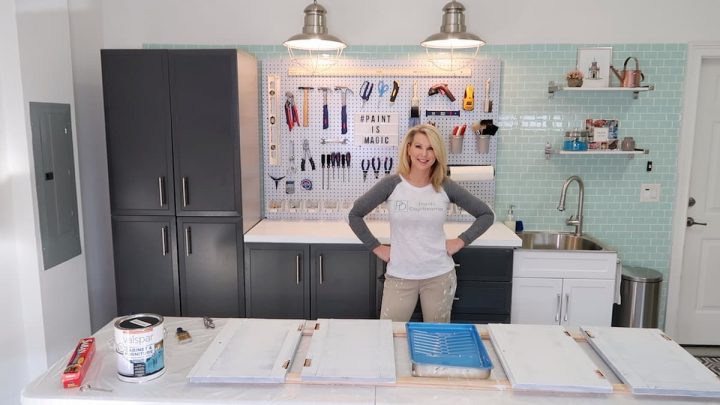
Cabinet Painting Supplies
- Painter’s Plastic
- Just buy the box and you can create any size drop cloth you need, you can cover furniture and even adjacent walls with this stuff!
- Frog Tape
- I’ve experimented with a lot of painter’s tape and this by far leaves the cleanest line and pulls off without damaging anything.
- Paint Tray w/Plastic Liners
- You will need multiple liners for each coat you paint.
- Wooster Pro Classic Brush
- You need a high quality brush to get a smooth finish, when you hand paint the base of the cabinets. Spend the money!
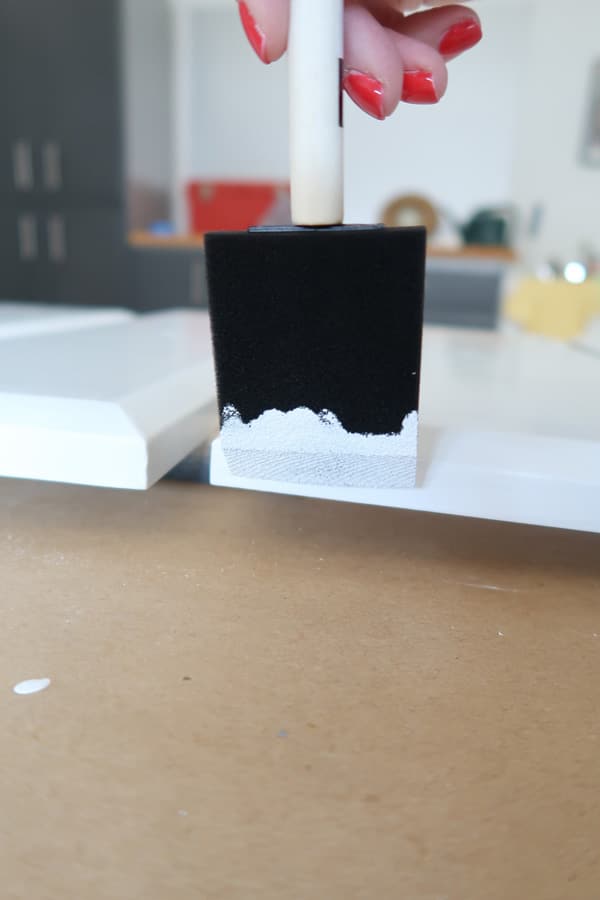
- Foam Brush
- Helps prevent over application on the edges of drawers and doors plus to clean up drips.
- Brush Cleaner
- If you spend the money on a good brush, you must clean it after every use!
- Foam Roller Multi-Pack
- A foam roller is a foam roller, so you can find the cheapest version.
- Valspar Cabinet Enamel from Lowe’s
- A new paint technology that is soap and water clean-up, but dries to a hard finish like an oil paint. It flows and levels to fade brush marks, so even the novice painter will get a smooth finish.
- 220 Grit Sanding Sponge
- Even the best painters experience drips and you’ll want to sand them down.
- Brown Craft Paper
- I found this helpful to cover the floor and table where I was painting.
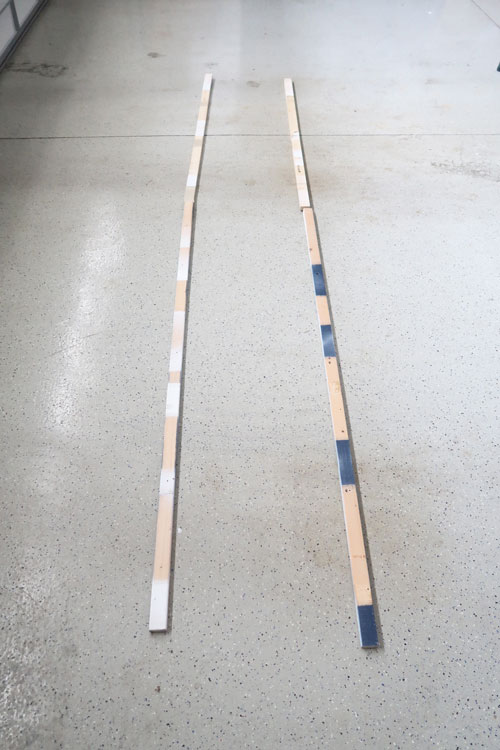
- 4 Pieces of long and narrow trim pieces of wood. Usually in the trim aisle at Lowe’s.
IMPORTANT: Foam rollers are critical to a smooth finish. Don’t use a regular roller! If you like the pail I am using, buy it here and the liners.
READ: Are You Using the WRONG Paint Roller Cover?
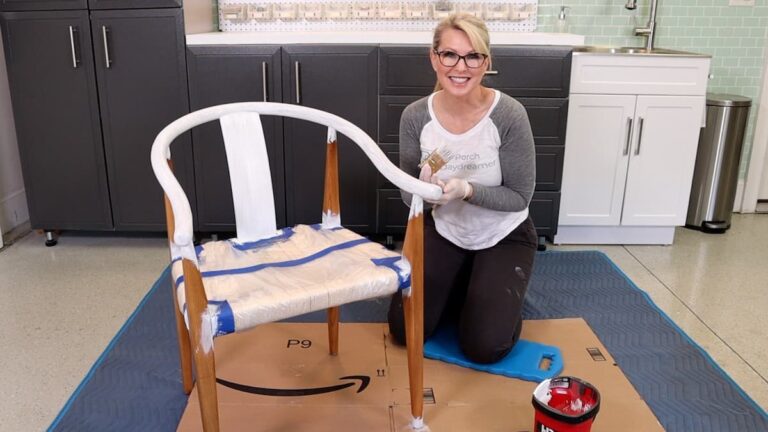
When painting cabinets, preparation is everything:
You can see the master bathroom renovation is in full swing! Please consider signing up for my weekly email newsletter at the bottom of this post for the full reveal.
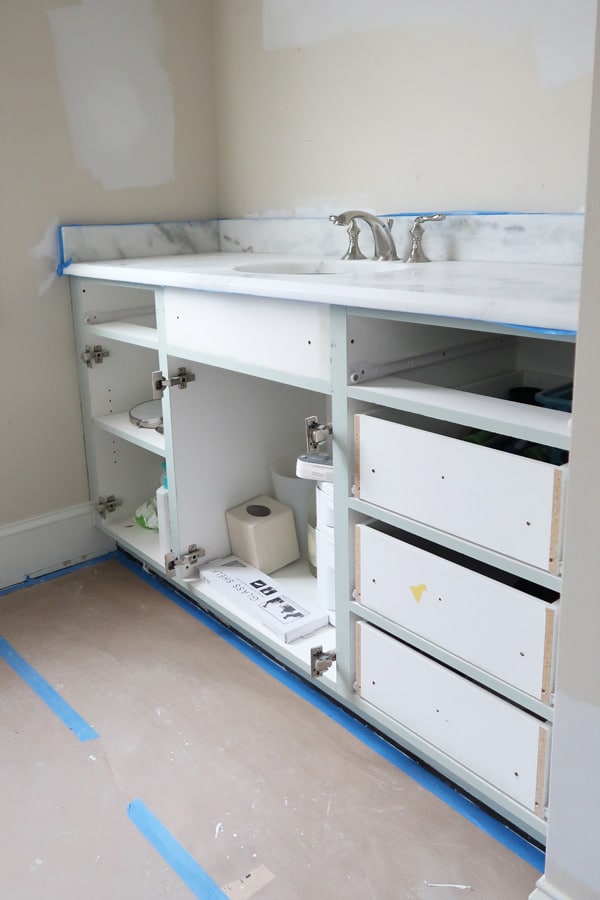
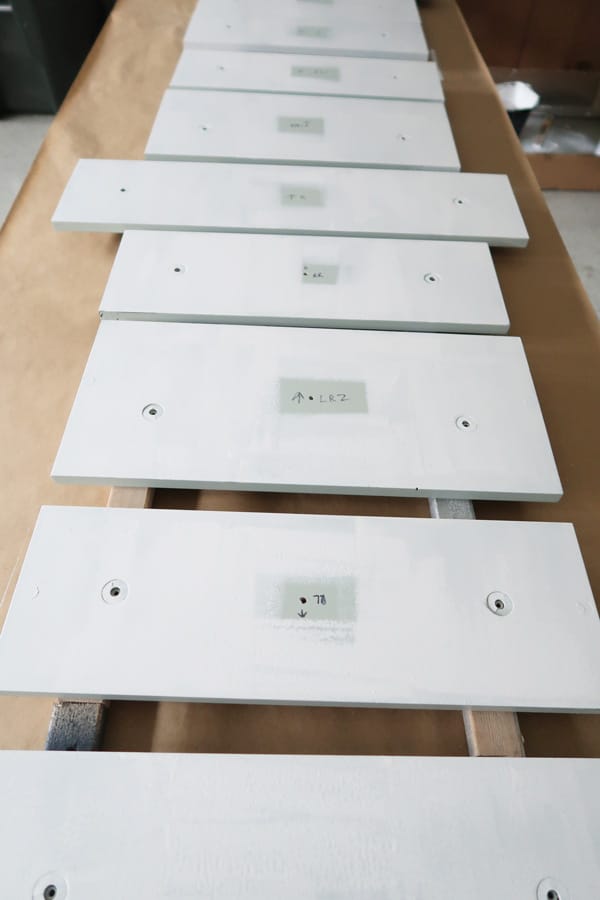
- Remove the drawers and doors from the base cabinets. LABEL each one as you remove, so you know the location when it is time to re-install.
- Remove the cabinet hardware. Store in a plastic bag.
- Sand to scuff all drawers, doors, and base cabinets with 220 grit sanding block.
- Clean off the cabinet surface and remove all dust. A hand held vacuum or blower can help with this process.
- Apply tape to adjacent surfaces you are not painting. Make sure you aren’t taping on the cabinets!
- Lay drop cloths to protect surfaces.
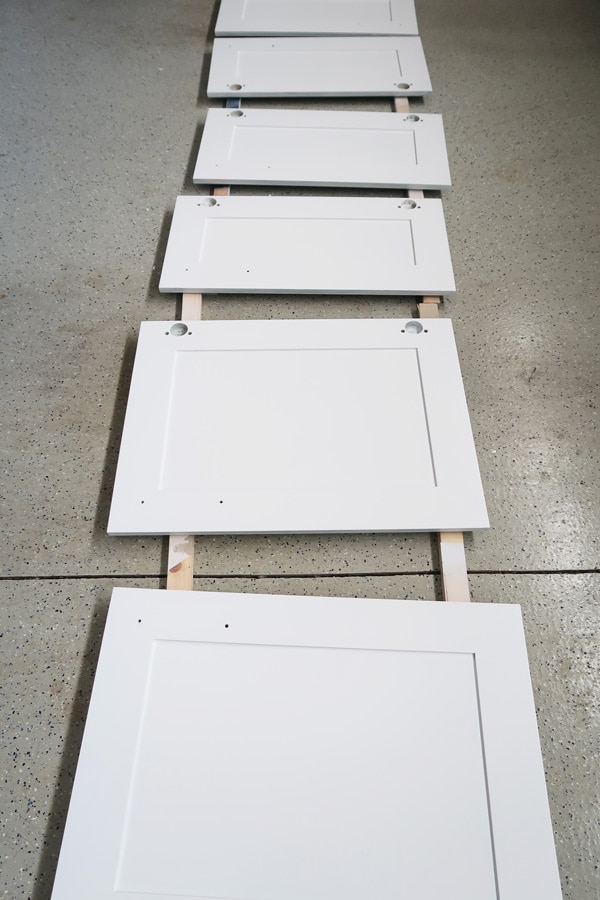
- Place trim boards for cabinets to dry in an area that is safe and protected from dogs, cats, dust, and kids so your cabinet drawers and doors can dry in peace.
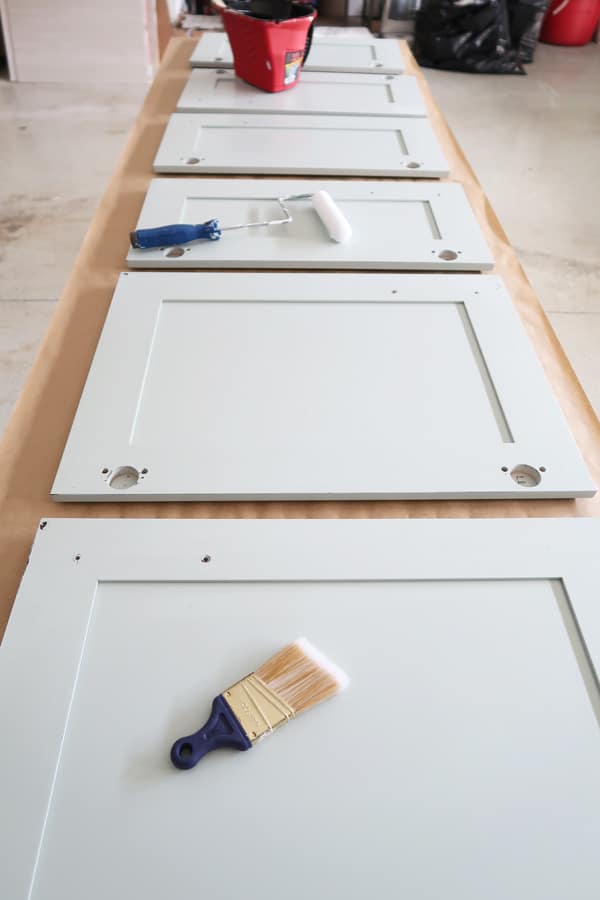
Here are the trim boards in the garage.
I am a BIG fan of using a Norwex cloth to clean the surface and then dry with a micofiber cloth.

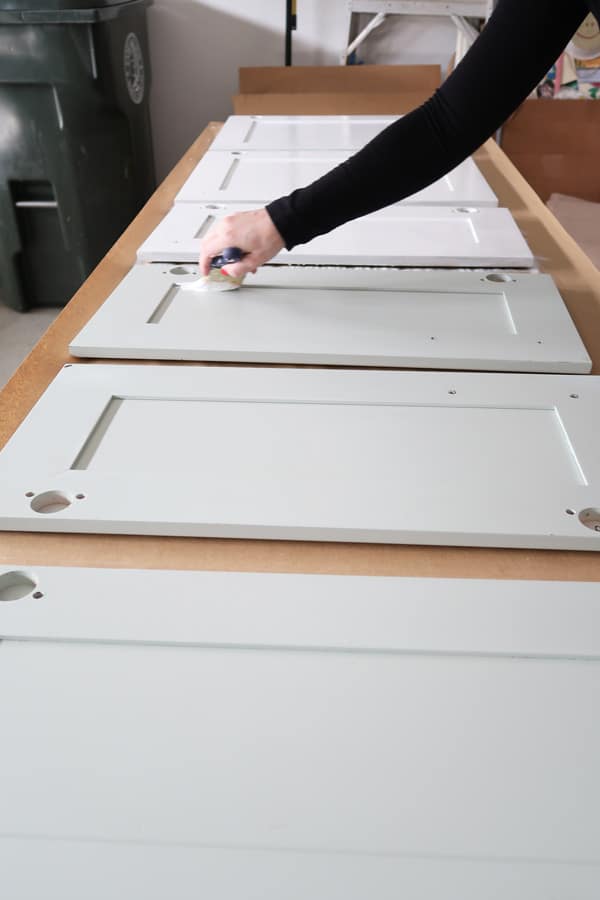
LR means this is the left vanity and far right door. You can label using numbers or names. Up to you!
START WITH THE BACKSIDE OF THE CABINET UP.
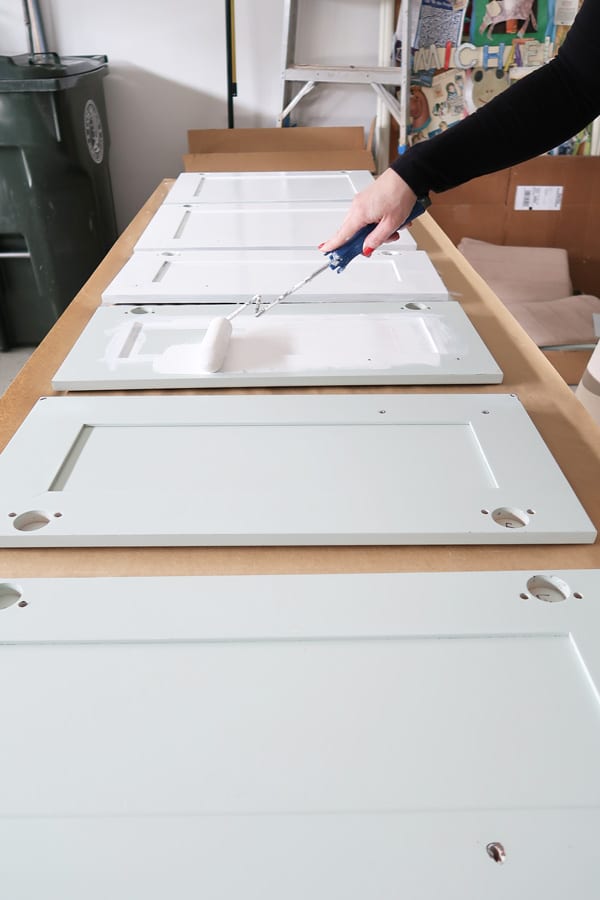
- First, paint drawers and doors.
- While drawers and doors are drying, paint the base cabinets and permanent structures (i.e. kitchen island legs and attached panels).
- You will repeat this cycle for each coat required.
You can skip to the video below, if you would rather learn that way!
Stir the paint with a stir stick. Don’t shake or you will create bubbles that can pop on the surface of the cabinets.
Step 1: Apply 1st Coat of Valspar Cabinet Enamel Paint
- Start by brushing in the areas a roller can’t reach first. Apply paint to edges using a foam brush.
- Try to limit brush marks by painting with the direction of the grain of the wood.
- Right after completing brushing, on the same piece, cover the remaining smooth surface using the foam roller.
- Always keep a wet edge of paint between brushing and rolling
- Place painted cabinets drawers and doors on trim board to dry.
- Next, using the same brush and foam roller apply a coat of Cabinet Enamel to the base cabinets.
- DRY at least 4 hours and clean your brush. Toss the foam roller and foam brush.
Warning: If you are using a dark color, the first coat will look awful. Don’t over apply and don’t panic.
Step 2: Apply 2nd and 3rd Coat Valspar Cabinet Enamel Paint
- Move doors / drawers back to painting surface.
- Start by brushing in the areas a roller can’t reach first. Apply paint to edges using a foam brush.
- Try to limit brush marks by painting with the direction of the grain of the wood.
- Right after completing brushing, on the same piece, cover the remaining smooth surface using the foam roller.
- Always keep a wet edge of paint between brushing and rolling
- Place painted cabinets drawers and doors on trim board to dry.
- Next, using the same brush and foam roller apply a coat of Cabinet Enamel to the base cabinets.
- DRY at least 4 hours and clean your brush. Toss the foam roller and foam brush.
- Repeat: If you need a 3rd coat, follow the steps above.
After your final coat on the first side: DRY OVERNIGHT!
Remember not to paint over your labels on the drawers and doors!
Step 3: Flip over Cabinets and Repeat Steps 1 and 2
- When you flip over the cabinets and see drip marks or sagging along the edges, BEFORE PAINTING, gently sand down with the 220 grit sand paper.
- Make sure to remove all traces of dust and particles, before painting.
- When finished, DRY OVERNIGHT before installing back in the room.
Why I’ll Never Hand Paint Cabinets Again
Now you know the basics of hand painting it’s time to see me actually painting. You will learn why the final coat on the face of the cabinets ended up being sprayed and not hand applied.
IF I would have hand applied all coats, I calculated it would have taken me 5 days!
In 15 minute sessions, I was able to spray each coat of paint for total painting time of 60 minutes 🙂 Cleaning the sprayer takes about 5 minutes each time.
30 minutes of set up initially and 15 minutes of tear down at the end = total spray project time of just under 2 hours!
The dry time takes the project to 2 days, with a lot LESS WORK!
Hopefully, after watching this 15 minute video you will get inspired to spray your cabinets instead!
Hover over the video to show the sound control and unmute.
Supplies for Spray Painting Cabinets
- To buy my sander, click here. It was a huge time saver versus hand sanding. The attachment I used was the 240 grit to remove the drips.
- Cool flow face mask
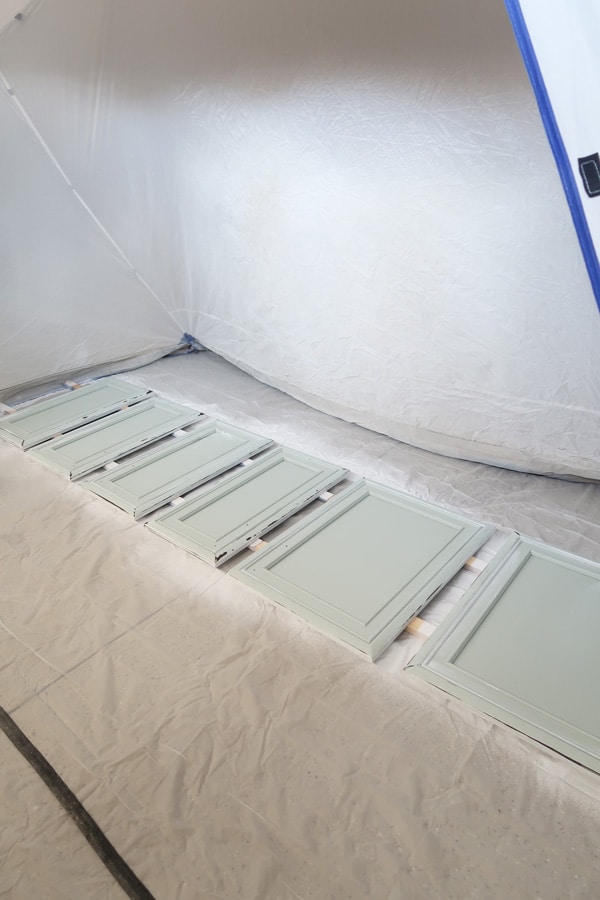
- Spray shelter
- Paint sprayer
- Shoes and clothing that you don’t mind getting painted
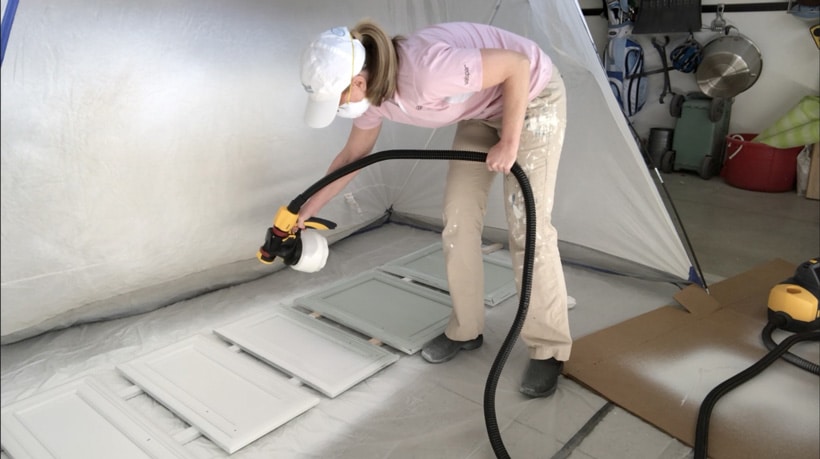
How-To Spray Cabinets
Now you see why I will never hand paint cabinets again and I HOPE I’ve inspired you to trying spraying them instead! Let’s dig into the process a little deeper.
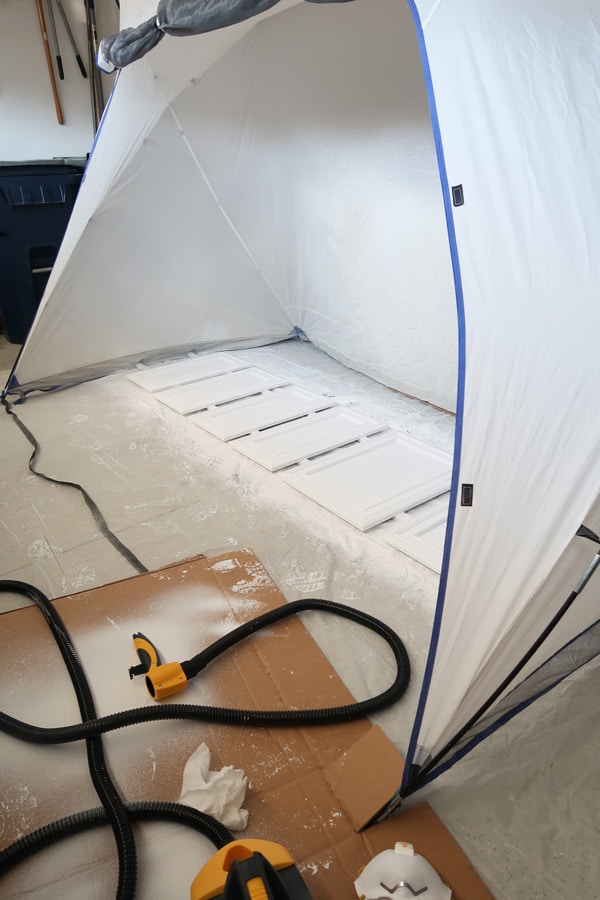
Step 1: Prep the Area Prior to Spraying
- Work in a well ventilated area. I work in my garage, with the door open about 12 inches.
- Place plastic on floor and tape down with painter’s tape.
- Set-up spray shelter.
- Place trim boards in shelter.
Paint Sprayer Settings
- Fill the container full of paint.
- Turn the base machine to high power or 2.
- Choose the widest spray width.
- Set it to a spray strength of 5.
- Horizontal or vertical is more about the direction you spray. Up and down or back and forth?
- Overlap each spray by 50% for full coverage.
TEST ON CARDBOARD, before spraying your cabinets.
If you want to paint more pieces, move the doors or drawers very carefully to clean trim boards away from the spray shelter to dry.
Step 2: Spray the 1st Side with Valspar Cabinet Enamel
- Using the settings above, starting with the backside of the cabinets, spray your first coat.
- Clean out sprayer using the manufacturer’s instructions. If you let it sit, the paint will dry and clog the nozzle so clean after every coat!
- Put paint back in original container and seal.
- DRY for AT LEAST 1 hour. Make sure paint is dry to the touch.
- While the doors or drawers are drying, paint your base cabinets. Hand apply the paint using a brush.
- When paint is dry to the touch on drawers or doors, spray the 2nd coat following the same instructions.
- Clean out the sprayer.
DRY OVERNIGHT.
Step 2: Spray the 2nd Side with Valspar Cabinet Enamel
- Flip over cabinets to spray the face of the cabinets.
- Using the settings above spray your 1st coat.
- Clean out sprayer using the manufacturer’s instructions. If you let it sit, the paint will dry and clog the nozzle so clean after every coat!
- Put paint back in original container.
- DRY for AT LEAST 1 hour. Make sure paint is dry to the touch.
- While the doors or drawers are drying, paint your base cabinets. Hand apply the paint using a brush. It may take 3 coats!
- When paint is dry to the touch on drawers and doors, spray the 2nd coat following the same instructions.
- Clean out the sprayer
DRY OVERNIGHT.
Guess what? You are DONE. Spraying took me 5 to 6 minutes for each coat! A sprayer applies the paint much thinner, so the dry time is far less between coats.
Plus, with spraying, you likely will only need TWO coats! Amazing. Get back to your life my friends.
Pin It for Later!
Tips for Re-Installing Cabinet Drawers and Doors
You’d be surprised that putting the doors and drawers back in place can be one of the most frustrating parts of painting cabinets!
Hopefully, you labeled the location of each piece and put it back in the same spot! The drill holes on drawers are specific to that drawer.
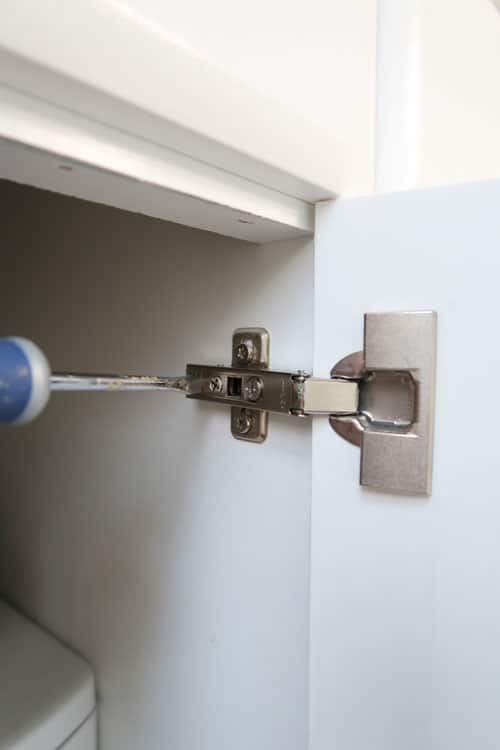
Of note: I have concealed hinges that are easy release, so my tips refer to this type of hinge
- Wait to attach the cabinet hardware until ALL drawers and doors are in place. You may need to move one or two and it’s one less thing to remove.
- Don’t close the drawer or cabinet without making sure it’s aligned first – you can scrape off the paint!
- If a drawer isn’t closing in line with another drawer, it may be in the wrong location. Or you may just need to use your palm to pound one side to make it level.
- Attach the hinge first to the door and then to the base cabinet. A flat head screw driver comes in handy to push the hinge to lock into place on the base cabinet.
- If a door isn’t closing, make sure the hinge is fully inserted into the cabinet door. Or it may just be in the wrong location.
To soften the close of the drawers and doors add stoppers.
Remember the final coat of paint on both the drawers and doors I ended up spraying. The first 2 coats on the drawers were hand applied with a foam roller and the final coat sprayed.
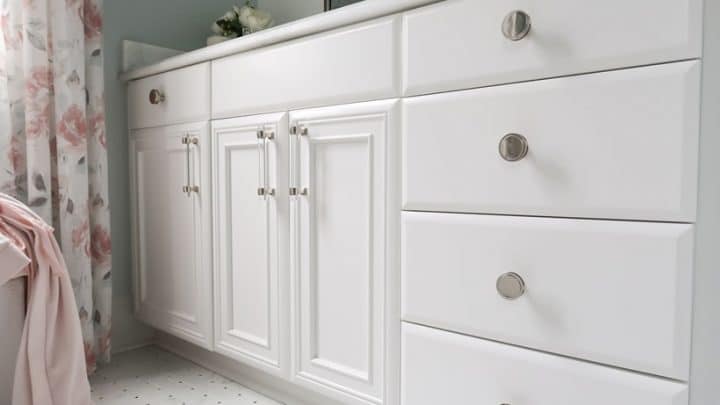
Here is the finished product in direct sunlight to show you what hand applying with a foam roller or spraying with Valspar Cabinet Enamel can achieve!
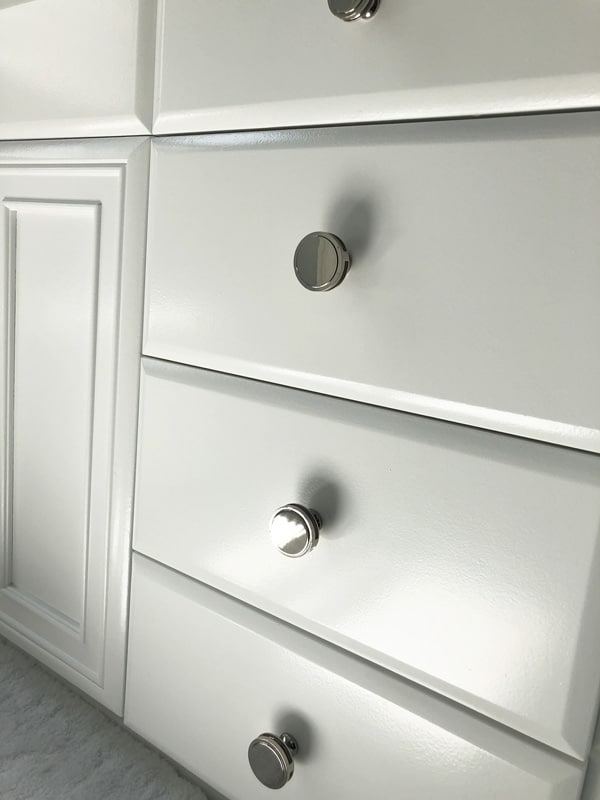
Paint Color
Benjamin Moore: Decorator’s White, OC-149
Custom tinted by Lowe’s
How-to Match Another Paint Brand into Lowe’s Paint
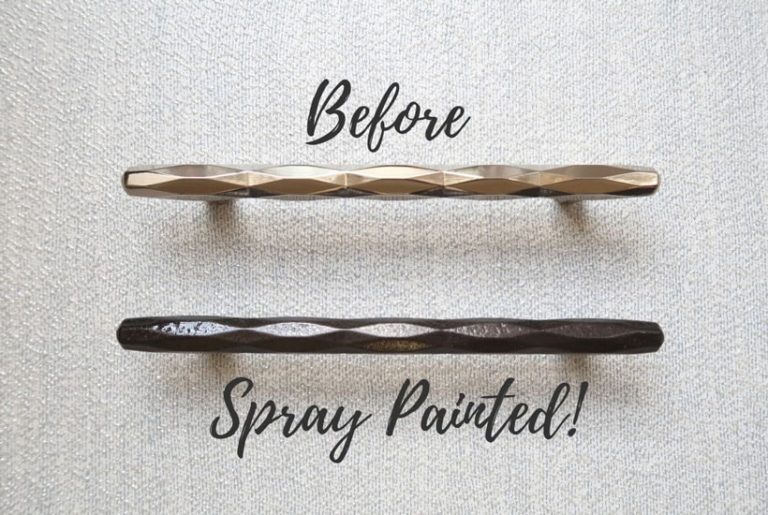
Hardware: Amerock, Oberon Polished Nickel, 1 3/4
Hopefully, I have given you a great cabinet painting resource in one place!
Cabinet Painting TIPS
NO-SAND Method to Painting Kitchen Cabinets
This no-sand kitchen cabinet painting tutorial is for ANY type of cabinets that were previously stained, coated with polyurethane OR painted.
The Best Cabinet Paint You Need to Know About
The one cabinet paint I recommend for both kitchens and baths because it is durable and requires NO top coat!
How-to Paint Cabinets and Get a Smooth Finish
For the beginner! Tried and true tips for getting the smoothest finish possible, when painting cabinets.
You can decide for yourself how you want to paint your own cabinets. I can promise you from now on spraying is the only option at my house!
Just remember there will be things that happen like drips, mis-tints, overspray, wrong installation placements, etc.
It’s just part of the process! Sanding fixes most paint mishaps and patience fixes the rest.
See how I use bonding primer to teach you how to paint IKEA Laminate Furniture: Paint IKEA Furniture: Easy hack for a peel proof finish!
Check out: Ultimate Guide to Updating an Outdated Kitchen
Here are more how-to paint posts!

Please consider following me on Pinterest and Instagram for daily inspiration.
Until next time…
Porch Daydreamer
Tracey
Did i understand time between coats if hand painting is 4 hours. But dry time if spraying can be as short as 1 hour if dry to touch?
Hi, Melanie! I have a cabinet painting class that goes into this detail and it’s included in my 12 month all access paint class pass.
You were absolutely speaking to me when you assured me that I do not need to be intimidated by a paint sprayer. I have a large project (an office with 3 walls of builtins – that’s 10 cabinet doors and 25 drawers, plus a bookcase). They are golden oak right now, but I’m heading into a 4-day weekend, and this is happening! I’ve read several of your posts and watched the videos. You have given me the confidence to give it a go!
Let me know how it goes! I’m so happy to hear I was helpful…always my mission 🙂
Hi, Tracey!
I very much appreciate your content and point of view on these kinds of projects.
Could you discuss the use of deglossers, TSP, non-TSP substitutes, e.g. Krud Kutter, etc., in the rehabilitation/re-painting of cabinets? I have a kitchen cabinet project coming up and the cabinets are pretty old and pretty crud-covered.
Thank you!
Hey, Jeffrey! I’ve been trained to use TSP which is a degreaser BUT never have I used it 🙂 I had an EPIC failure on my stairs using a de-glosser, where the paint peeled completely off so if it’s a varnish or gloss polyurethane they are not the best option. They can work well on furniture with a satin polyurethane, BUT I ALWAYS use a bonding primer after using one to avoid stain bleed through.
Basically, Dawn liquid dish detergent (which is a degreaser) mixed with water will work on kitchen cabinets to clean them. I do like Krud Kutter cleaner too, but you can save some money with a little elbow grease and Dawn soapy water.
Hi, Thanks so much for such a great article. Do you suggest spraying the bonder or using a paint brush?
Thanks!
I like to spray both the primer and the paint to get the smoothest finish! Thank you.
Hi, first of all thank you for all of your great tips and tutorials. We are in the middle of redoing the kitchen and choose to prime, and two coats of the cabinet enamel. I was wondering how many days you recommend waiting to put on the hardware and pulls so that the paint is COMPLETELY dried? We don’t want to mess up the hard work!
Kaylan
Thank you! I know, for me it’s SO hard to be patient waiting for the paint to dry because I want everything back to normal and looking good! 24 hours is a good rule that I’ve followed and haven’t had any issues. If it’s really humid, it may be a good idea to wait 48 hours.
Hi! I want to paint my kitchen cabinets but am curious as to what the cost difference is between painting vs spraying. Considering we’d have to buy all of the materials, roughly what’s the price difference?
Melody, this post goes into a lot of detail about when to invest in a sprayer and will help you decide! https://porchdaydreamer.com/when-to-buy-paint-sprayer/
Hi, I previously painted my cabinets with chalk paint. I now want to paint with an actual cabinet paint like Benjamin Moore alkyd paint. Do I need to sand because it’s a different kind of paint? I sealed the top of them with a chalk paint sealer.
I’d test the inside of a cabinet door with a bonding primer and then apply Valspar Cabinet Enamel. The Ben Moore paint isn’t what I used in this tutorial, so I can’t comment on it. Once the paint is dry, see if you can scratch it off. If the bonding primer works, then you can avoid sanding. If it doesn’t, then you need to sand.
I’m thinking of tackling the job of painting my kitchen cabinets. Love your tutorials! My cabinets are what I think is a laminate film (not sure because they were in the house when we bought it) over something cheap. Can I just clean, prime, and paint?
Here is a better post for you! https://porchdaydreamer.com/painting-cabinets-get-a-smooth-finish-every-time/
Bonding primer should do the trick!
I am a little late to the party but figured I lose nothing by asking and hopefully I get a reply. If I am painting for firat time do I need to sand everything? And what can I use to clean off grease. Also you said paint is water based but all I could find at Lowes is oil based? Did I misunderatand?
Maria, for a full tutorial on how to paint cabinets please refer to this post for more information: https://porchdaydreamer.com/painting-cabinets-get-a-smooth-finish-every-time/
Definitely clean off the cabinets. I like Krud Kudder and their pre-paint cleaner which can be found at Lowe’s or Home Depot.
This is really helpful. I’m hesitant to use a sprayer because I’ve had bad luck in the past, especially with spiting and getting a texture rather than a smooth finish.
I know cleaning is super important for maintaining the sprayer. At the end of your video you say you wait then apply the second coat.
What do you do with the sprayer between coats? Does it need to be disassembled and cleaned? Can the nozzle be covered to keep it from drying? I’d love some additional info on those steps.
Hi, Rose! In between coats, I leave the paint in the sprayer container, cover it with a piece of plastic wrap, secured it with a rubber band, and put it in the refrigerator so it doesn’t dry out. Then I fully clean the sprayer top/mechanism between coats since the recoat time is 8 hours. You’ll have to follow your sprayer’s instructions on cleaning but I found taking all of the pieces apart to clean with warm water until it runs clear is the best method. Then while I am actually spraying, I have a damp paper towel and wipe the nozzle often so the paint doesn’t dry at the tip. I’m planning on painting some more cabinets and will do a more thorough tutorial on the sprayer 🙂
Love your posts! Do you thin the primer when using the paint sprayer? When I sprayed primer, it created a rough small speckles texture, so spraying paint on top of that left it rough looking and not a smooth finish like the orginal cabinets. I can’t seem to get it to a smooth finish.
Oh gosh! I have had that problem, but it was because my sprayer was dying and started spitting clumps. You can thin it with no more than 10% water, but with the right settings it should spray a fine mist. If the sprayer isn’t totally clean on the inside that can happen too. Look at this post, where I document the settings I used with the primer and a different sprayer attachment: https://porchdaydreamer.com/paint-sprayer-best-project-ever/
Hope that helps and why it is critical to spray on cardboard before starting!
Hi there,
I see your other post on painting stained cabinets, and it requires no sanding. This post repainting cabinets require sanding. Can you explain when do you need to sand and when you don’t? I’m trying to paint all my cabinets in the whole house, kitchen and bathroom. Thanks.
CL, this tutorial is how-to REPAINT over painted cabinets. I did apply a primer and didn’t sand before starting. If you listen to the video, I sanded because of the drips hand painting created on the face of the cabinets. None of my cabinets have been sanded before applying paint over stain – only primed.
Hi, i have finally started my cabinet painting project. I have decided to go with spray painting. I got the exact sprayer you recommended and it seems to have a lot of bubbles after spraying. Most of them disappeared when the paint dry, but some did not. They looks like tiny volcanoes. I have tried many different power and different flow combination, it seems like power 1 has less bubbles but they are still there. You have any tips for me to avoid these bubbles?
Congratulations on spraying your cabinets! My first thought on what may be happening is are you getting to close to the surface, which will create the areas you mentioned? Are you over applying. It should be a fine coat and maybe you are using too much power. I just looked at my sprayer and I used the a low power spray setting and the narrower spray pattern. I remember having to back off the power too. Play around on some card paper to test. You’ll get it!
Can you use the paint sprayer for the primer? I’ll be painting cabinets for the first time and covering a very dark veneer and I know I’ll need to sand and prime first. Thank you!
Absolutely! I have sprayed on primer both furniture and cabinets. Read this post for settings and tips: https://porchdaydreamer.com/paint-sprayer-best-project-ever/
For this project, you used Valspar Cabinet enamel and had it tinted to Benjamin moore’s Decorators white? When I spoke to a Lowe’s professional today about tinting the Valspar cabinet enamel they said it had to be tinted with a Valspar color. Is that info incorrect and it can be tinted with any brand or did you use a Benjamin Moore paint and not the Valspar enamel on this project?
Hey, JC! Unfortunately, the Lowe’s associate wasn’t properly trained. Most major paint manufacturer’s formulas are in the Lowe’s data base and can be tinted into Valspar Cabinet Enamel. They have to look it up by selecting Benjamin Moore and type Deco to get the list to populate and select Decorator’s White (I asked my Lowe’s associate how he did it). Then send the formula to the machine under the type and size of paint. Try to find a tenured person in the paint department to assist. Good luck!
Love your cabinets. Not quite sure I can apply to cherry but love the light color. Can you share fabric name of your dining room chairs.
Hey, Dorene! Most definitely you can apply to cherry by using a bonding primer first. The original color of my cabinets was an espresso stain. All details of my dining room can be found in this post: https://porchdaydreamer.com/reveal-french-country-dining-room/
What about the rest of the cabinet? The island and sides of the cabinet is hand painted or sprayed? Can the sprayer be used to also paint the walls? What order do you need to start the process? Walls, cabinet bases, then doors/drawer fronts? Thank you!
Hey, Gayle! If you read the “steps” in the tutorial I walk through the entire process. The “base” cabinets or anything that can’t be removed for spraying I hand apply the paint. A paint sprayer can be used on walls with a LOT of prep and taping off using plastic (floors, furniture, windows, trim, etc). I sprayed a large armoire with my sprayer inside of my bedroom. Read this post to see what was involved in prepping: https://porchdaydreamer.com/paint-sprayer-best-project-ever/
I followed your instructions almost to a tee and it worked out wonderfully. I did not put cabinets on trim boards….big mistake. Thank you for all your valuable info and being so willing to help us with all your hard work. A true inspiration!!!
Thanks, Kelly!!! Trim boards help tremendously, but I have made the same mistake 🙂 I’m so happy my information is helpful that makes my day!